-
Notifications
You must be signed in to change notification settings - Fork 29
How To
- Starting RIDE
- Use keyword completion
- View keyword documentation
- Navigate to user keyword definition
- Validate keyword arguments
- Highlight occurrences in editor
- Find where user keywords are used
- Search for keywords
- Search for test cases based on used keywords or tags
- Create keyword
- Extract Keyword
- Extract Variable
- Copy data between RIDE and other editors
- Rename Keyword
- Run external programs
- Configuring saving
- Linking from imported resource to tree
- What tags a test case has
- Debug a test case
Ride is started from command line with command ride.py.
Keyword completion is available in both grid and text editors, when editing test case or user keyword, and in dialogs that edit setups and teardowns. Keyword completion can be invoked with Ctrl-Space or Ctrl-Alt-Space keyboard shortcuts. Keyword completion shows the keywords that are found either from the test suite or resource being edited, or from its imported resource files or libraries. This page describes in detail how the keywords are found.

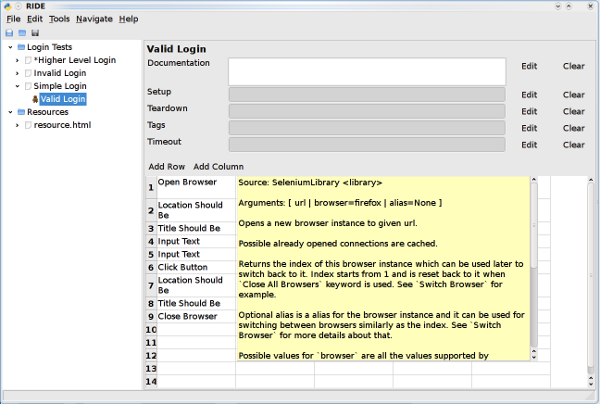
On grid editor is possible to view a documentation of a keyword by hovering a mouse over the name of the keyword and pressing down the control key.

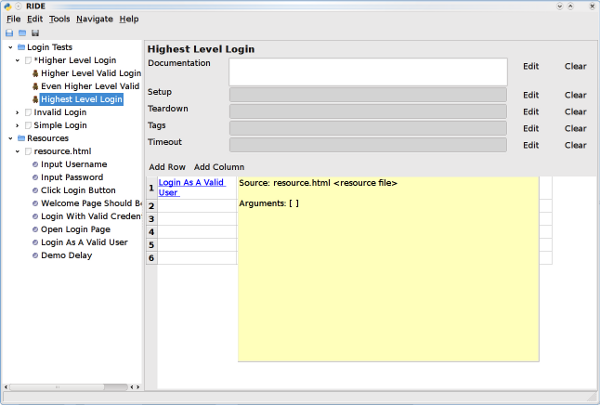
In addition to showing the keyword documentation, user keywords whose definition can be found from the edited data (either in the same suite or in a resource import) are shown as links when a mouse is hovered over them and the control key is held down. The keyword definition can be reached by clicking the underlined name.

Arguments are validated automatically for all known keywords. The validation is shown on the grid editor and visualized as different cell background:
| Situation | Color |
|---|---|
| Too many or too few arguments | red |
| No arguments allowed | dark gray |
| Optional argument | light gray |
| Argument used correctly | white |
| Argument not known | white |
The colors that are used can be configured in Settings. When mouse is hovered over a cell, RIDE shows a tooltip explaining the cell contents or possible error.

When a cell is selected in a the grid editor, other cells and also settings containing the same content are also highlighted. If a cell containing a variable is selected, all cells and settings containing the same variable are highlighted.

All user keywords have a Find Usages button in the editor view and a context menu entry in the tree. Both of these open a new non-modal dialog listing the places where the keyword has been used. Clicking an entry in the list automatically navigates to that location.

In the future releases this functionality will be enhanced to support also library keywords and to make it easier to find unused keywords.
Select from menu Tools -> Search Keywords, and keyword search dialog is opened. Keywords from all resolved library and resource imports are listed. The dialog is non-modal, so it can be kept open at all times during editing. By default, the search only covers keyword names, but by selecting the checkbox 'Search Documentation', also the keyword documentation is included in the search.

There's a separate plugin, called Search Plugin, that supports searching test cases based on keywords or tags of the tests. Search results are shown in a list, and by clicking a list item, the corresponding test is opened in the editor.
This plugin can be enabled via the [Plugin Manager|Plugins]. Once enabled, a new menu item Tools -> Search is added to the menu bar.
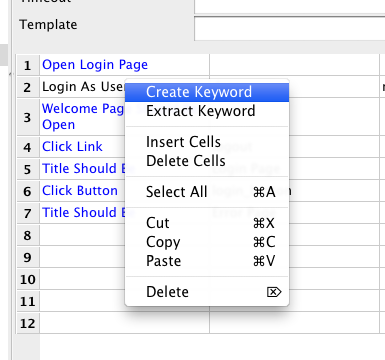
New keywords can be created from context menu by left clicking a cell in grid. New keyword will have the value of the cell that was clicked as name. It will also have as many arguments as there were cells with values after the cell containing the name.
The editor immediately opens the new keyword in editor, so you can start writing the implementation.

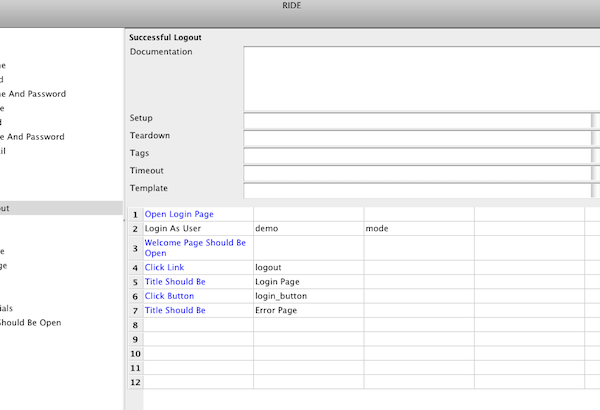
In the image above have a keyword 'Login User' and as we can see from its black color, it has not been implemented yet.

We left click the keyword and choose 'Create Keyword' from context menu.

The editor opens the newly created keyword.
Rows in the grid can be extracted to a new keyword by selecting the rows that are to be extracted and selecting 'Extract Keyword' from context menu.

In the above example we have selected three rows to be extracted as a new keyword.

RIDE shows a dialog where we can choose the name for the new keyword and also arguments for it.

We named our new keyword 'Verify User Has Logged Out' and added no arguments. Editor shows the new keyword which has the extracted rows.
RIDE 0.30 adds a possibility to extract variable from cell values. This is to simplify changing static test data to reusable variables (for example to extract platform specific configurations out of tests etc.).
- To use this feature:
-
- Select the area you want to use as variable value (must be either a cell or a group of consecutive cells in the same row).
- Right click to open context menu.
- Select Extract Variable from the menu
- A variable dialog opens and you can fill variable name and comment it if you need
- The selected cell values are replaced with the newly created variable
It is possible to copy data between RIDE's grid based editors and spreadsheet programs such as Excel and OpenOffice. This useful functionality works using the standard copy, paste, and cut operations. Copying data to/from plain text editors works too. In that case the cell separator is the tab character and the row separator is the newline.
This feature can be accessed via context menu in test case or user keyword editor or via context menu in the tree. The scope of the renaming is currently global, which means that all references in all opened files with the name of the keyword are replaced. It is not currently possible to limit the scope, but that is future improvement that will be implemented.
There's a built-in plugin Run which can be used to run arbitrary commands in the system. Run configurations may be created, edited and deleted via Run | Manage Run Configurations menu. The configurations are stored in the Settings file, and may thus be shared between users.
There are two settings that can be used to configure how files are written. Currently both of these have to be manually edited. These are:
- line separator - can be used to force line endings. Valid values are native (the default), windows and unix
- txt format separator - cell separator in txt format. Valid values are space (the default) and pipe
There is link from resource import settings to the related resource in the tree if the resource import can be resolved. Link can be followed by pressing Ctrl down and clicking the link.
Tags are a simple and very powerful way of adding meta-data to tests. RIDE shows tags in the settings section. RIDE shows inherited tags in red (if it is a forced tag) and in gray (if it is a default tag). Tags can be edited in place.
To set a break point add a new line above the problematic keyword use this "Comment | PAUSE" (this was modified to be case insensitive and flexible, so this is valid: "Comment | Pause here to do some debug.") When the test case is started it will run normally until it hits the special Comment. Then you can use the Continue, Next and Step over buttons on the Run tab.