REST APIs and Data Scraping.
You will get practice interacting with a REST API in order to collect data. You can read more about REST apis here.
See also: https://github.com/espadrine/Solve-Data-In-Code/blob/master/misc/network.md
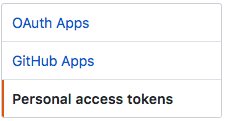
Go to your settings page on github and click on "Developer Settings." Make sure you save the token you generate somewhere, otherwise you will need to generate a new one. Never save tokens in a public place (like GitHub)!
Using the command line, clone (or copy) this repository to your own machine so you have a copy of the code we'll be working with today.
git clone https://github.com/REU-SOS/DataCollection.git
This will install node packages into node_modules
npm install
Edit script.js to replace "YOUR TOKEN" with your generated token and your github username.
Now run the script. You should be able to see a list of your repos (may be empty, we'll fix that!).
node script.js
The code makes a call to get all of a user's repos.
   var options = {
		url: 'https://api.github.com/user/users/' + userName + "/repos",
		method: 'GET',
		headers: {
			"User-Agent": "GetRepos",
			"content-type": "application/json",
			"Authorization": token
		}
	};
You will do the following tasks:
- Write code for creating a new repo
- Write code for creating an issue for an existing repo.
- Create a total of 5 issues with random titles, bodies, et cetera.
- Write code for listing the issues in your repo
- Write code for getting a single issue in your repo
You can also debug/implement REST api calls using curl.
A simple example for getting all repos of authenicated user.
curl --request GET -H "Authorization: token YOURTOKEN" https://api.github.com/user/repos
A more complex example: Change a repositories settings to have issue support.
curl --request PATCH -H "Authorization: token YOURTOKEN" --data '{"name":"hw4","has_issues":"true"}' https://api.github.com/repos/cjparnin/hw4
Tips for extending.
-Hallows you to set headers as part of your request.- Just replace the
--requestwith your METHOD (e.g., GET, POST). - You need
--datawhen using POST/PATCH, that will be the data sent to the server.
Now that we can print data from GitHub to console, we need to collect it for later use.
First, let's print the results of listing all of the issues in our repo. Modify the parsing step of your function as follows:
var data = JSON.stringify(JSON.parse(body), null, 2);
fs.writeFileSync('issues.json', data)
(For more information on why the stringify/parse steps are included, see this StackOverflow thread: https://stackoverflow.com/questions/4810841/how-can-i-pretty-print-json-using-javascript)
Try printing the .json file you just saved back to console. Create a new .js file or add a function to script.js. You'll need to do some reading/research on your own to figure out how to read the .json file you created.
Not every dataset will have a nice REST api allowing you to get data. In addition, sometimes rate limits, or missing data will make it necessary to try something else. In those cases, you need to know how to scrape data.
Scraping is a process for acquiring content through a scripted browser or user agent. There are many tools that support scraping. Scraping can get tricky because content that you want may be deeply nested in a web page or it may be hidden behind several pages that require filling out forms or stepping through user interfaces.
For this workshop, will practice using Selenium, which is a powerful tool for scripting web browsers, such as Chrome.
Prerequisite: Make sure you have an Eclipse environment with Maven.
- From Eclipse, use Import Existing Maven project. Locate Selenium folder and import.
- Run JUnit tests and make sure you can see 2 passing test cases.
In a browser, a html page is represented by DOM, a document model consisting of a tree of elements, attributes, and values. XPath is a tree selector language that makes it easy to write a query to select all elements that match a criteria.
Let's play around in Chrome's console. Search for anything, and go to google's search result page. In a console, type: $x("//a"). This allows us to use a xpath expression to select all links.
Now that we know how to select elements. Lets automate the process of interacting and clicking through a webpage.
We will use Selenium to locate several properties from the following site: http://checkbox.io/studies.html
See if you can perform the following actions on this site by writing new Selenium tests. How would you assert each test is passing? http://junit.sourceforge.net/javadoc/org/junit/Assert.html
-
- Scrape the total number of studies still open.
-
- Scrape the participant count of "Frustration of Software Developers."
-
- If a status of a study is open, click on a "Participate" button.
-
- Enter text into a study (don't actually submit, or you can't run the test again!): http://checkbox.io/studies/?id=569e667f12101f8a12000001
Quick reference:
//Select all ancestors./Select child..Select parent//a[@data-href]Select all links that have an attribute "data-href".//h2[.='Search Results']Select all h2 elements with value = "Search Results".//h2/following-sibling::div"Select the sibling div after a h2 element.
When you start working with your mentors, you (probably) won't have a set of instructions like the ones you're getting today. You're going to have to figure out how to research and perform some of these actions yourselves.
Pick a language you've used today, and try to scrape data from the following site: https://crash-stats.mozilla.com/report/index/dac14c55-07bd-4cab-a745-e97350180524
You'll need to fill in some of the blanks yourselves. If you choose Javascript, you'll need to look up a scraping approach to use. If you choose Java, you'll need to write a new program that also cleans and stores the data you're scraping.
Save the following into a .json file, with proper labels:
- The product involved in the crash
- The version of the software
- The build ID the crash occurred in
- What percentage of memory was in use in the system


