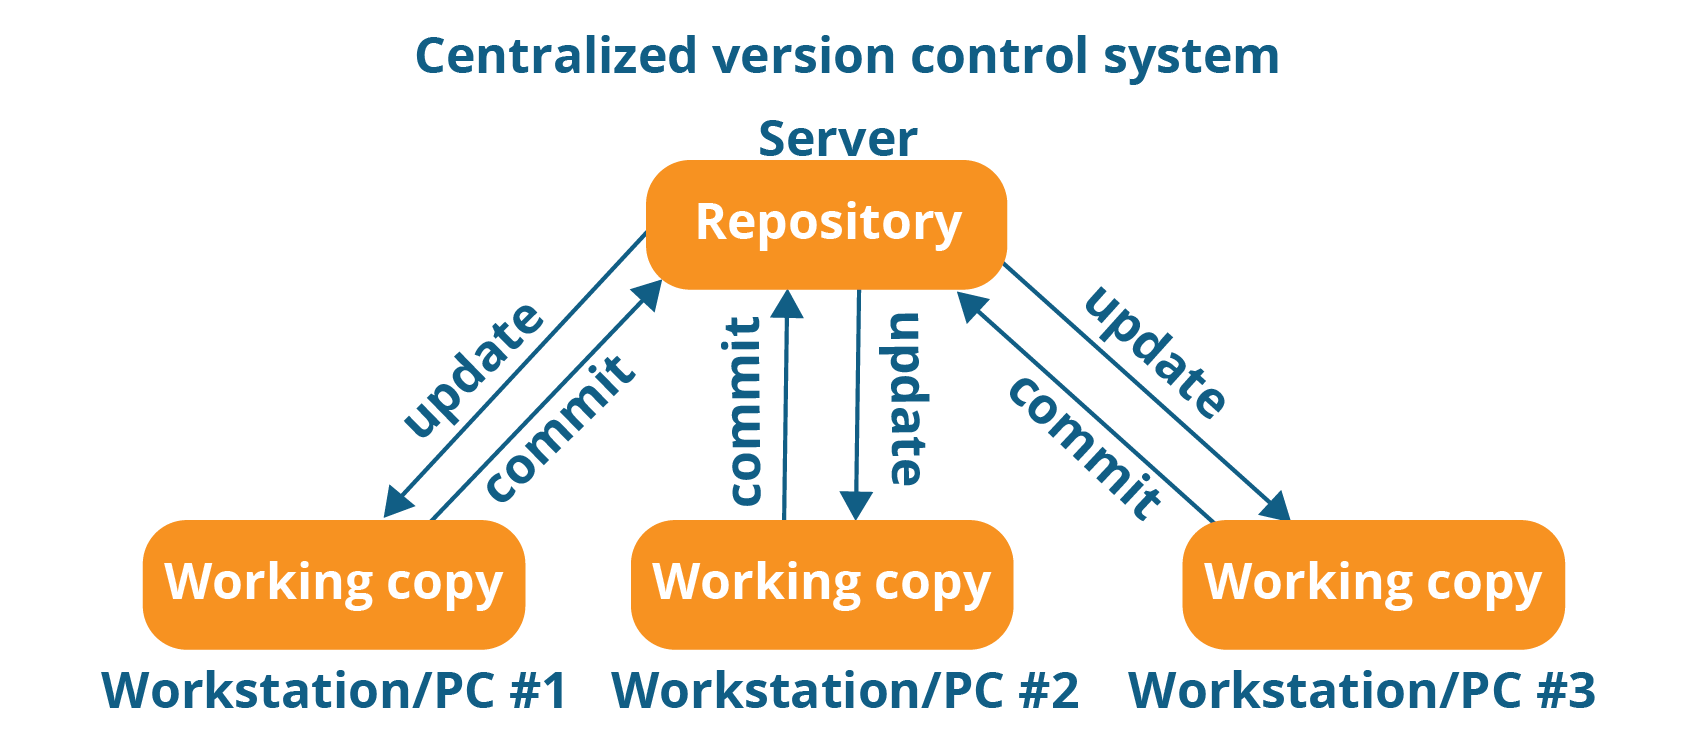
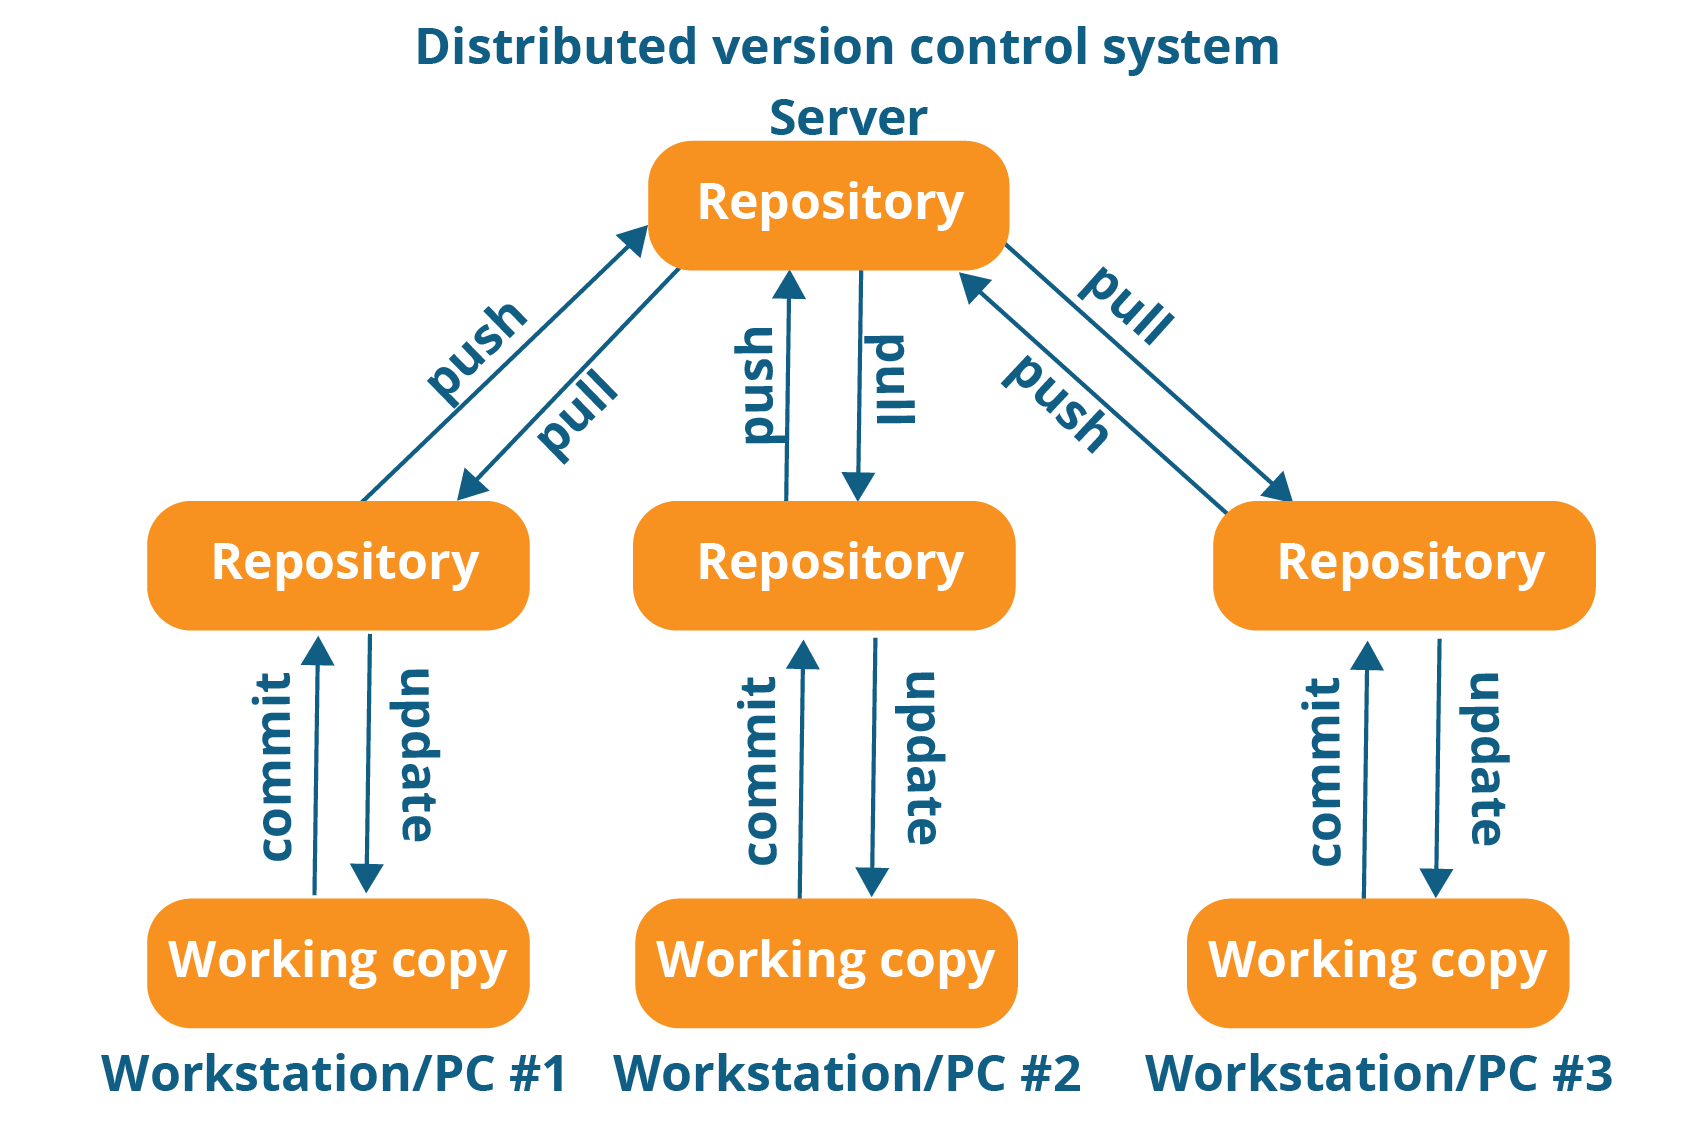
| Image Credits - Jenkins Plugin |
Suppose you are working on a simple HTML project, suddenly your boss tells you to change the title of the project. Now you have another version, after that someone else comes and tells you to change the title. This keeps happening for a long time. Now in your system, you have several updated HTML files with new titles. This was the traditional way that the developer used to follow back in the day, where one cannot view what were the changes, and who changed them. This was a problem in those days, but with the help of version control systems, you can easily get the above information without having to save billions of different files in your system.
- Backup and Restore
- Synchronization
- Undo
- Track Changes and Ownership
- Sandboxing
- Branching
Sandboxing - Place where you can put all your sample code you don’t need to be published, just like prototyping.
- Lock - Modify - Unlock Strategy
- Copy - Modify - Merge Strategy
 |
|---|
| Lock - Modify - Unlock Strategy |
 |
|---|
| Copy - Modify - Merge Strategy |
Here, Jyothi (developer 2) can resolve the conflict
- Remove her own changes and leave the last one.
- Take some part of her implementation and then push the latest version to the server.
 |
|---|
| Image Credits - Medium |
Disadvantage if the entire history is saved in the main server, we need to create some backups
 |
|---|
| Image Credits - Medium |
Each developer has a copy of their own repository, and he/she knows what was changed by who and what. If something happens, then we can use an individual repository as backup.
One of the popular Version Control Systems. Please read the docs
 |
|---|
| Image Credits - Stack Overflow |
Dowload here
After downloading you can check for the version in your command prompt
git --version

>> git version 2.30.0.windows.2
-
Go to GitHub and create a new repository with a name Git-Tutorial-For-Beginners
- Make it Public
- Include a README.md file (enable this option).
-
Clone the repository to your system. I personally use Visual Studio Code Terminal. You can use the evergreen Commmand Prompt Termial as well.
- Get the clone link from the dropdown which says (Clone or Download).
- Type
git clone paste_the_link. - Extra Material - How to clone a github repository
-
To view the connections of your repository type in
git remote -v. -
You can check the status of your repository using
git status. -
You can add a new file using
git add index.html. But the easy way to do it is to create a new html file in your Visual Studio code and then commit to your repository. -
To commit, use
git commit -m “message”will only commit the changes locally. -
When you refresh your GitHub you won’t see any changes, because you need to push the changes to the remote server.
-
To view the log use
git log. -
To push use
git pushor sometimes you can usegit push -u origin masterto push the changes. -
Now when you refresh the GitHub repository you can view the changes.
- Just make some changes in your initial file ( Main Repository)
- But in your local system these changes will not be reflected so you need to pull the change (repository) first. Make sure you do this when you are working on a larger project.
- To pull the change you can use
git pull origin master.
If you are working on bigger projects then use Git GUI (Graphical User Interface).
- To start GUI use
git gui& - Edit something in your file and open GUI and hit Rescan to see the changes.
- To commit from the GUI, click on the file name from the unstaged changes folder, add a commit message and click on Commit.
- You need to Push to the main repository, choose master → origin to push the changes.
- Refresh the GitHub to see the changes.
- Extra Materials - Learn to Use the Built-in GUI Tool | Git
- To use it type
gitk. - It is very obsolete. Mostly not used.
- Extra Materials - Learn to Use Gitk – the Built-in Repository Browser | Git
 |
|---|
.git Folder |
The following steps are just to view the .git file hierarchy. Go play around and see what's in it.
- To go into the git folder
cd .git - To go into HEAD use
cd HEAD cat HEADcd refsls - lcd headscat master(you will get a long integer which sorta looks like 867D3ER583FG89…)- Now when you open git log, the id of the commit matches the above.
- Whatever you commit first it would be saved in the index folder.
cd objects/ls - l- Blob (Binary large Object)
- To view what's inside a Commit -
git show -s --pretty=raw the (id of commit) - To go inside a tree
git ls-tree (id) - To go inside a blob
git show (blob id) - Inside the blob you can find the content of the file.
- Incase of a simple blob 70e475949jfnu - The first two numbers (70) represent a folder and the rest is the file.
cd objects/ls -lcd 70- Inside that you will see the file e47---, you can find the contents in terms of binary file.
 |
|---|
| Undoing Changes |
 |
|---|
| Git Reset |
To viewback the commits use git reset
git reset --soft HEAD~1 (1 indicates how many commits back)
To revert back to the changes. Add git revert id (get the commit id)
 |
|---|
.gitignore |
Gitignore will be hidden. To hide any log files place it (commit )inside the gitignore so it will be hidden. And then you play with it.
In git everything is built using Graphs (nodes).
 |
|---|
| Branch and Merge |
- Open Git K using
gitKto see all commits. - Each branch is a feature.
- After finishing the feature we can finally merge them to the master.
 |
|---|
| Fast Forward Merge |
- A, B, C are commits.
- HEAD will always point to the latest commit.
 |
|---|
| Fast Forward Merge |
cd .gitls - lcat HEADref: refs/heads/master
cd ..- To create a new branch call checkout →
git checkout -b feature cat Headref: refs/heads/feature
nano song.txt- Just add a new line or something.
git add .git commit -m “first commit in feature”nano song.txtJust add another new line in the same file
git status - modified song.txtgit commit -m “second commit in feature”git status - Nothing to commitgit log to see changes -- commit was second one ((HEAD → feature)- Let us switch to master
git checkout mastergit log -- commit was another one (HEAD → master)
- Merge the feature to the master branch
- To merge you must always be in the master branch
git merge feature- Fast Forward
git log → (HEAD → master, feature)