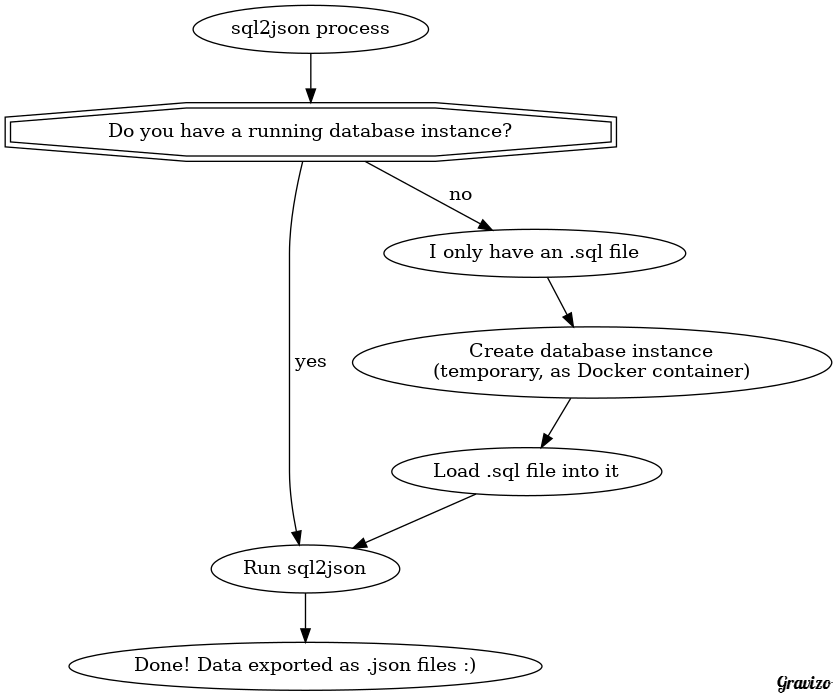
So you have a .sql file. We first need to load it into a new MySQL server instance (we can conveniently do that with help of Docker):
$ docker run -d --name sql2json-dbserver -p 3306:3306 imega/mysql:1.1.0
That image (imega/mysql:1.1.0) has a minor issue we need to fix - it doesn't have the mysql client installed, let's fix it:
# get a shell in it
$ docker exec -it sql2json-dbserver sh

# install mysql client and fix an issue with the socket location
$ apk add --update mysql-client && mkdir -p /run/mysqld/ && ln -s /var/lib/mysql/mysql.sock /run/mysqld/mysqld.sock

# return back from the container
$ exit
Ok the instance is running and ready to use, now we need to load the .sql file into it.
If your .sql script has USE <dbname> statement (maybe along with DROP DATABASE IF EXISTS <dbname>), you need to use that as your <dbname>.
The example file we use has dbname=Chinook (case sensitive). First, create a database into which we'll load the data:
$ echo 'CREATE DATABASE <dbname>' | docker exec -i sql2json-dbserver mysql
Now, let's load the data into that database:
$ cat example_dataset/Chinook_MySql.sql.gz | gzip -d | docker exec -i sql2json-dbserver mysql <dbname>
(note: you don't need the gzip part unless your .sql file is gzipped)
You can verify that the data was loaded:
$ echo 'SHOW TABLES' | docker exec -i sql2json-dbserver mysql <dbname>
Tables_in_Chinook
Album
Artist
Customer
Employee
Genre
Invoice
InvoiceLine
MediaType
Playlist
PlaylistTrack
Track
Ok, now we have a DBMS instance running with the data we want to export as JSON.
Let's find out the IP address of the DBMS:
$ docker inspect -f '{{range .NetworkSettings.Networks}}{{.IPAddress}}{{end}}' sql2json-dbserver
172.17.0.2
This particular image doesn't have a password configured, so the details we need to build the DSN are:
username=(none)
password=(none)
host=172.17.0.2 (remember to replace with your own details)
Therefore, our DSN is:
,,mysql:host=172.17.0.2;port=3306;dbname=Chinook;charset=utf8
If it would have a user/password, the DSN is:
myusername,supersecret,mysql:host=172.17.0.2;port=3306;dbname=Chinook;charset=utf8
For the record, our DSN format is:
<username>,<password>,<pdo_dsn>
Now we have created the database server and loaded the data, you can proceed to the next heading which explains how to transform a database into JSON.
Ok great, we just need the DSN and we're ready to do the export. If you don't know the DSN, read the previous heading.
In this example scenario, our DSN is:
,,mysql:host=172.17.0.2;port=3306;dbname=Chinook;charset=utf8
Let's create a directory, into which the .json files will be dumped:
$ mkdir sql2json_result
Now run the conversion process:
$ docker run --rm -it -v "$(pwd)/sql2json_result:/result" -e "DSN=,,mysql:host=172.17.0.2;port=3306;dbname=Chinook;charset=utf8" joonas/sql2json
2016-12-21 20:23:38 - Username: (no username)
2016-12-21 20:23:38 - Password: (no password)
2016-12-21 20:23:38 - Connecting to DSN mysql:host=172.17.0.2;port=3306;dbname=Chinook;charset=utf8
2016-12-21 20:23:42 - Listing tables
2016-12-21 20:23:42 - Fetching schema
2016-12-21 20:23:43 - Wrote /result/combined_schema.json
2016-12-21 20:23:43 - Dumping Album
2016-12-21 20:23:43 - Wrote 347 rows to /result/data/Album.json.gz
2016-12-21 20:23:43 - Dumping Artist
2016-12-21 20:23:43 - Wrote 275 rows to /result/data/Artist.json.gz
2016-12-21 20:23:43 - Dumping Customer
2016-12-21 20:23:43 - Wrote 59 rows to /result/data/Customer.json.gz
2016-12-21 20:23:43 - Dumping Employee
2016-12-21 20:23:43 - Wrote 8 rows to /result/data/Employee.json.gz
2016-12-21 20:23:43 - Dumping Genre
2016-12-21 20:23:43 - Wrote 25 rows to /result/data/Genre.json.gz
2016-12-21 20:23:43 - Dumping Invoice
2016-12-21 20:23:43 - Wrote 412 rows to /result/data/Invoice.json.gz
2016-12-21 20:23:43 - Dumping InvoiceLine
2016-12-21 20:23:43 - Wrote 2240 rows to /result/data/InvoiceLine.json.gz
2016-12-21 20:23:43 - Dumping MediaType
2016-12-21 20:23:43 - Wrote 5 rows to /result/data/MediaType.json.gz
2016-12-21 20:23:43 - Dumping Playlist
2016-12-21 20:23:43 - Wrote 18 rows to /result/data/Playlist.json.gz
2016-12-21 20:23:43 - Dumping PlaylistTrack
2016-12-21 20:23:43 - Wrote 8715 rows to /result/data/PlaylistTrack.json.gz
2016-12-21 20:23:43 - Dumping Track
2016-12-21 20:23:44 - Wrote 3503 rows to /result/data/Track.json.gz
2016-12-21 20:23:44 - Done, exported 11 tables
Now you should have the following file structure:
$ tree sql2json_result/
sql2json_result/
├── combined_schema.json
├── data
│   ├── Album.json.gz
│   ├── Artist.json.gz
│   ├── Customer.json.gz
│   ├── Employee.json.gz
│   ├── Genre.json.gz
│   ├── Invoice.json.gz
│   ├── InvoiceLine.json.gz
│   ├── MediaType.json.gz
│   ├── Playlist.json.gz
│   ├── PlaylistTrack.json.gz
│   └── Track.json.gz
└── schema
    ├── Album.json
    ├── Artist.json
    ├── Customer.json
    ├── Employee.json
    ├── Genre.json
    ├── Invoice.json
    ├── InvoiceLine.json
    ├── MediaType.json
    ├── Playlist.json
    ├── PlaylistTrack.json
    └── Track.json

2 directories, 23 files
You can now see the schema in JSON:
$ cat sql2json_result/schema/Album.json
{
  "name": "Album",
  "fields": [
    {
      "Field": "AlbumId",
      "Type": "int(11)",
      "Null": "NO",
      "Key": "PRI",
      "Default": null,
      "Extra": ""
    },
    {
      "Field": "Title",
      "Type": "varchar(160)",
      "Null": "NO",
      "Key": "",
      "Default": null,
      "Extra": ""
    },
    {
      "Field": "ArtistId",
      "Type": "int(11)",
      "Null": "NO",
      "Key": "MUL",
      "Default": null,
      "Extra": ""
    }
  ]
}
If you have jq installed, it's easy poke with the JSON data:
$ cat sql2json_result/data/Album.json.gz | gzip -d | jq '.[0]'
{
  "AlbumId": "1",
  "Title": "For Those About To Rock We Salute You",
  "ArtistId": "1"
}
Or even sort by one field:
$ cat sql2json_result/data/Album.json.gz | gzip -d | jq '.[].Title' | sort | head -10
"[1997] Black Light Syndrome"
"20th Century Masters - The Millennium Collection: The Best of Scorpions"
"Ace Of Spades"
"Achtung Baby"
"A Copland Celebration, Vol. I"
"Acústico"
"Acústico MTV"
"Acústico MTV [Live]"
"Adams, John: The Chairman Dances"
"Adorate Deum: Gregorian Chant from the Proper of the Mass"
We ran sql2json with the --rm switch, so sql2json was already removed.
You can now destroy the DBMS instance by running:
$ docker rm -f sql2json-dbserver
The beauty of running containerized software is that even when running complex stuff, cleanup ensures that after removing the container it looks like the software was never installed - no trace left behind. :)