This AWS Partner Solution uses a Terraform module to deploy an infrastructure that meets the requirements of Mendix for Private Cloud. You deploy this solution in an automated way using Amazon Elastic Kubernetes Service (Amazon EKS). The infrastructure is for users of the Mendix application-development platform who want to deploy and manage Mendix apps in the Amazon Web Services (AWS) Cloud.
For more information, refer to the Mendix documentation.
This Partner Solution was developed by Siemens in collaboration with AWS. Siemens is an AWS Partner. Mendix is a wholly owned subsidiary of Siemens.
To use Mendix, you must have an operator license. For more information, refer to Licensing Mendix for Private Cloud.
There is no cost to use this Partner Solution, but you'll be billed for any AWS services or resources that this Partner Solution deploys. For more information, refer to the AWS Partner Solution General Information Guide.
This Partner Solution deploys into a new virtual private cloud (VPC).
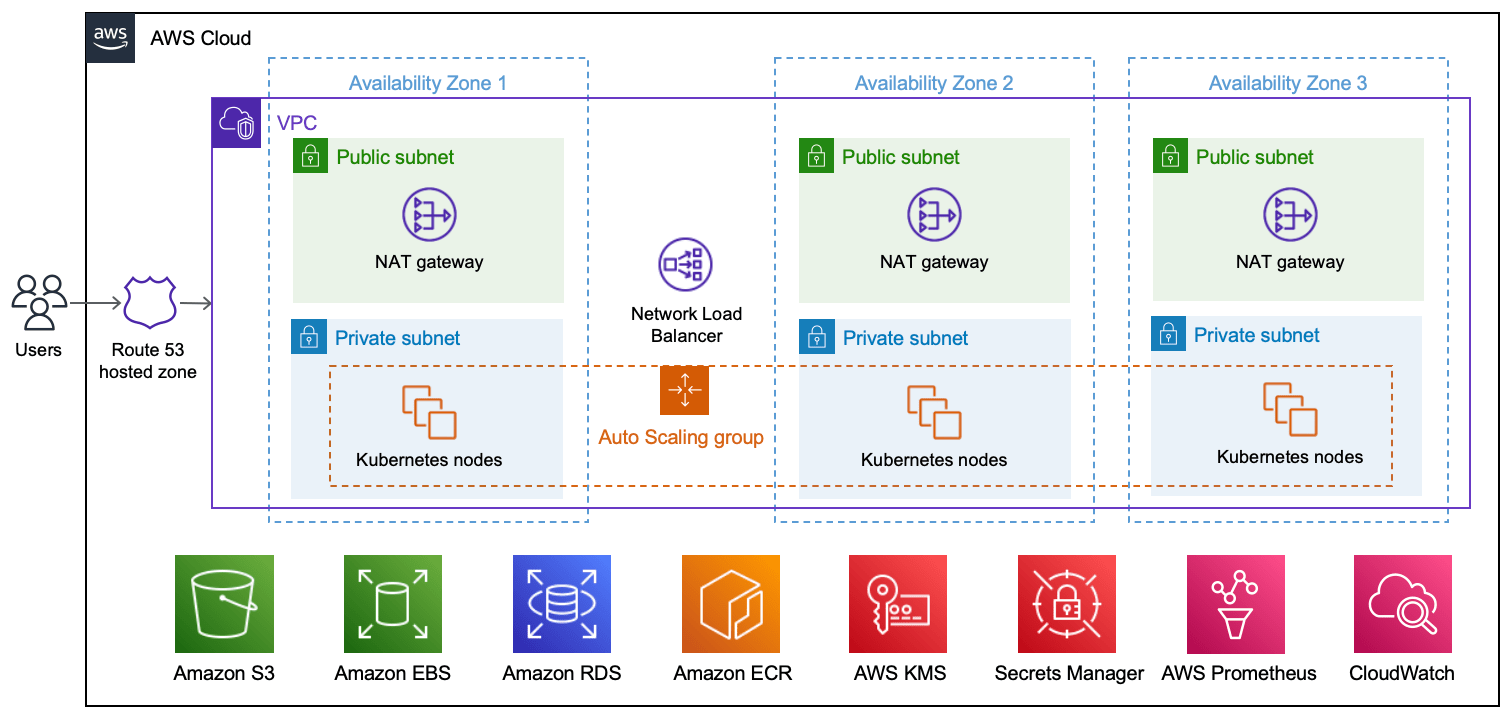
As shown in the diagram, this solution sets up the following:
- A highly available architecture that spans three Availability Zones.
- A VPC configured with public and private subnets, according to AWS best practices, to provide you with your own virtual network on AWS.
- An Amazon Route 53 public hosted zone that routes incoming internet traffic.
- In the public subnets, managed NAT gateways to allow outbound internet access for resources in the private subnet.
- In the private subnets, Amazon EKS clusters—each with three Kubernetes nodes—inside an Auto Scaling group. Each node is an Amazon Elastic Compute Cloud (Amazon EC2) instance. Each cluster contains the following (not shown):
- Mendix apps and components.
- Cert-manager.
- An open-source logging and monitoring solution with Grafana, Prometheus, Loki, and Promtail.
- ExternalDNS, which synchronizes exposed Kubernetes services and ingresses with Route 53.
- A Network Load Balancer to distribute traffic across the Kubernetes nodes.
- Amazon Simple Storage Service (Amazon S3) to store the files.
- Amazon Elastic Block Store (Amazon EBS) to provide storage for Grafana, Prometheus, and Loki.
- Amazon Relational Database Service (Amazon RDS) for PostgreSQL to store Mendix application data.
- Amazon Elastic Container Registry (Amazon ECR) to provide a private registry.
- AWS Key Management Service (AWS KMS) to provide an encryption key for Amazon RDS, Amazon EBS, and AWS Secrets Manager.
- Secrets Manager to replace hardcoded credentials, including passwords, with an API call.
Before you can provision your Mendix environments on Amazon EKS, you must install and configure the required tools, configure Mendix Private Cloud, and configure Terraform.
-
Install the latest version of Terraform.
-
Configure an IAM user with programmatic access and at least the following IAM permissions.
-
Install the latest version of AWS CLI.
-
Run
aws configureto configure AWS CLI with theACCESS_KEY_ID,SECRET_ACCESS_KEY, andREGIONcorresponding to your IAM user. -
Install the latest version of AWS IAM Authenticator.
-
Install the latest version of kubectl.
-
Download GNU Wget (required for the Terraform EKS module).
- Confirm that your Mendix Runtime version is 9.21 or newer.
- Create your Mendix app. For more information, refer to Deploying a Mendix App to a Private Cloud Cluster.
- Register a new EKS cluster. For more information, refer to Creating a Cluster and Namespace.
- Add a new connected namespace called mendix.
- Retrieve the cluster ID and the cluster secret in the Installation tab for your namespace.
-
Provision an S3 bucket with your desired name and an Amazon DynamoDB table with the partition key
LockID(string type) to store the state file and have a locking mechanism, respectively. -
Edit
providers.tf, filling in your information, as in the following example:terraform { backend "s3" { region = "eu-central-1" bucket = "state-bucket-state" key = "terraform.tfstate" dynamodb_table = "dynamodb-table-state" encrypt = true } -
Edit
terraform.tfvars, filling in your information, as in the following example:aws_region = "" domain_name = "project-name-example.com" certificate_expiration_email = "[email protected]" s3_bucket_name = "project-name" cluster_id = "" cluster_secret = "" environments_internal_names = ["app1", "app2", "app3"]
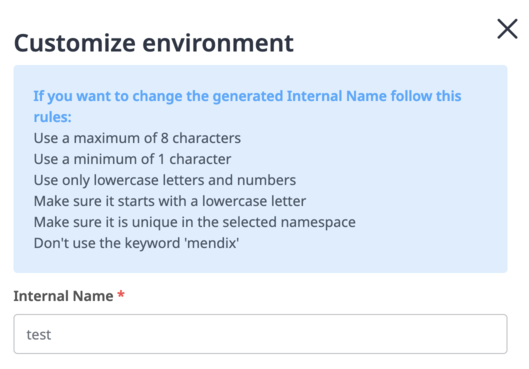
The number of applications deployed is handled by the environments_internal_names variable. Internal names are used during the environment creation, as shown here:
The internal name must match the name that you specify in the environments_internal_names variable when you create your Mendix app.
-
Run the following commands:
terraform init terraform apply -
After everything has been provisioned, run the following command to retrieve the access credentials for your new cluster and automatically configure kubectl:
aws eks --region $(terraform output -raw region) update-kubeconfig --name $(terraform output -raw cluster_name) -
Retrieve the aws_route53_zone_name_servers that were generated using the AWS Console. To do so, either choose Route53 > Hosted Zone or run the following command:
terraform output aws_route53_zone_name_servers -
Depending on your provider, update External Domain Name Registrar or Route53 registered domain with the aws_route53_zone_name_servers values. For more information, refer to Configuring Amazon Route 53 as your DNS service.
-
In the developer portal, choose Cluster Manager, then choose the Customization tab. Enable External Secrets Store.
- If you're deploying more than three apps, change the default instance type of the
eks_node_instance_typevariable. By default, the instance type for the Kubernetes nodes is optimized to support up to three apps. Deploying more than three apps with the default instance type may affect the performance of your applications. For more information, refer to Choosing an Amazon EC2 instance type in the Amazon EKS User Guide.
Kubernetes API requests within your cluster's VPC (such as node to control plane communication) use the private VPC endpoint.
Your cluster API server is accessible from the internet. If required, you can limit the CIDR blocks that can access the public endpoint by configuring the allowed_ips variable. For more information, refer to Amazon EKS cluster endpoint access control.
All the EBS volumes, the RDS PostgreSQL database, and the S3 storage bucket are encrypted at rest. The end-to-end TLS encryption is handled at the Ingress NGINX Controller level. A certificate is generated for each app by cert-manager, configured with a Let’s Encrypt certificate issuer.
While all the Amazon EKS nodes are placed in an Auto Scaling group, the Kubernetes Cluster Autoscaler is not installed by default. The Cluster Autoscaler automatically scales up and down by allowing Kubernetes to modify the Amazon EC2 Auto Scaling groups.
A basic logging and monitoring stack containing Prometheus, Grafana, Loki and Promtail is available at the following URL: https://monitoring.{domain_name}
To retrieve the Grafana administrative credentials, run the following command:
terraform output -json grafana_admin_password
If you encounter any issues while provisioning your Mendix environments on AWS, use the following troubleshooting tips.
When initializing Terraform, Apple M1 users may encounter the following error:
│ Provider Terraform Registry 38 v2.2.0 does not have a
│ package available for your current platform, darwin_arm64
Solution: Install m1-terraform-provider-helper:
brew install kreuzwerker/taps/m1-terraform-provider-helper
m1-terraform-provider-helper activate
m1-terraform-provider-helper install hashicorp/template -v v2.2.0
In the Mendix Private Cloud portal, in the Cluster Manager, the status of your cluster is shown as Waiting for Connection, but the cluster never connects.
Cause: The Mendix Agent or the Mendix Operator may not be configured correctly or may not be connected.
Solution: Perform the following steps:
-
Retrieve the logs of the installer job by running the following command:
kubectl logs job.batch/mxpc-cli-installer -n mendixYou should receive the following output:
-- Done-- Applying Kubernetes Secrets... Done! -- Applying Service Accounts... Done! -- Applying Storage Plans... Done! -- Applying Operator Patches... Done! -- Successfully applied all the configuration! operatorconfiguration.privatecloud.mendix.com/mendix-operator-configuration patched operatorconfiguration.privatecloud.mendix.com/mendix-operator-configuration patched operatorconfiguration.privatecloud.mendix.com/mendix-operator-configuration patched -
Reinstall the installer by running the following command:
terraform destroy -target=helm_release.mendix_installer
terraform plan; terraform apply --auto-approve
To clean up your environment, run the following commands:
terraform destroy -target="module.eks_blueprints_kubernetes_addons.module.ingress_nginx[0].module.helm_addon.helm_release.addon[0]" -auto-approve
terraform destroy -target="module.eks_blueprints_kubernetes_addons.module.ingress_nginx[0].kubernetes_namespace_v1.this[0]" -auto-approve
terraform destroy -target="module.eks_blueprints_kubernetes_addons.module.prometheus[0].module.helm_addon.helm_release.addon[0]" -auto-approve
terraform destroy -target="module.eks_blueprints_kubernetes_addons.module.prometheus[0].kubernetes_namespace_v1.prometheus[0]" -auto-approve
terraform destroy -target="module.eks_blueprints_kubernetes_addons" -auto-approve
terraform destroy -auto-approve
After you deploy this Partner Solution, confirm that your resources and services are updated and configured—including any required patches—to meet your security and other needs. For more information, refer to the AWS Shared Responsibility Model.


