fwd-edu-breakout=github:climate-action-kits/pxt-fwd-edu/fwd-breakout
sonar=github:climate-action-kits/pxt-fwd-edu
datalogger=datalogger
fwdSensors.touch.fwdOnTouch(jacdac.ButtonEvent.Down, function () {
    for (let index = 0; index < 4; index++) {
        fwdMotors.drive(fwdMotors.DrivingDirection.Forward, 25)
        basic.pause(3000)
        fwdMotors.stop()
        fwdSensors.ledRing.fwdSetAllPixelsColour(0x00ff00)
        fwdMotors.pump.fwdTimedRun(1500)
        basic.pause(3000)
        fwdSensors.ledRing.fwdSetAllPixelsColour(0xff0000)
    }
})
fwdSensors.ledRing.fwdSetAllPixelsColour(0xff0000)
fwdMotors.setupDriving(
fwdMotors.rightServo,
fwdMotors.leftServo,
45
)
basic.forever(function () {
    if (fwdSensors.sonar1.fwdDistancePastThreshold(0.075, fwdSensors.ThresholdDirection.Over)) {

    } else {

    }
})
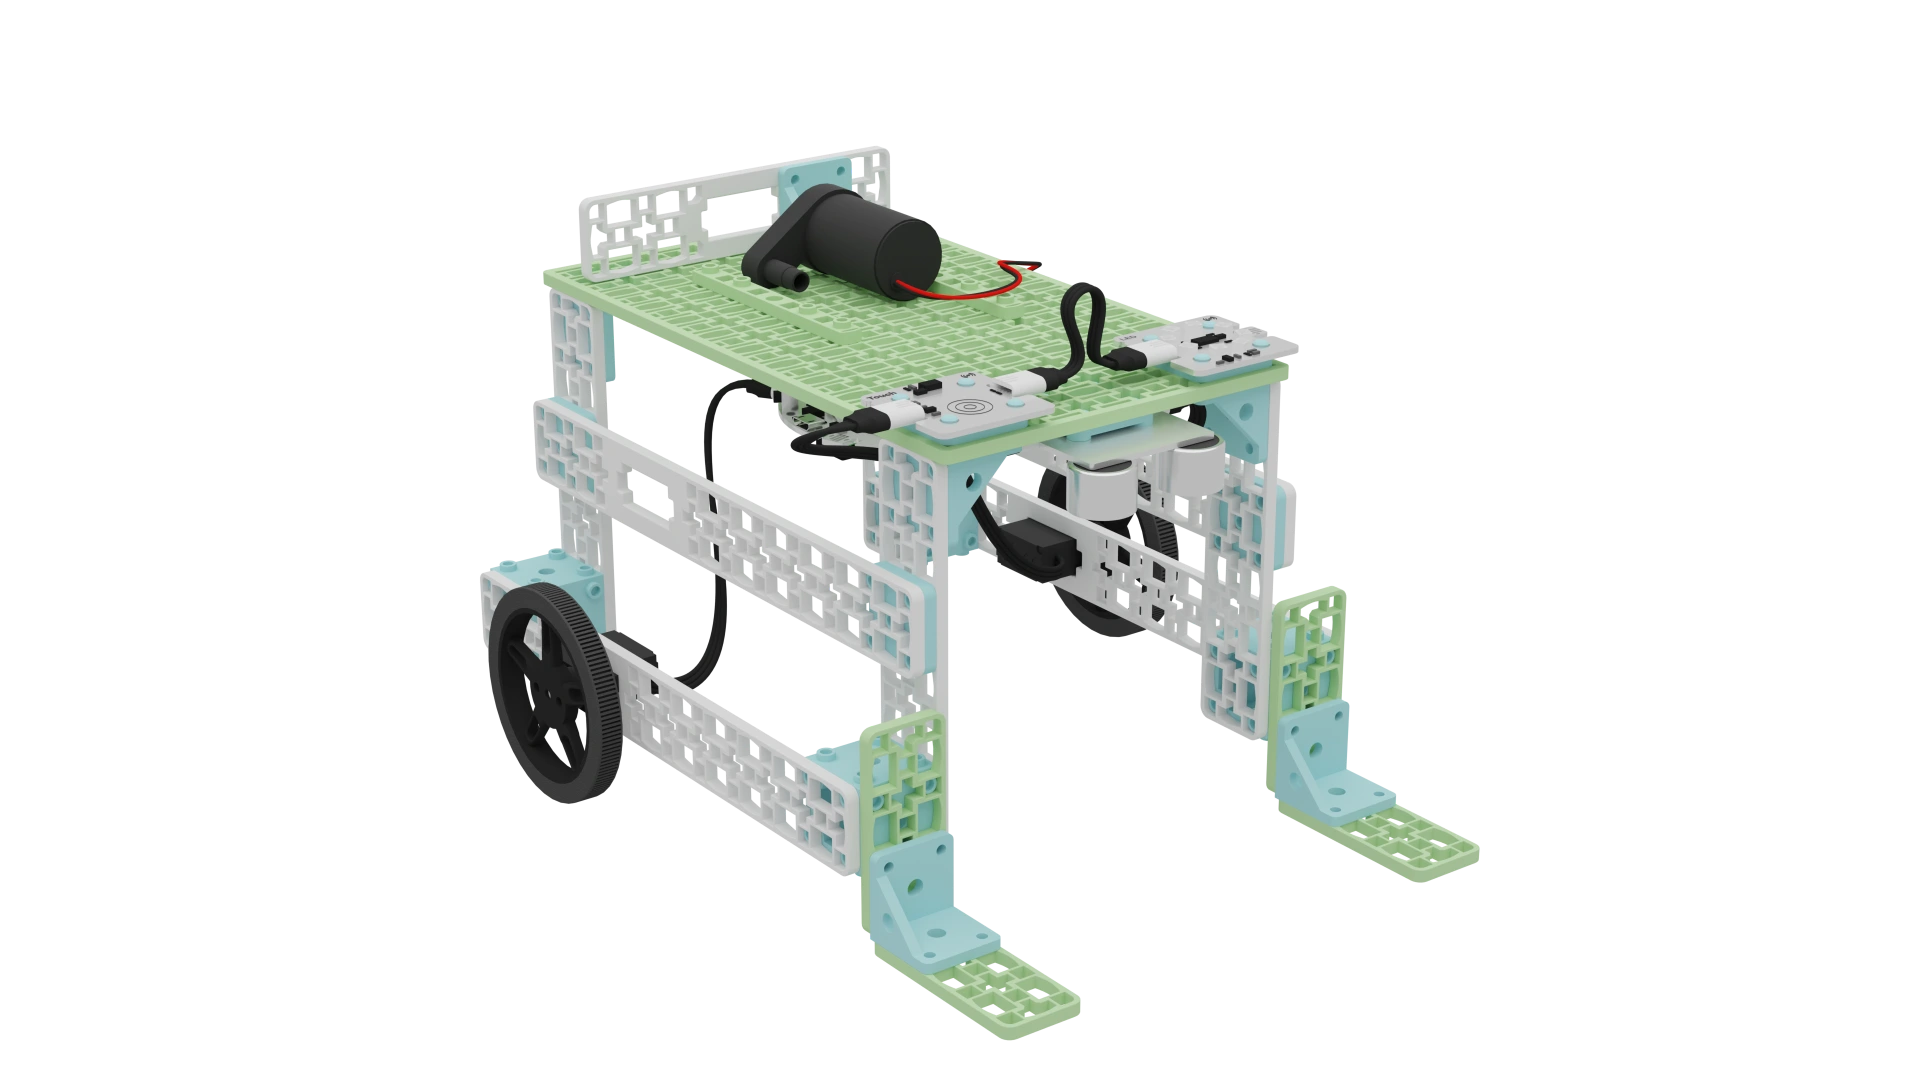
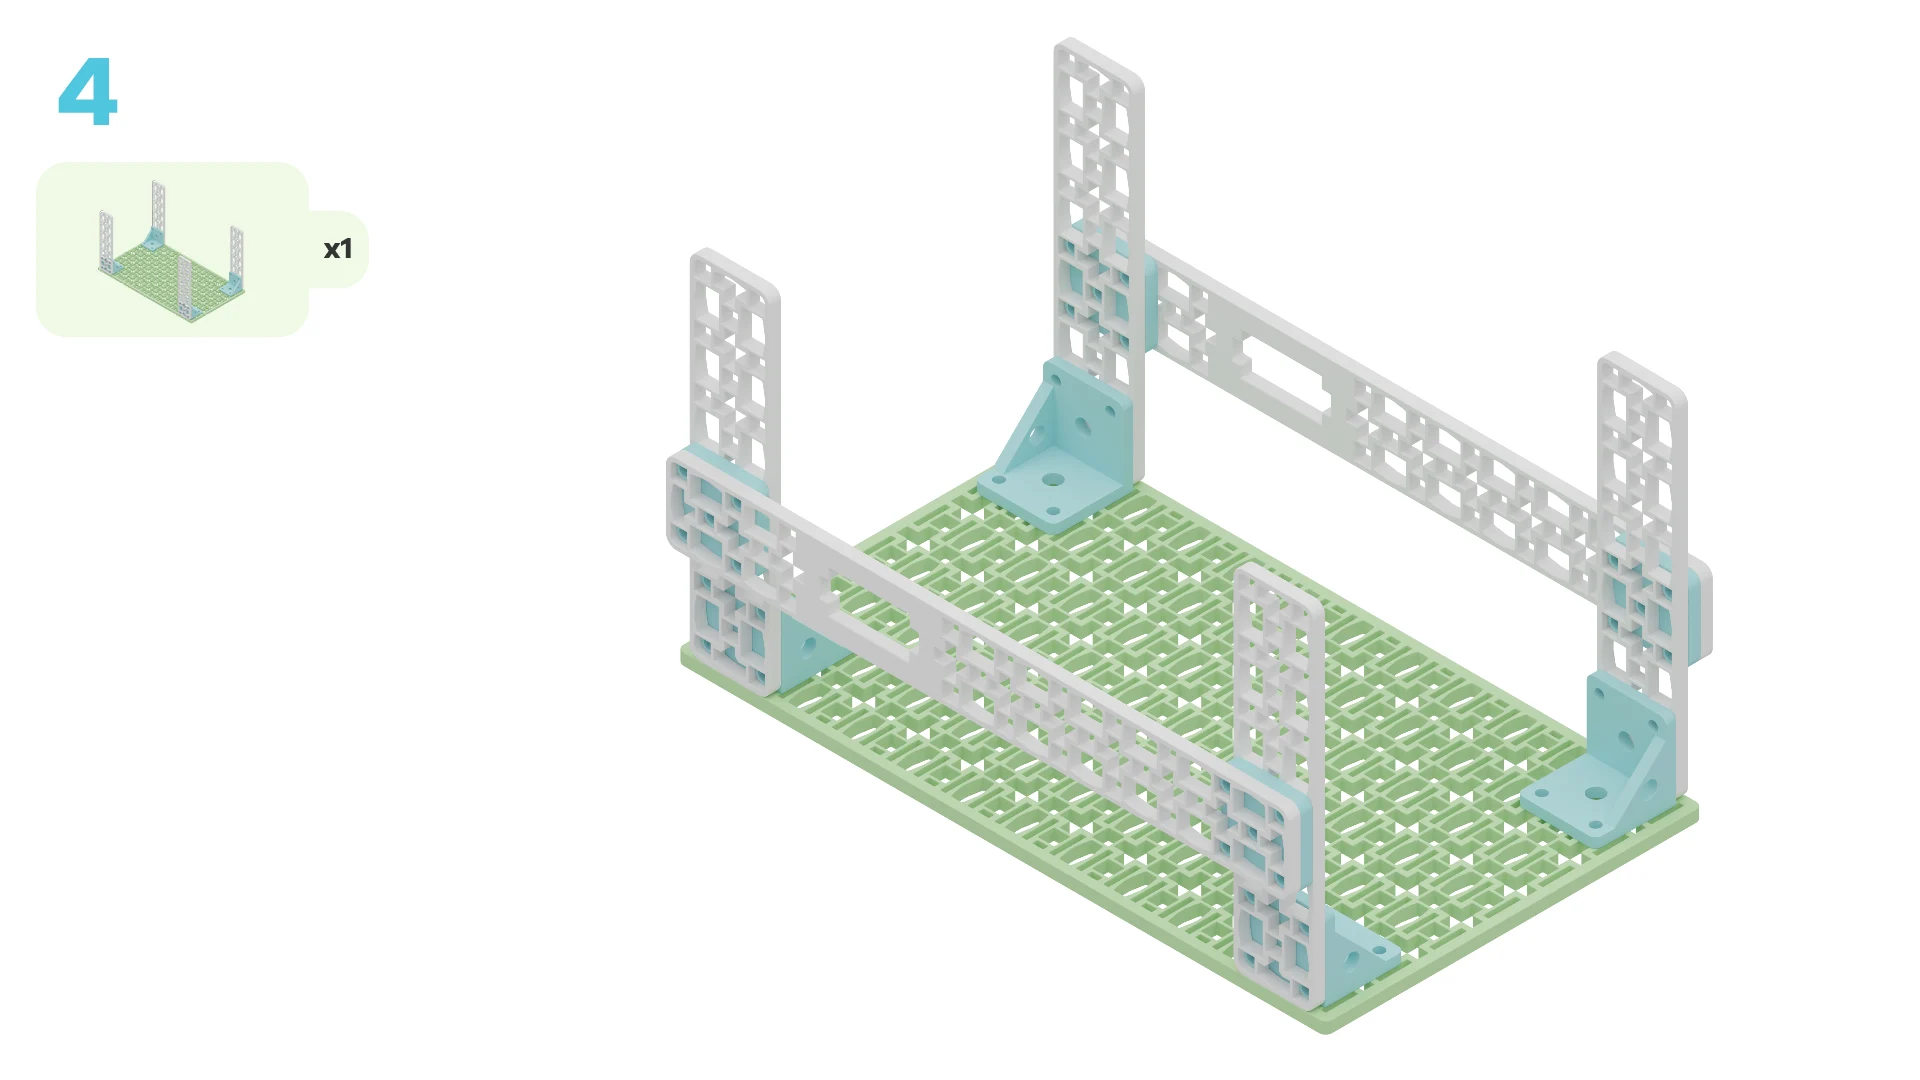
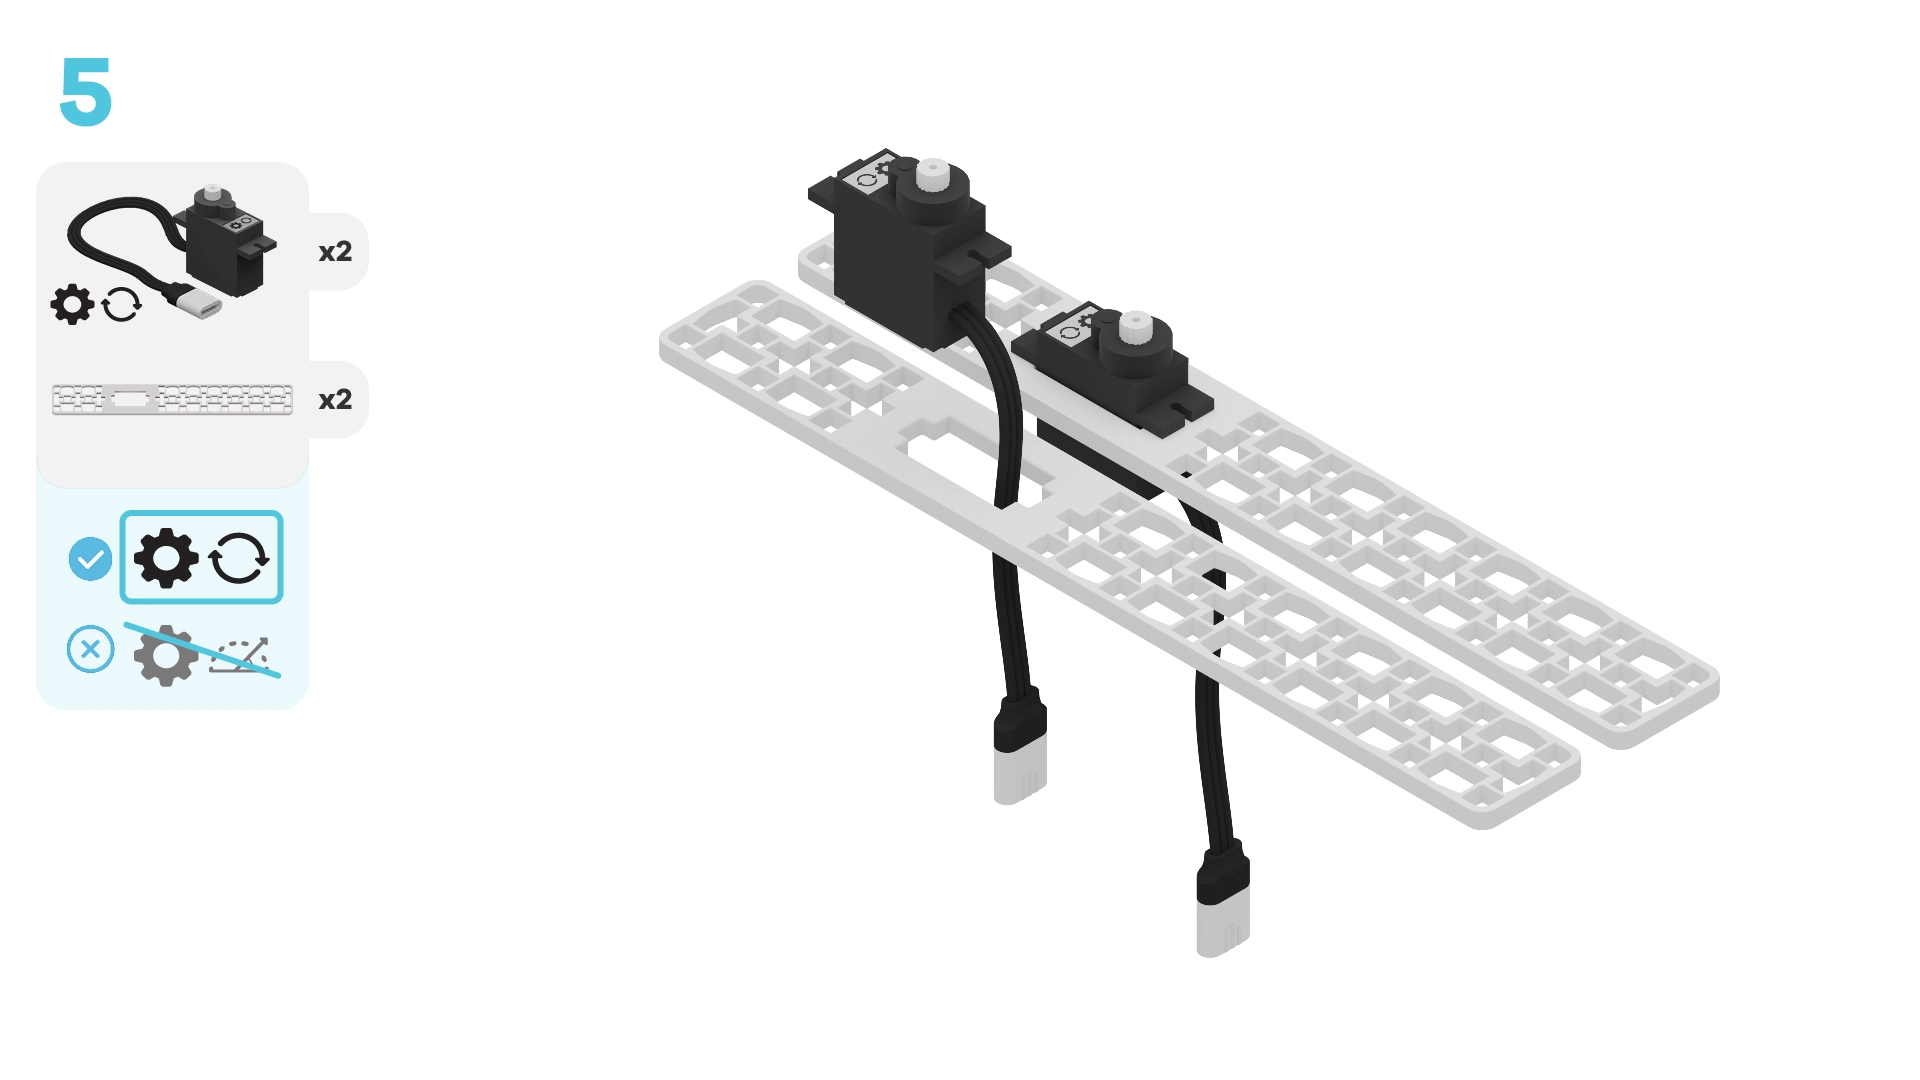
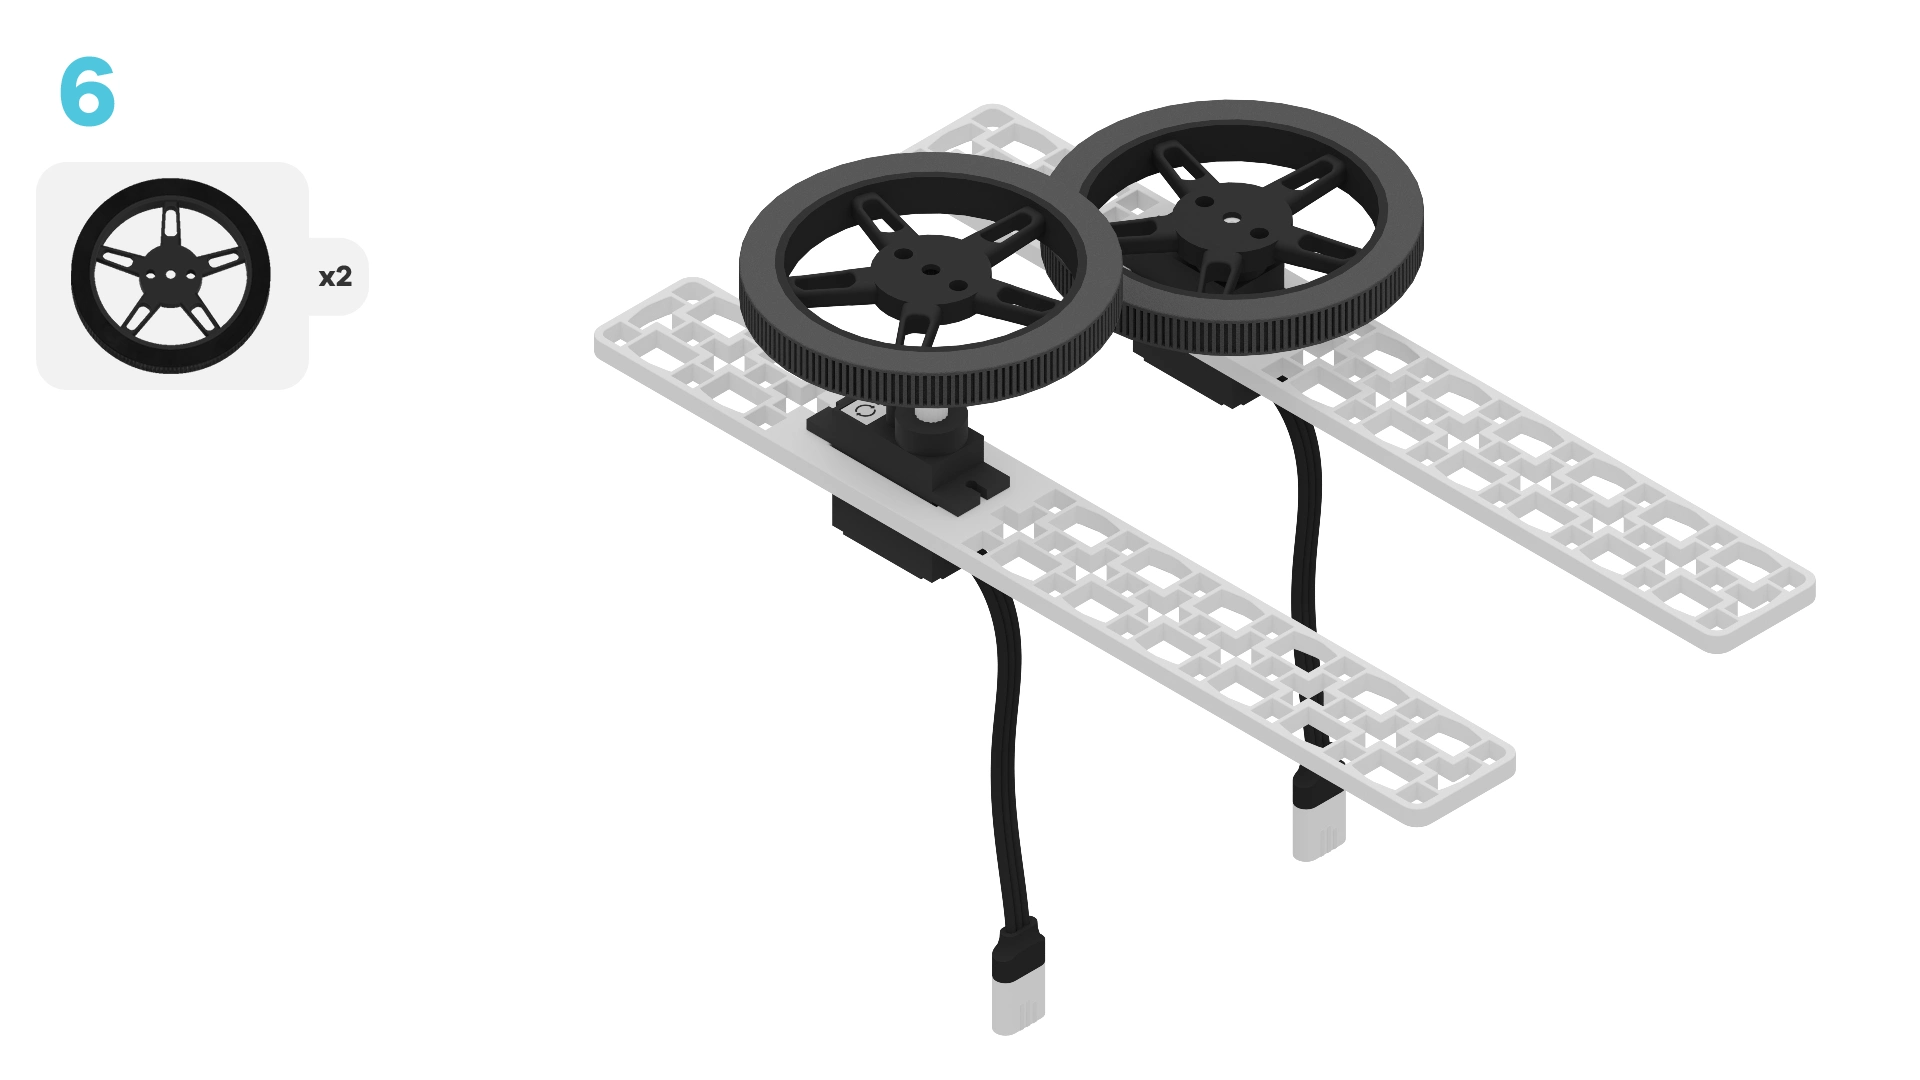
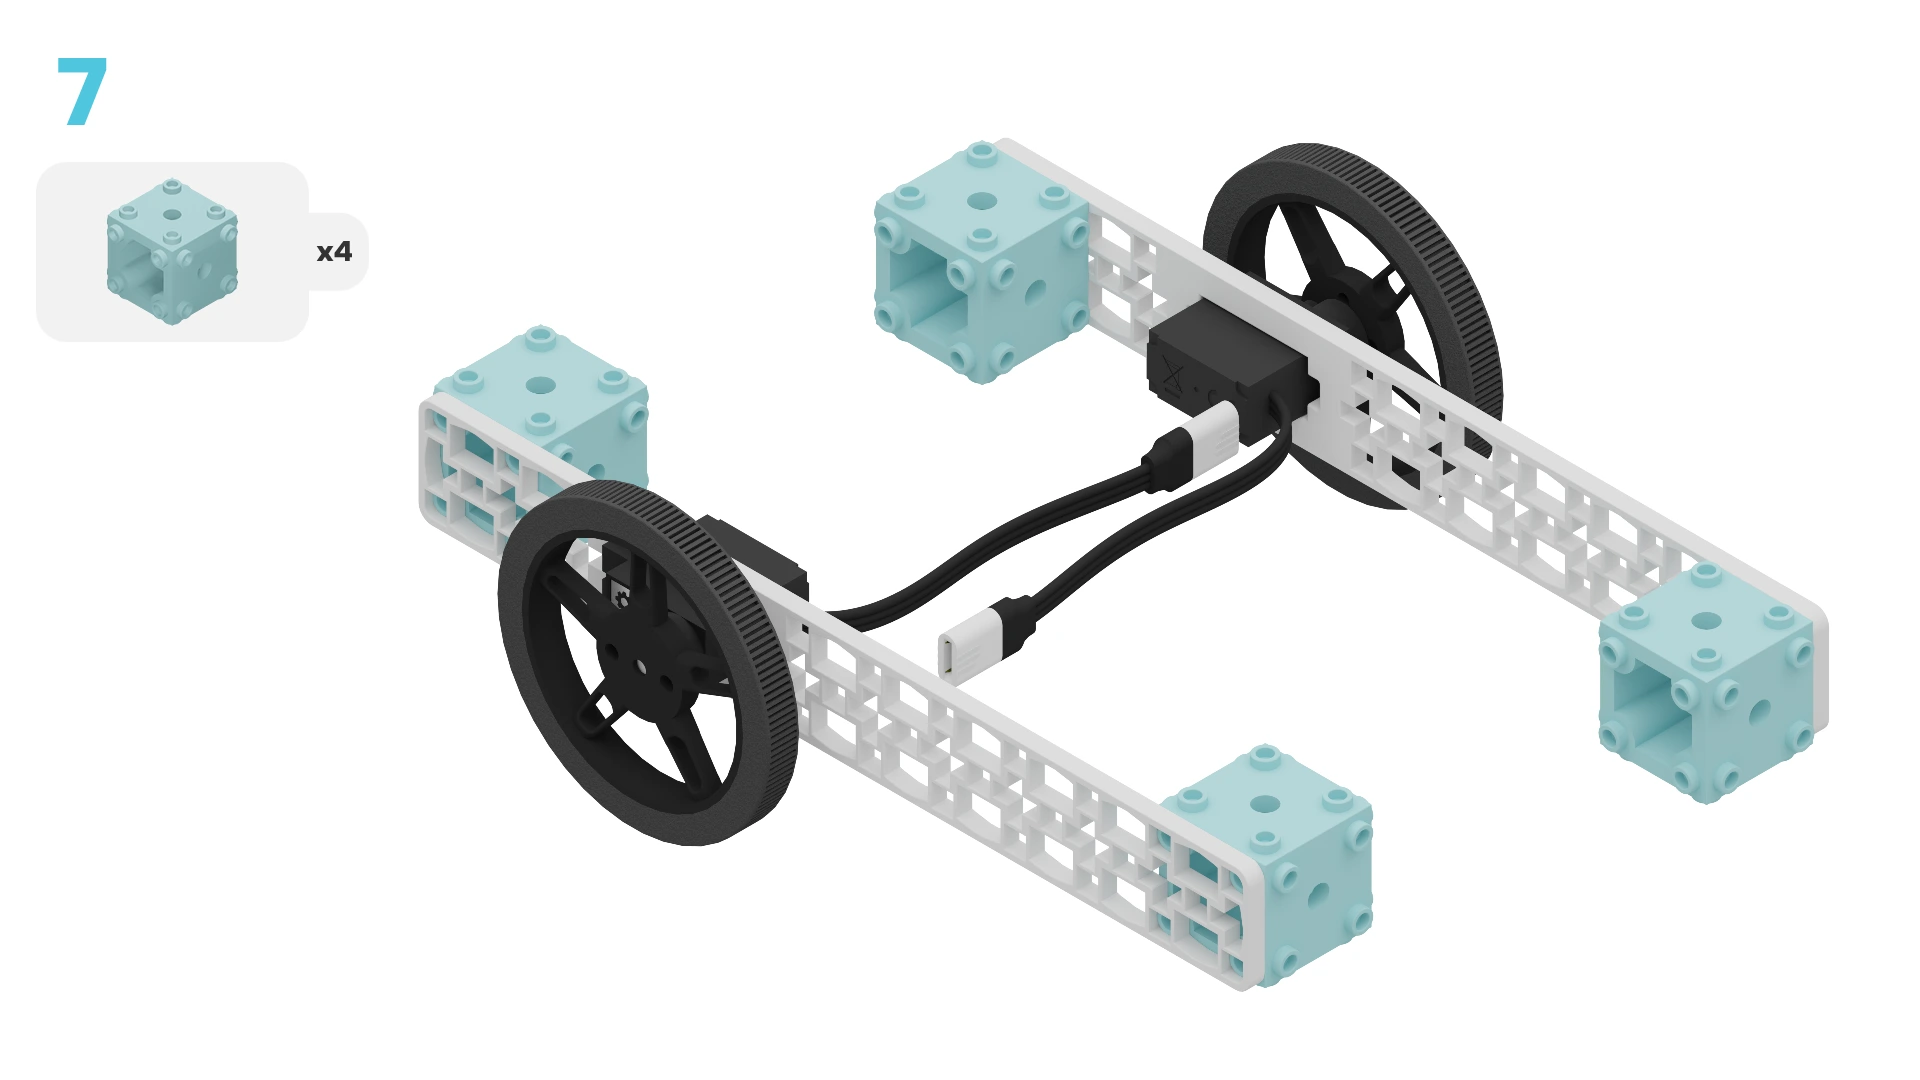
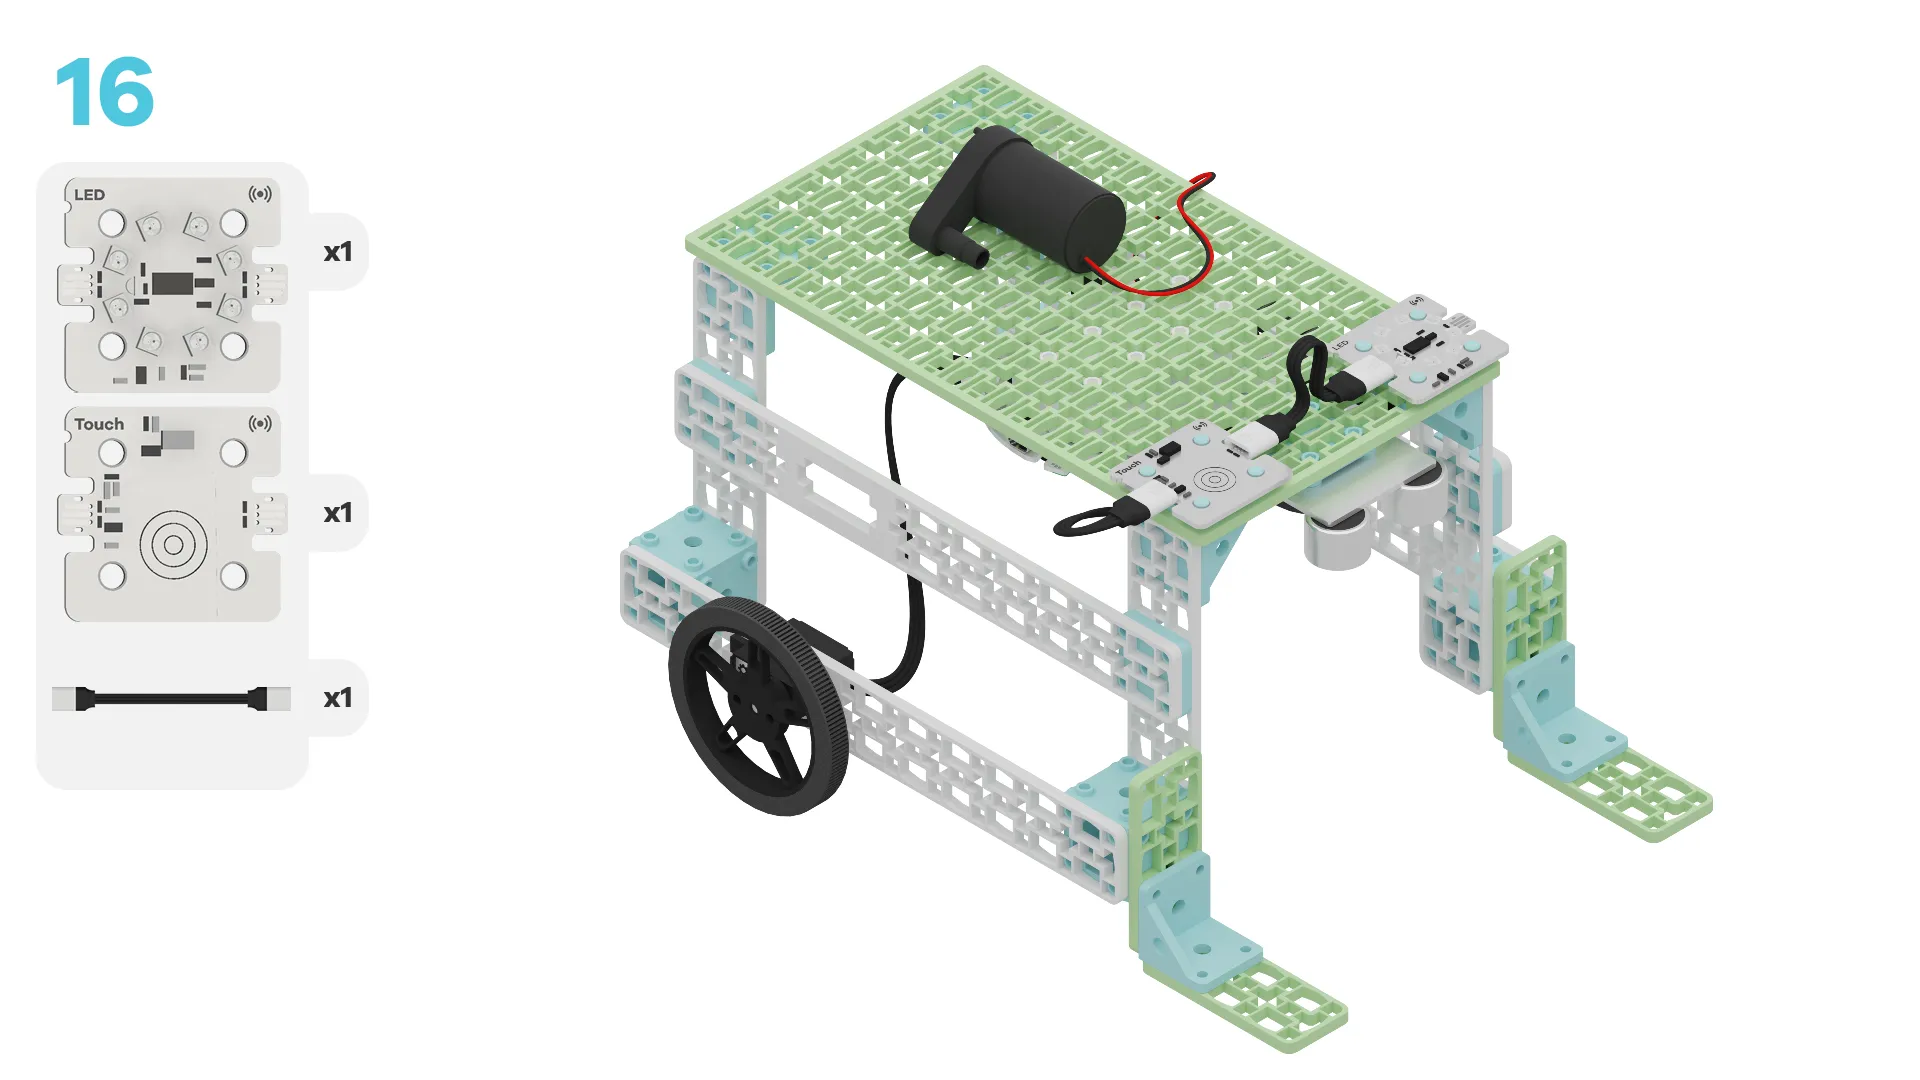
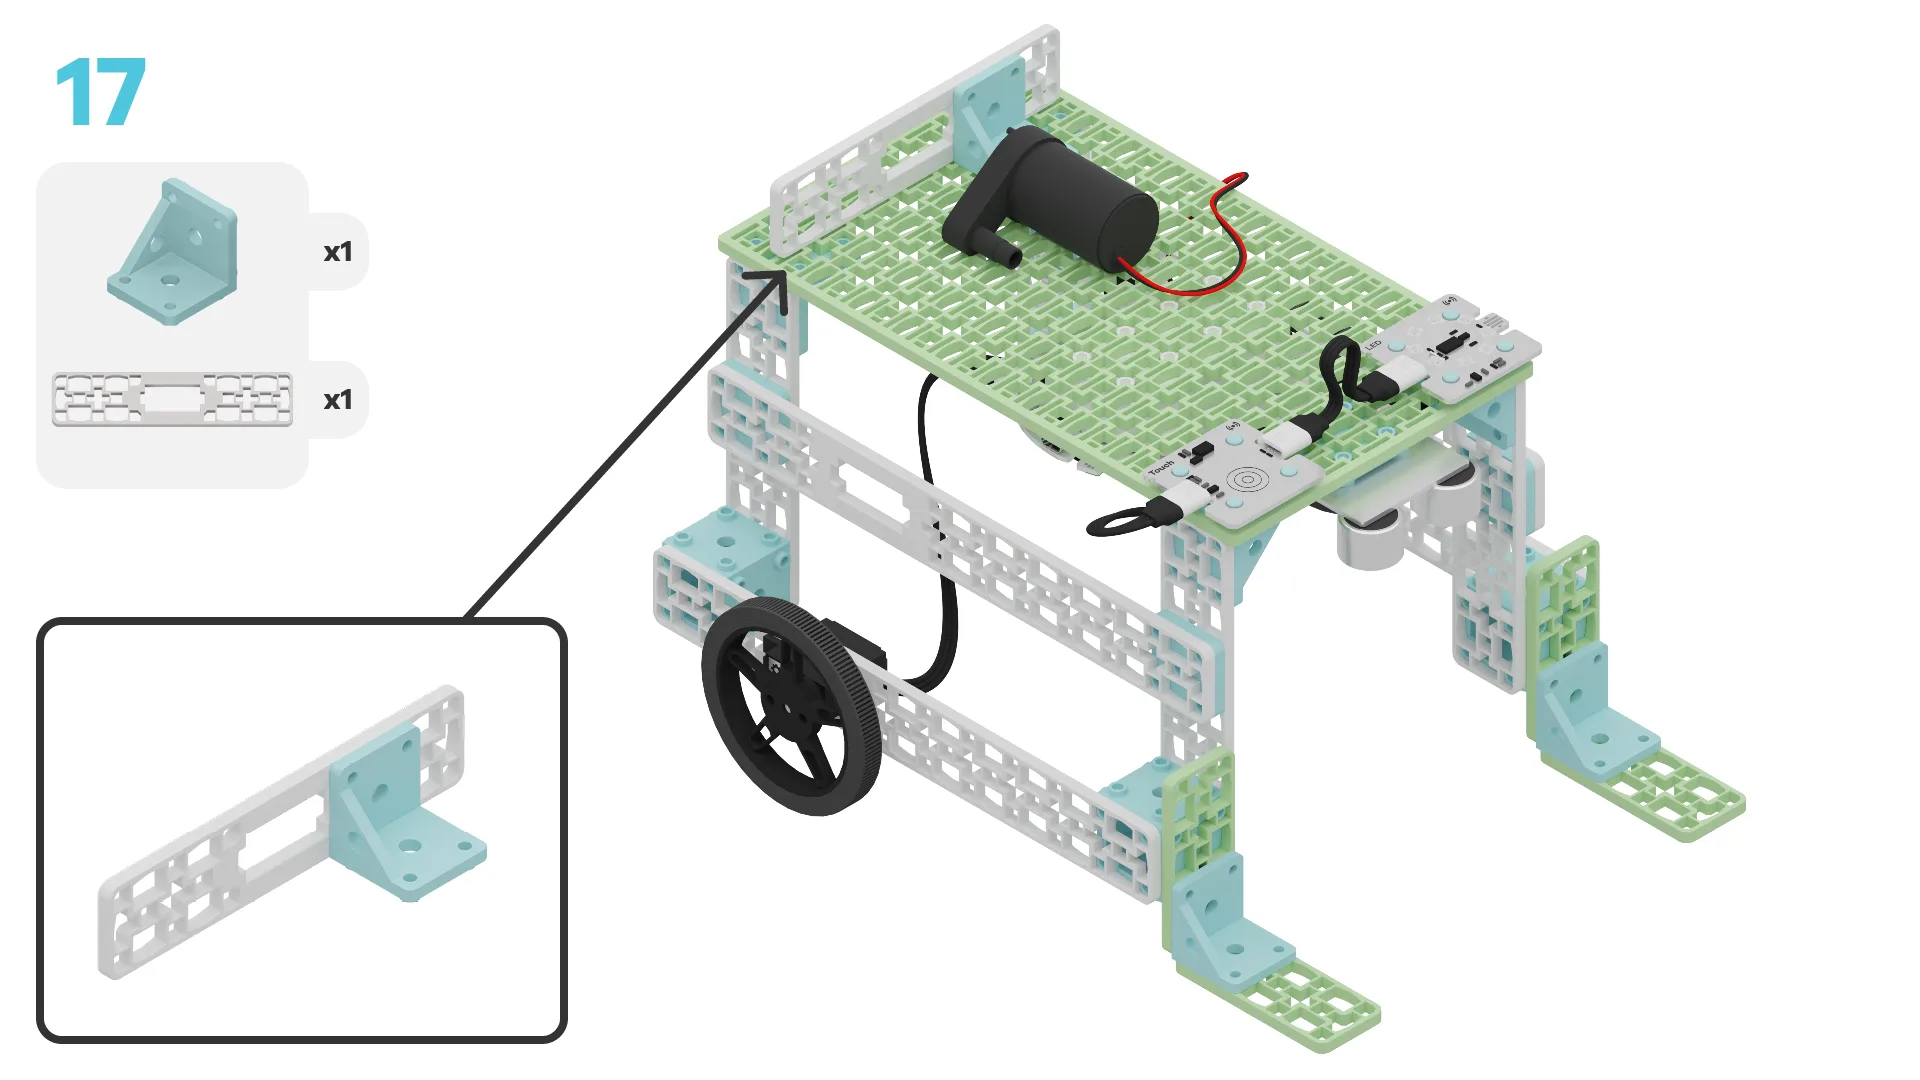
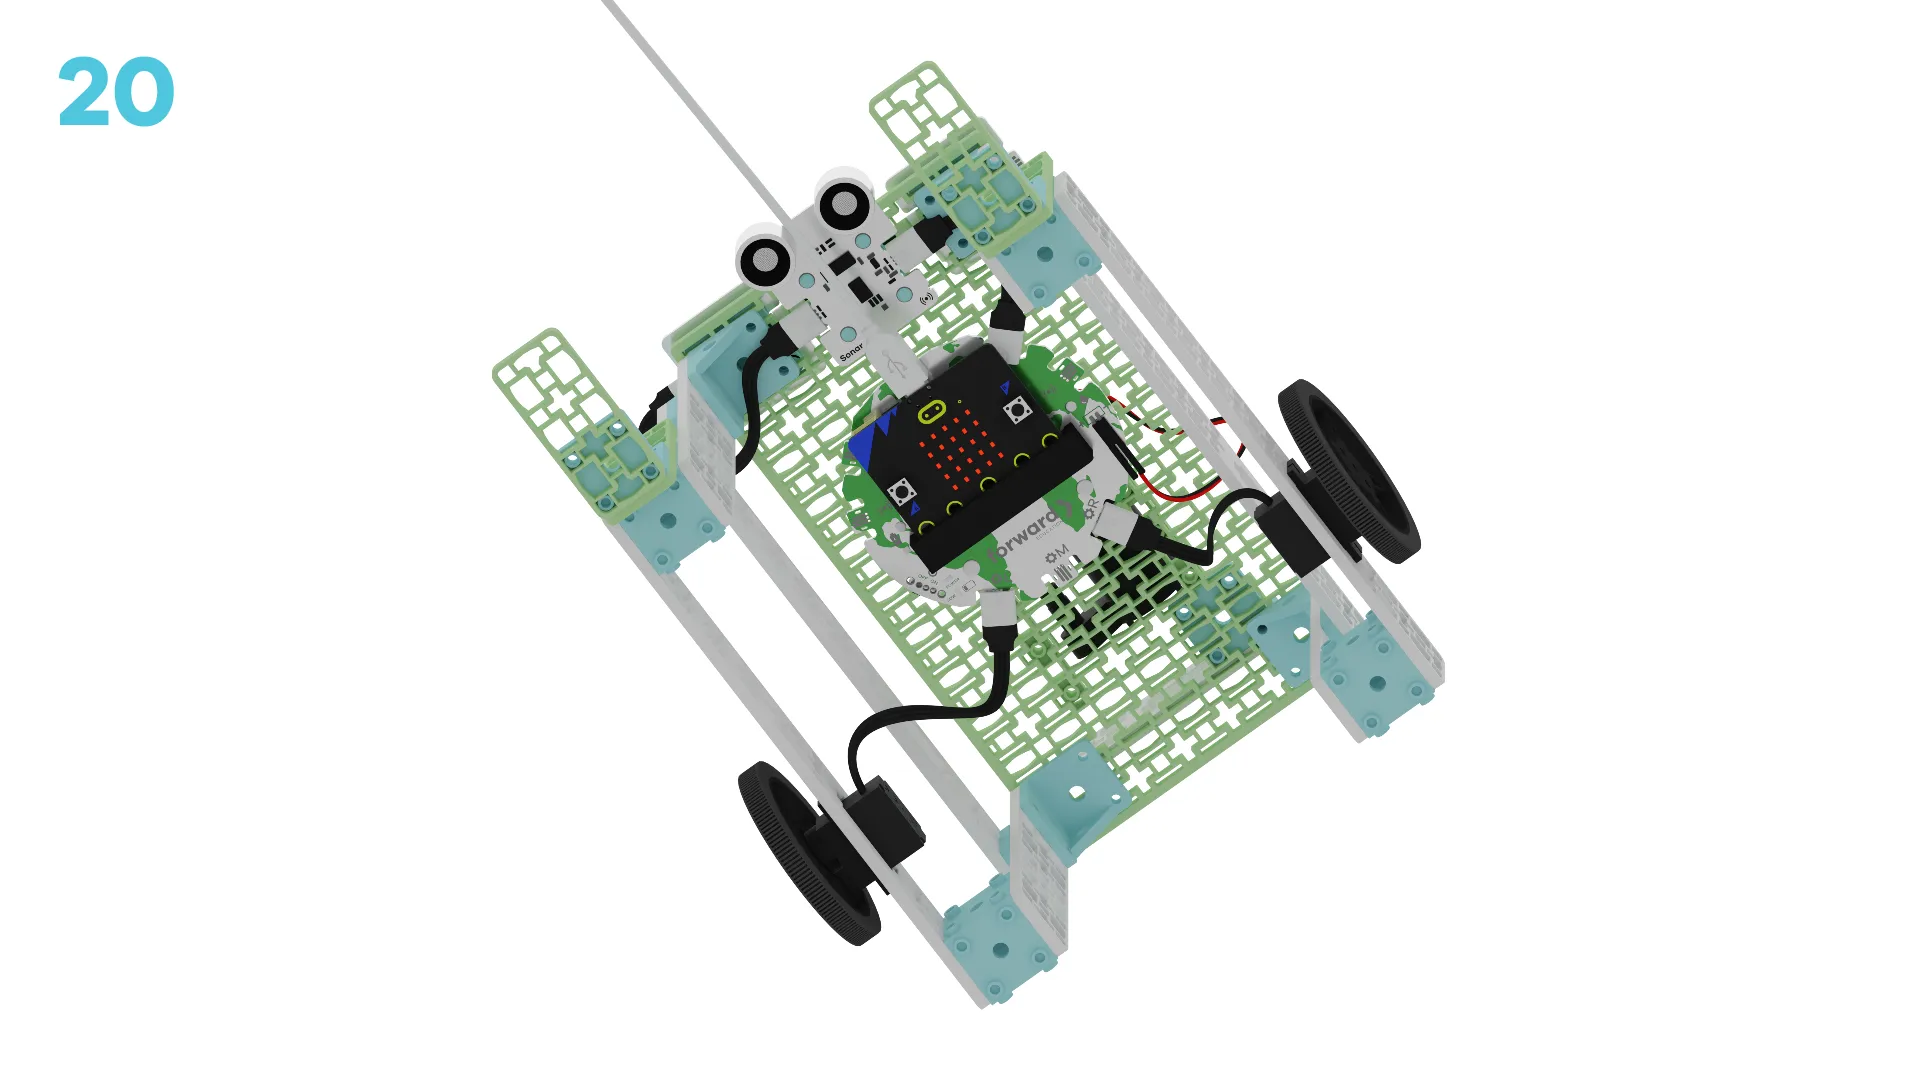
Let's create a mobile irrigation system! We are going to do this in four parts:
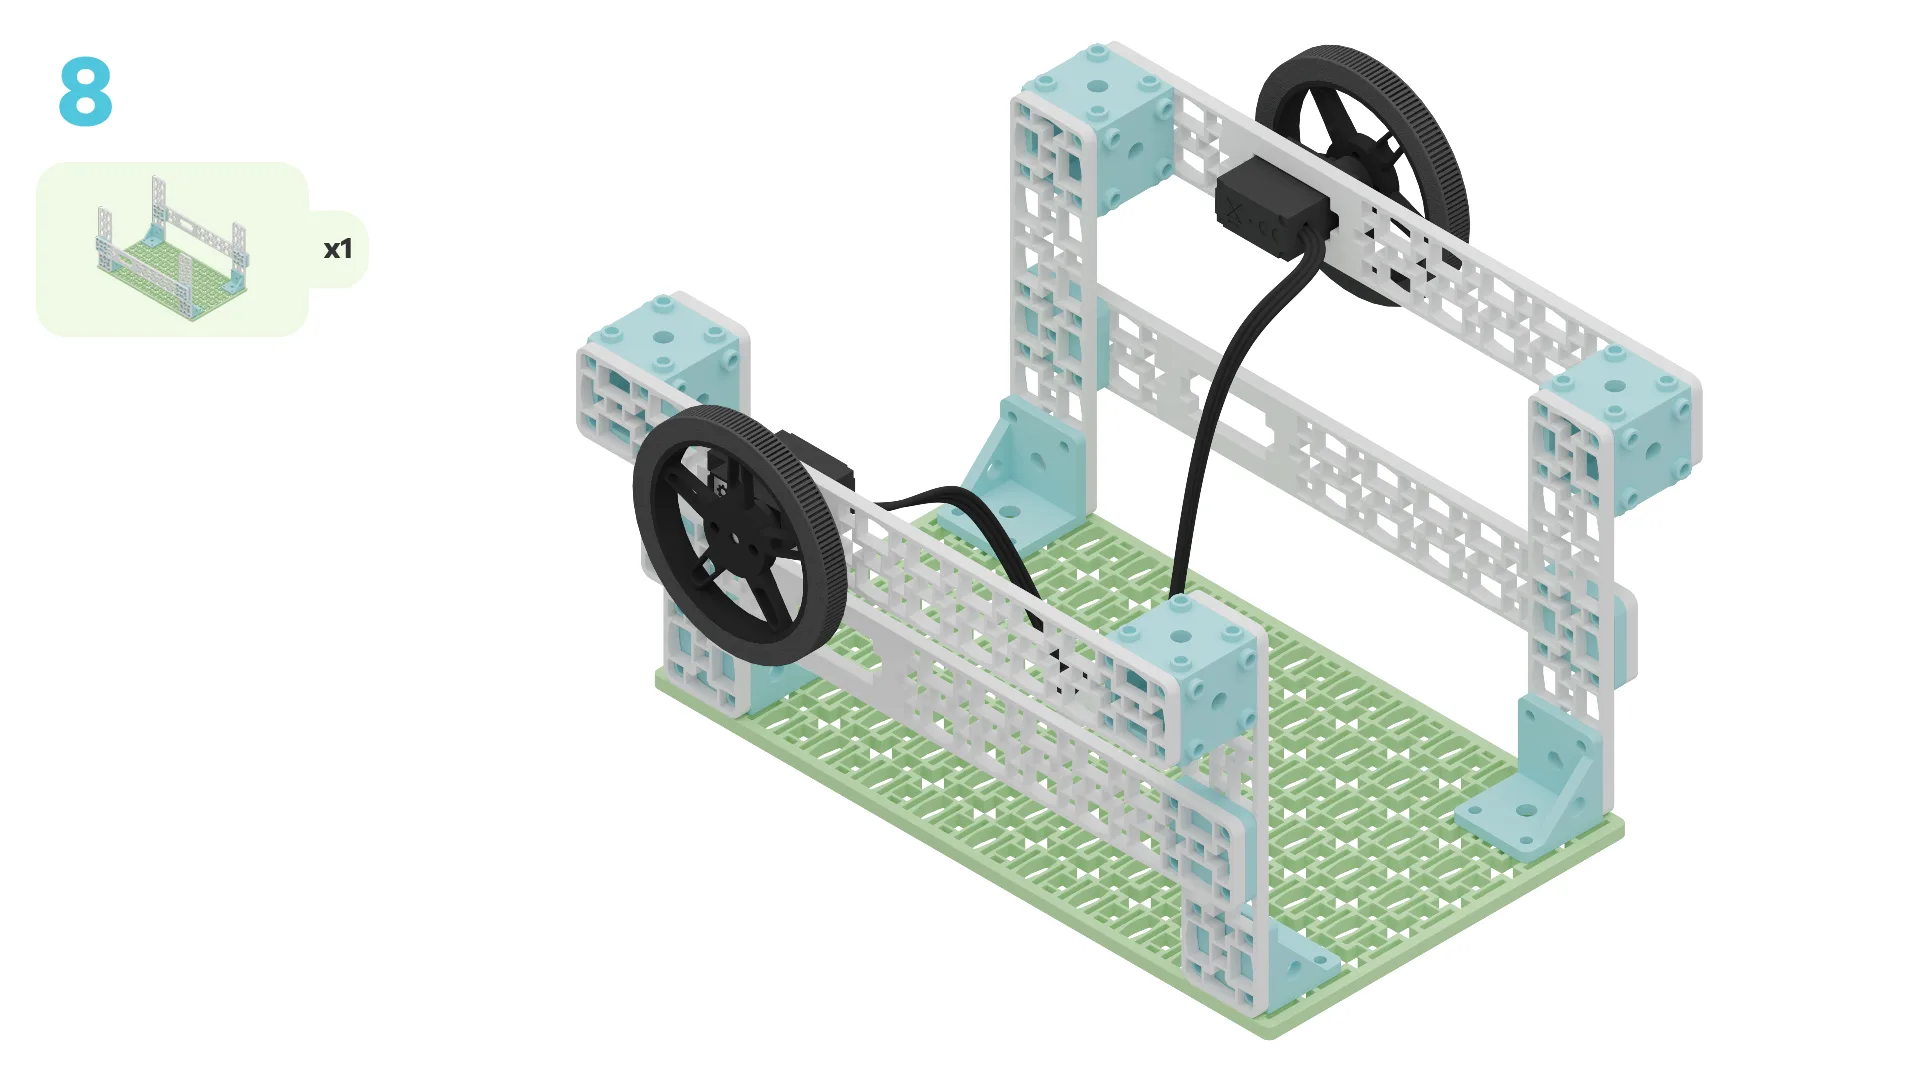
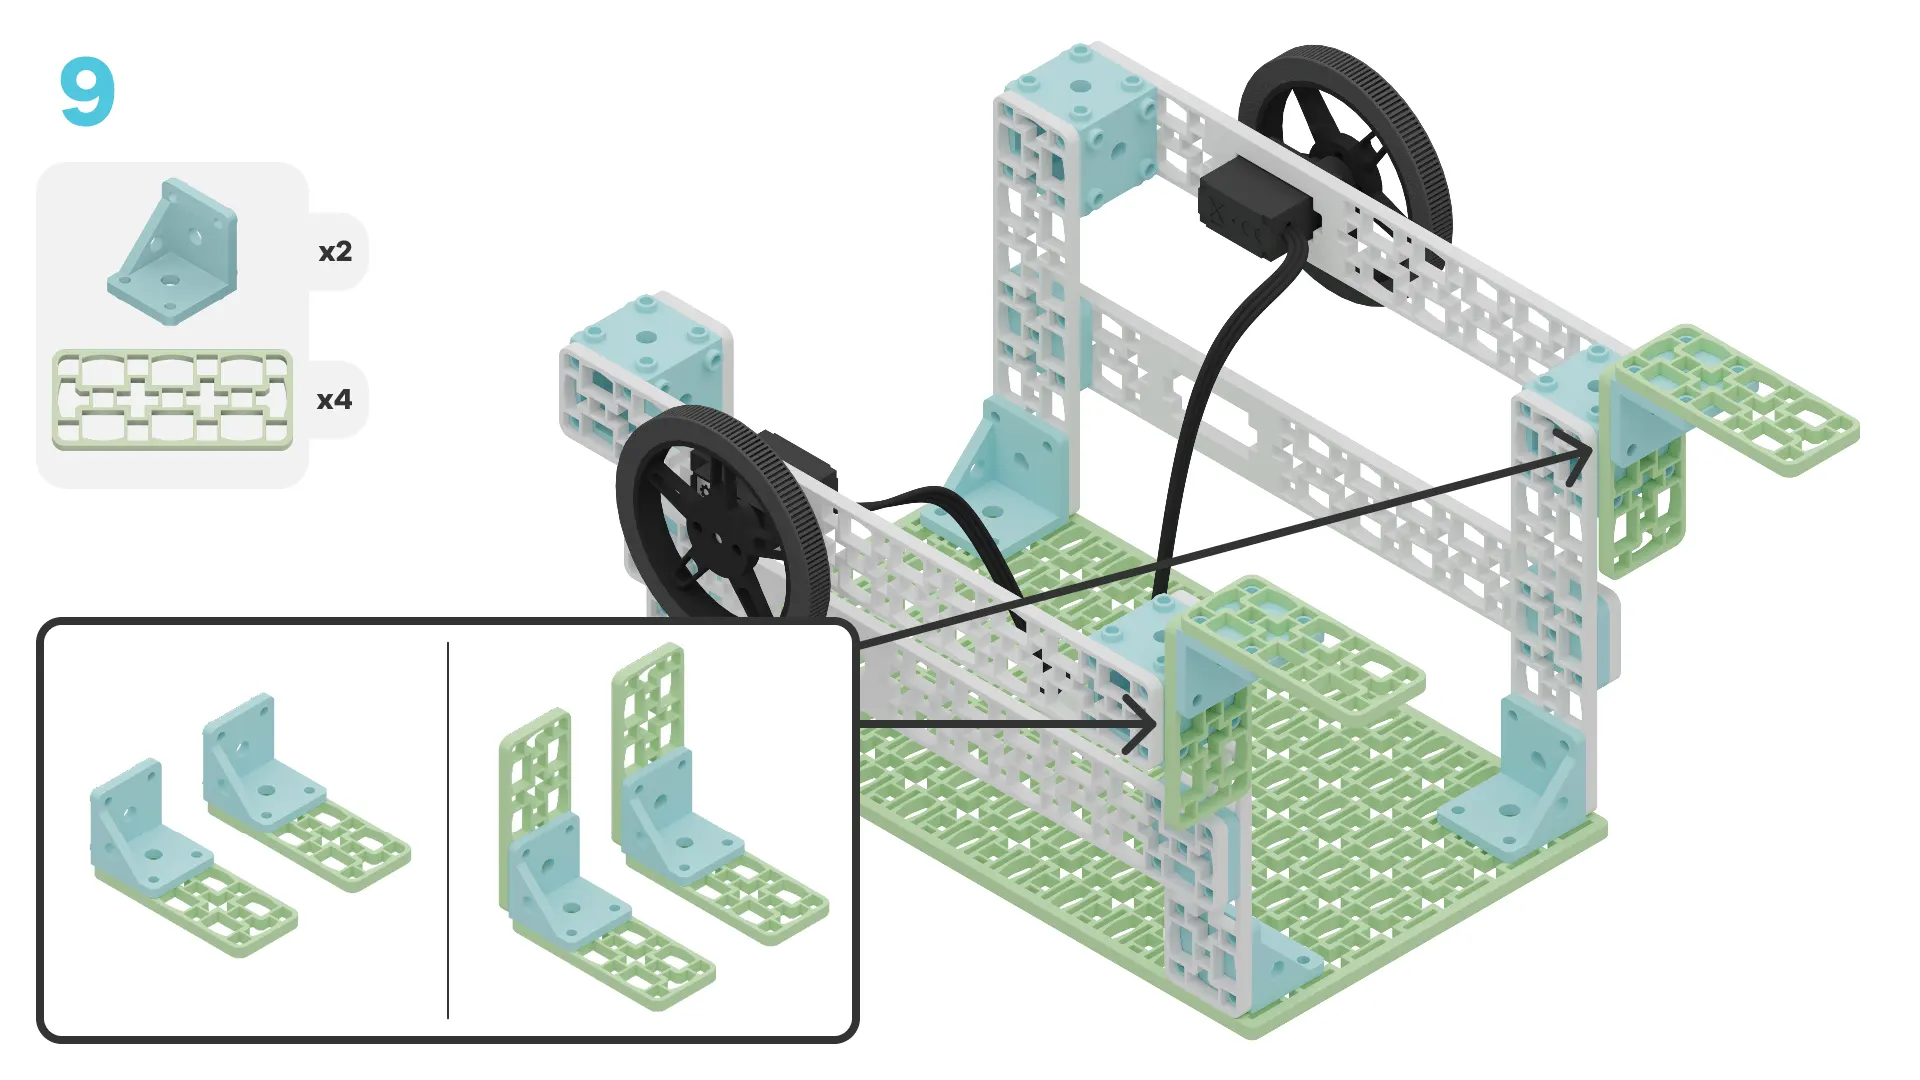
- Build our mobile irrigation system
- Add code to bring it to life
- Modify the code to learn how it works
- Complete a challenge to improve water conservation
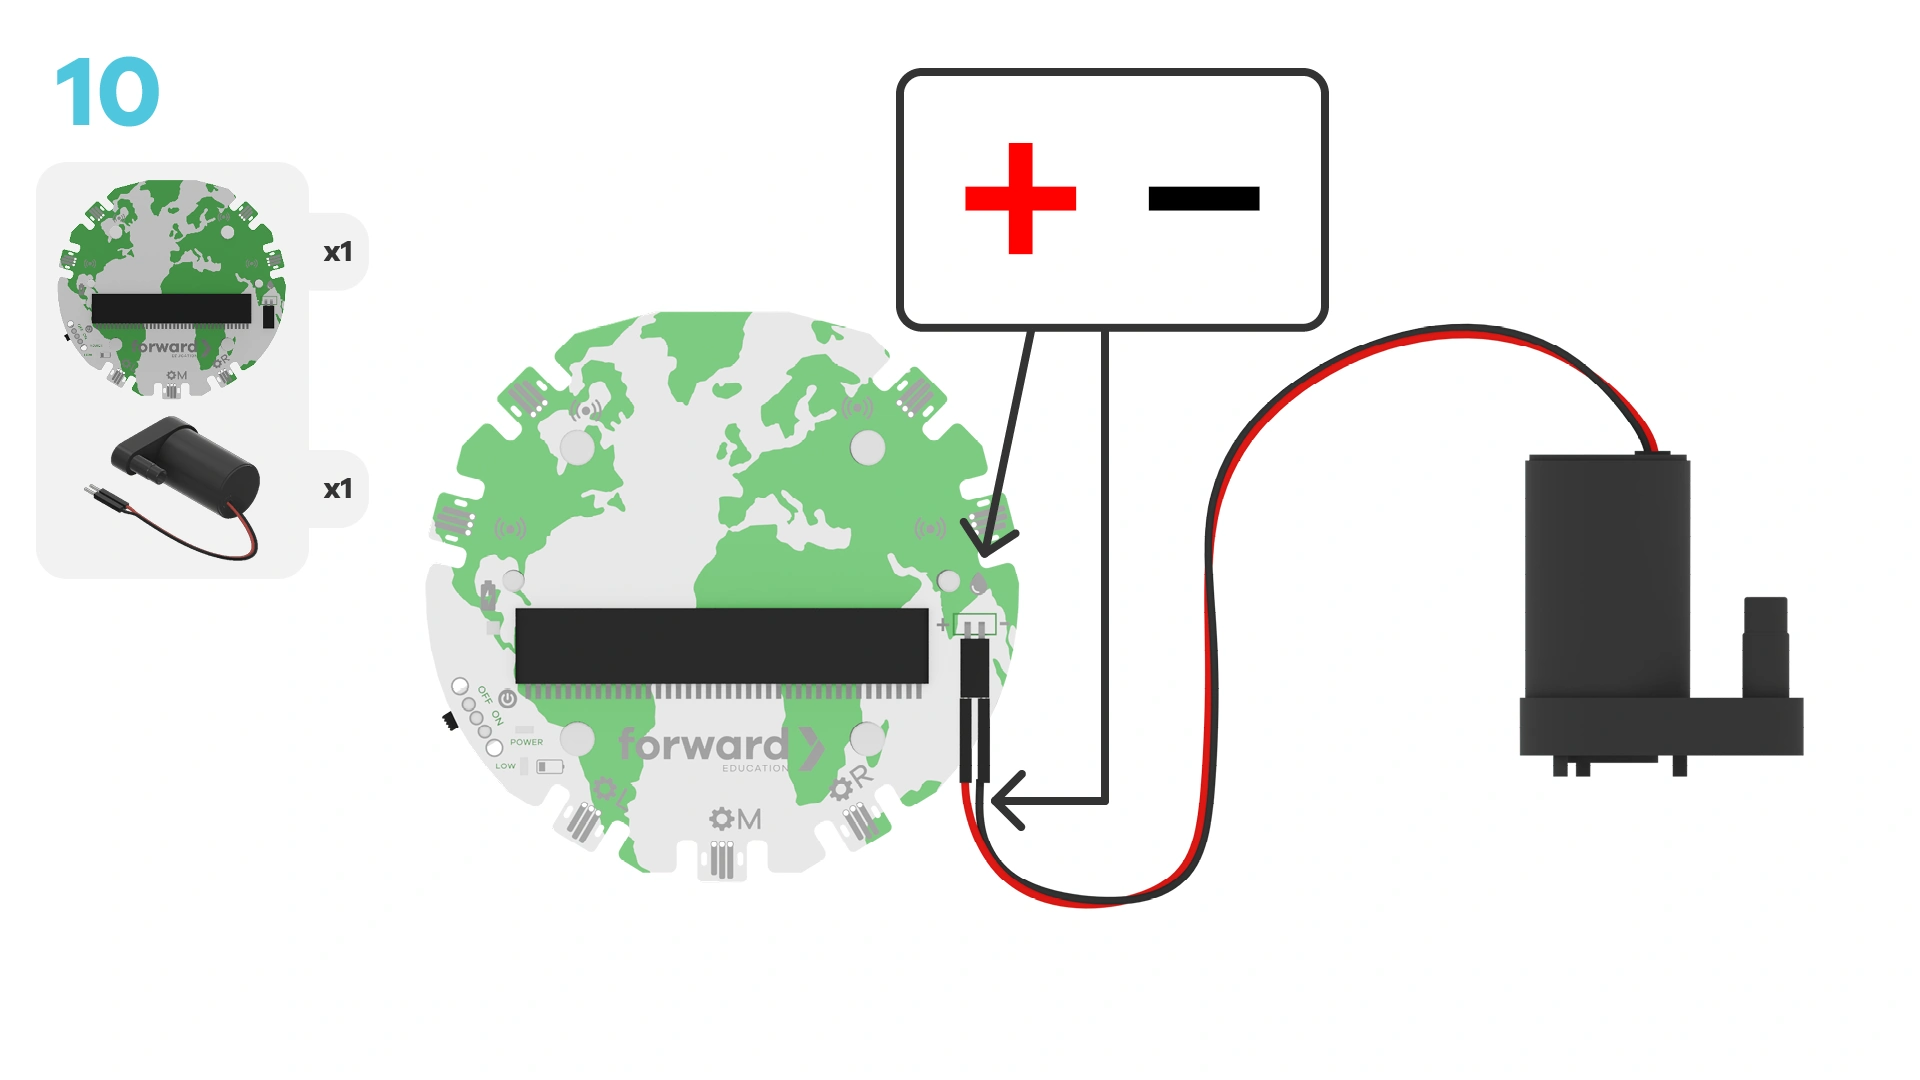
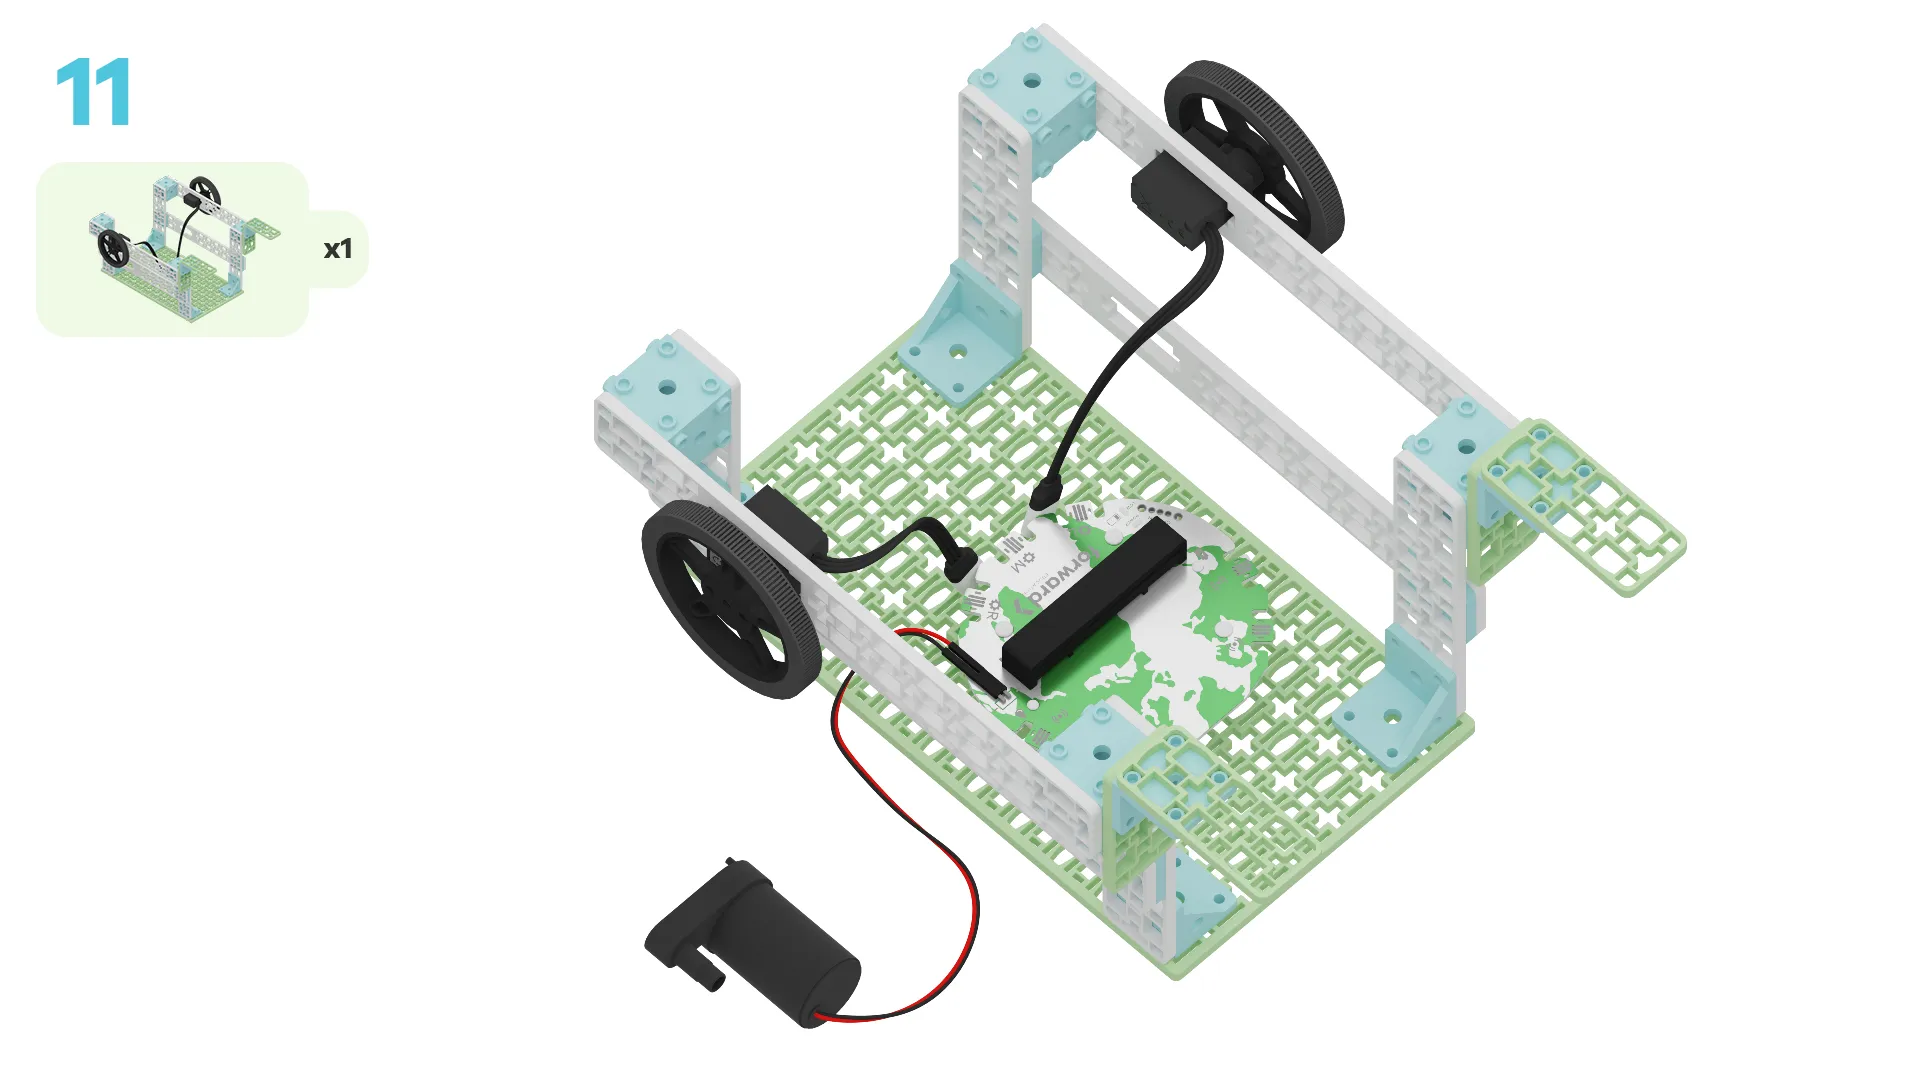
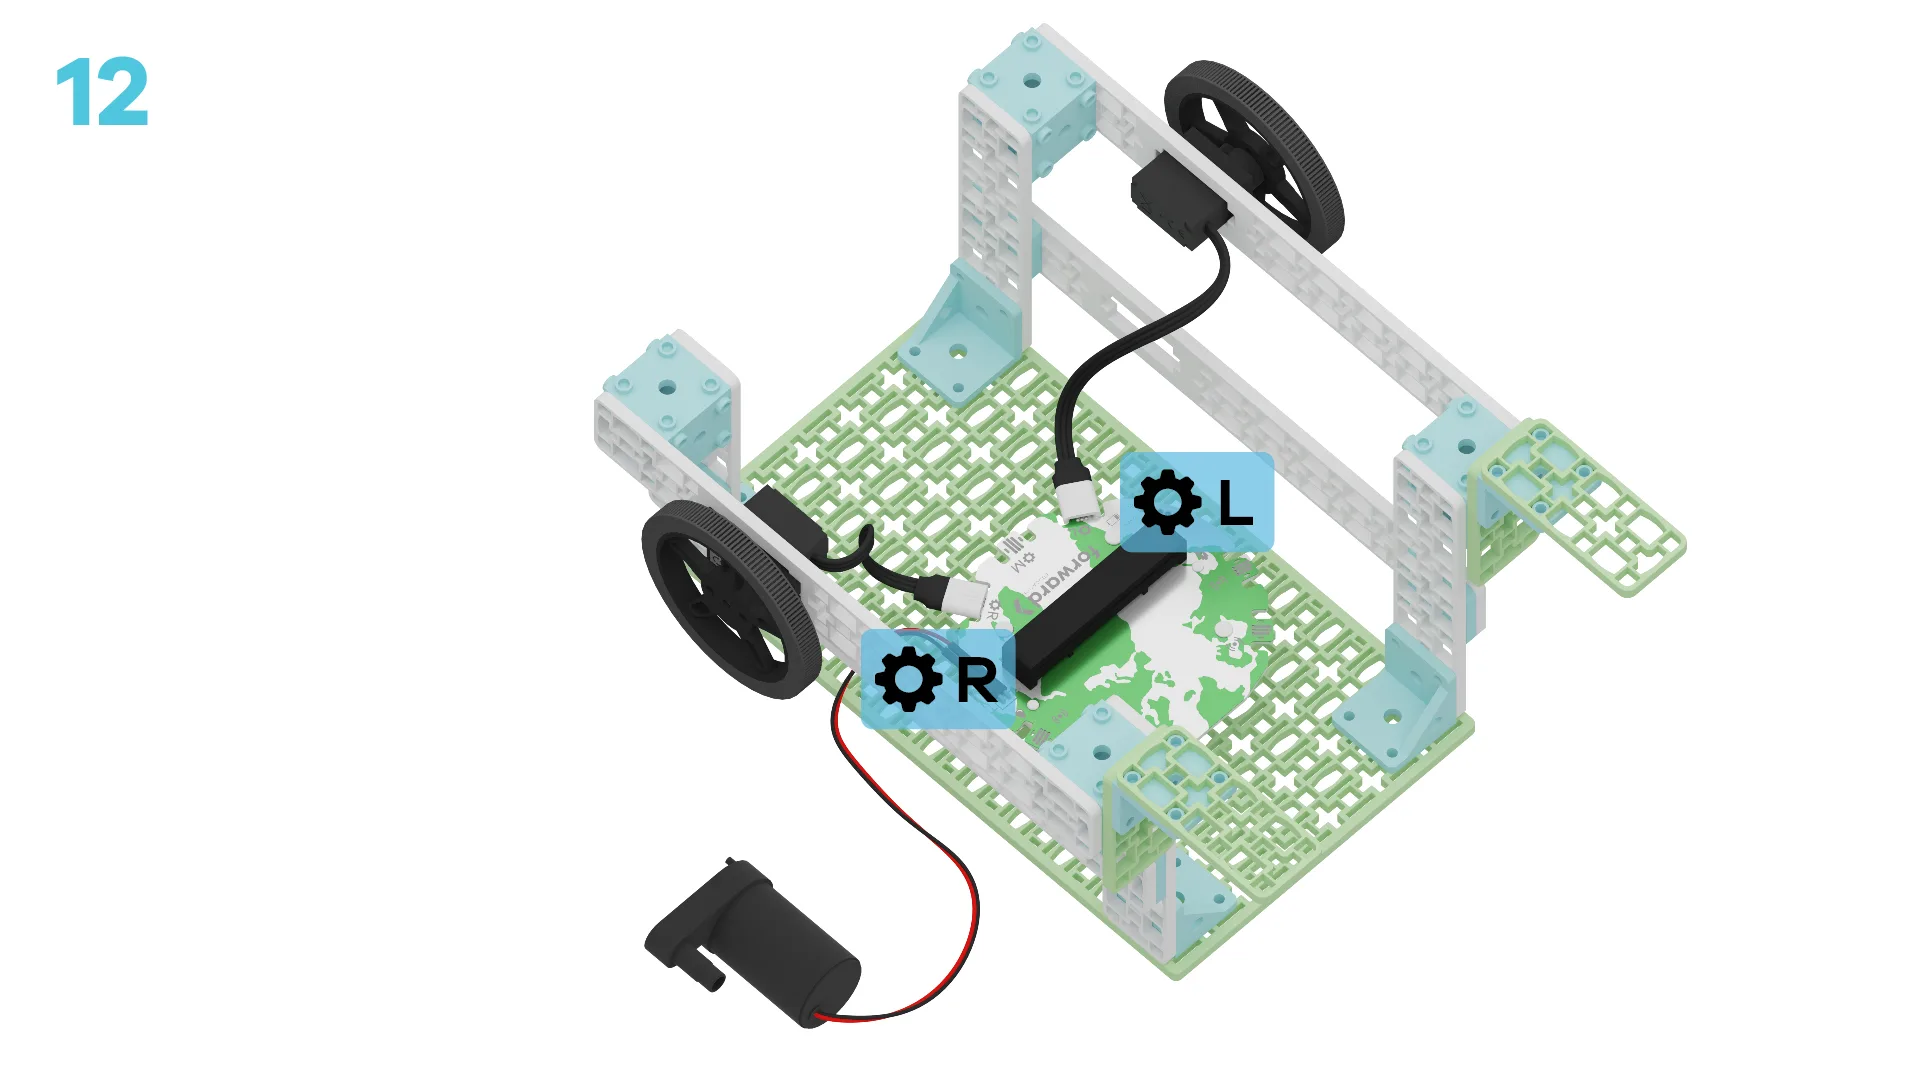
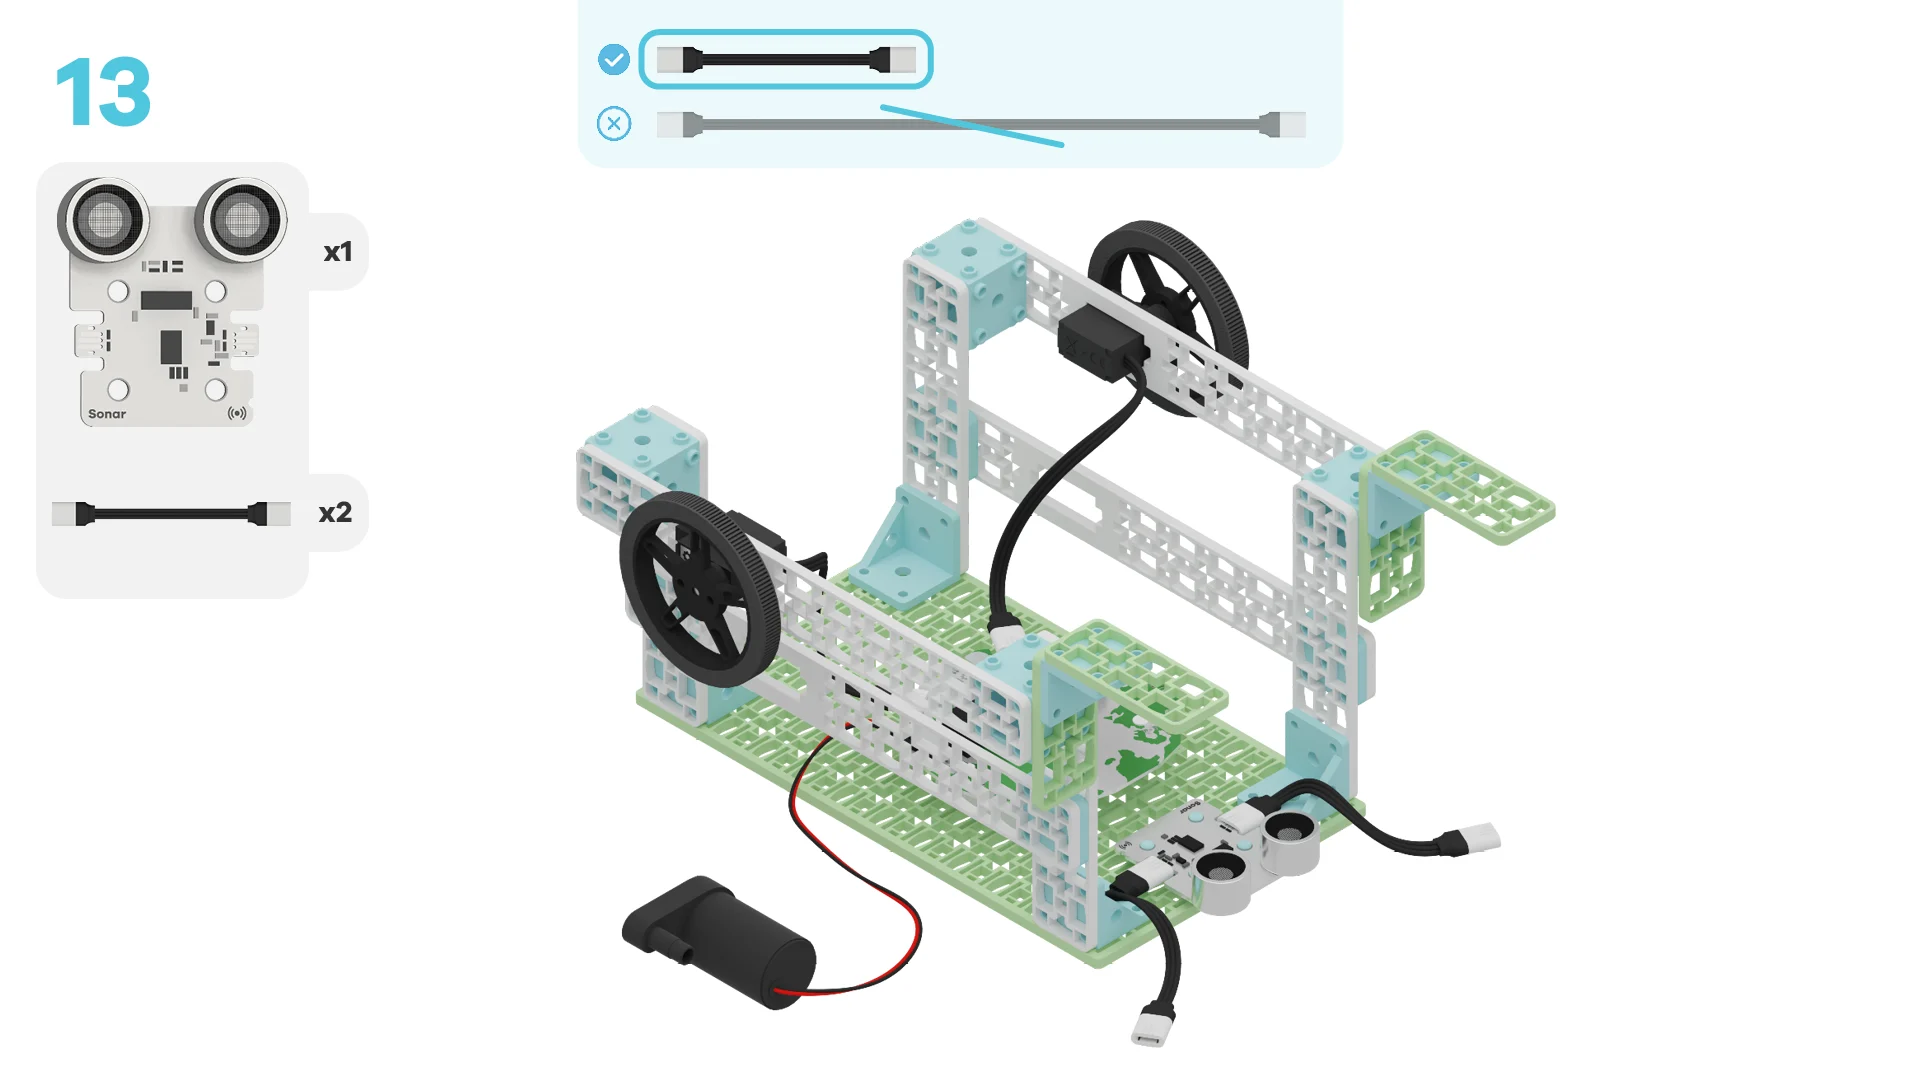
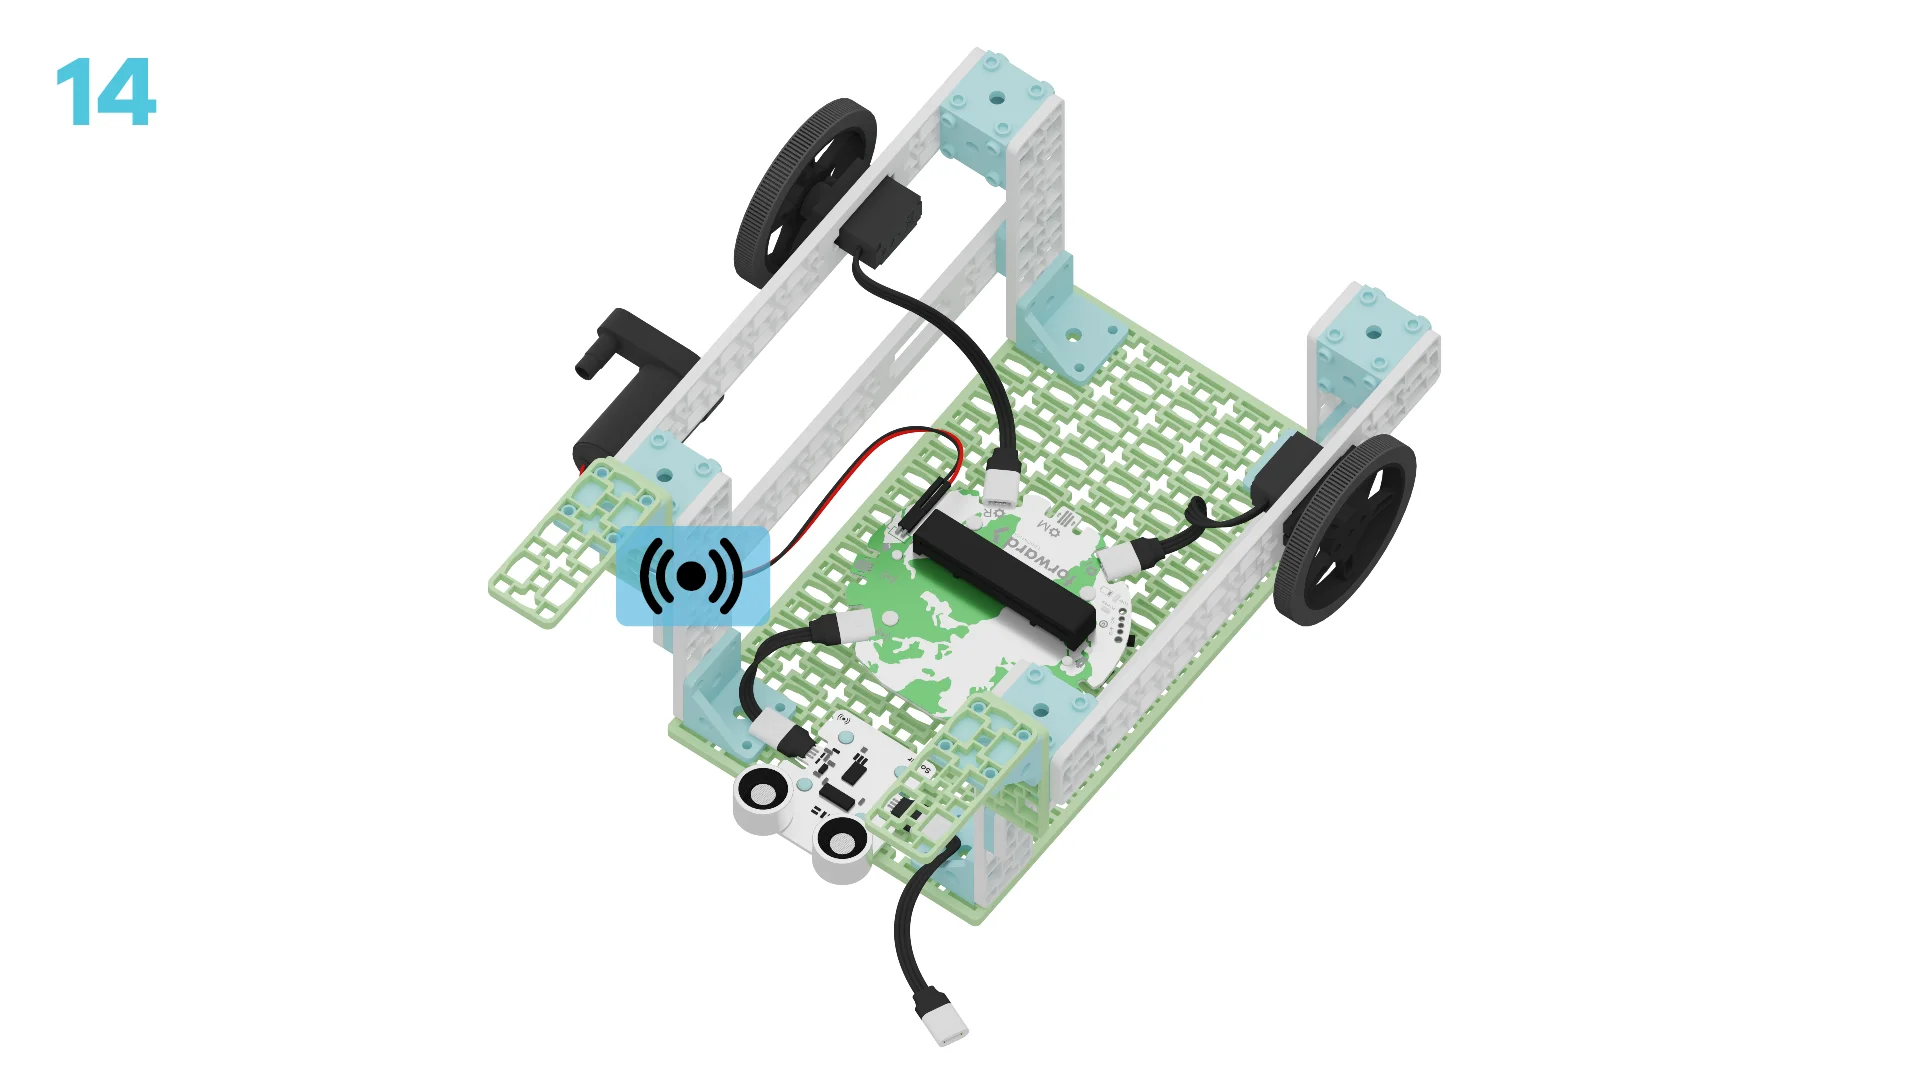
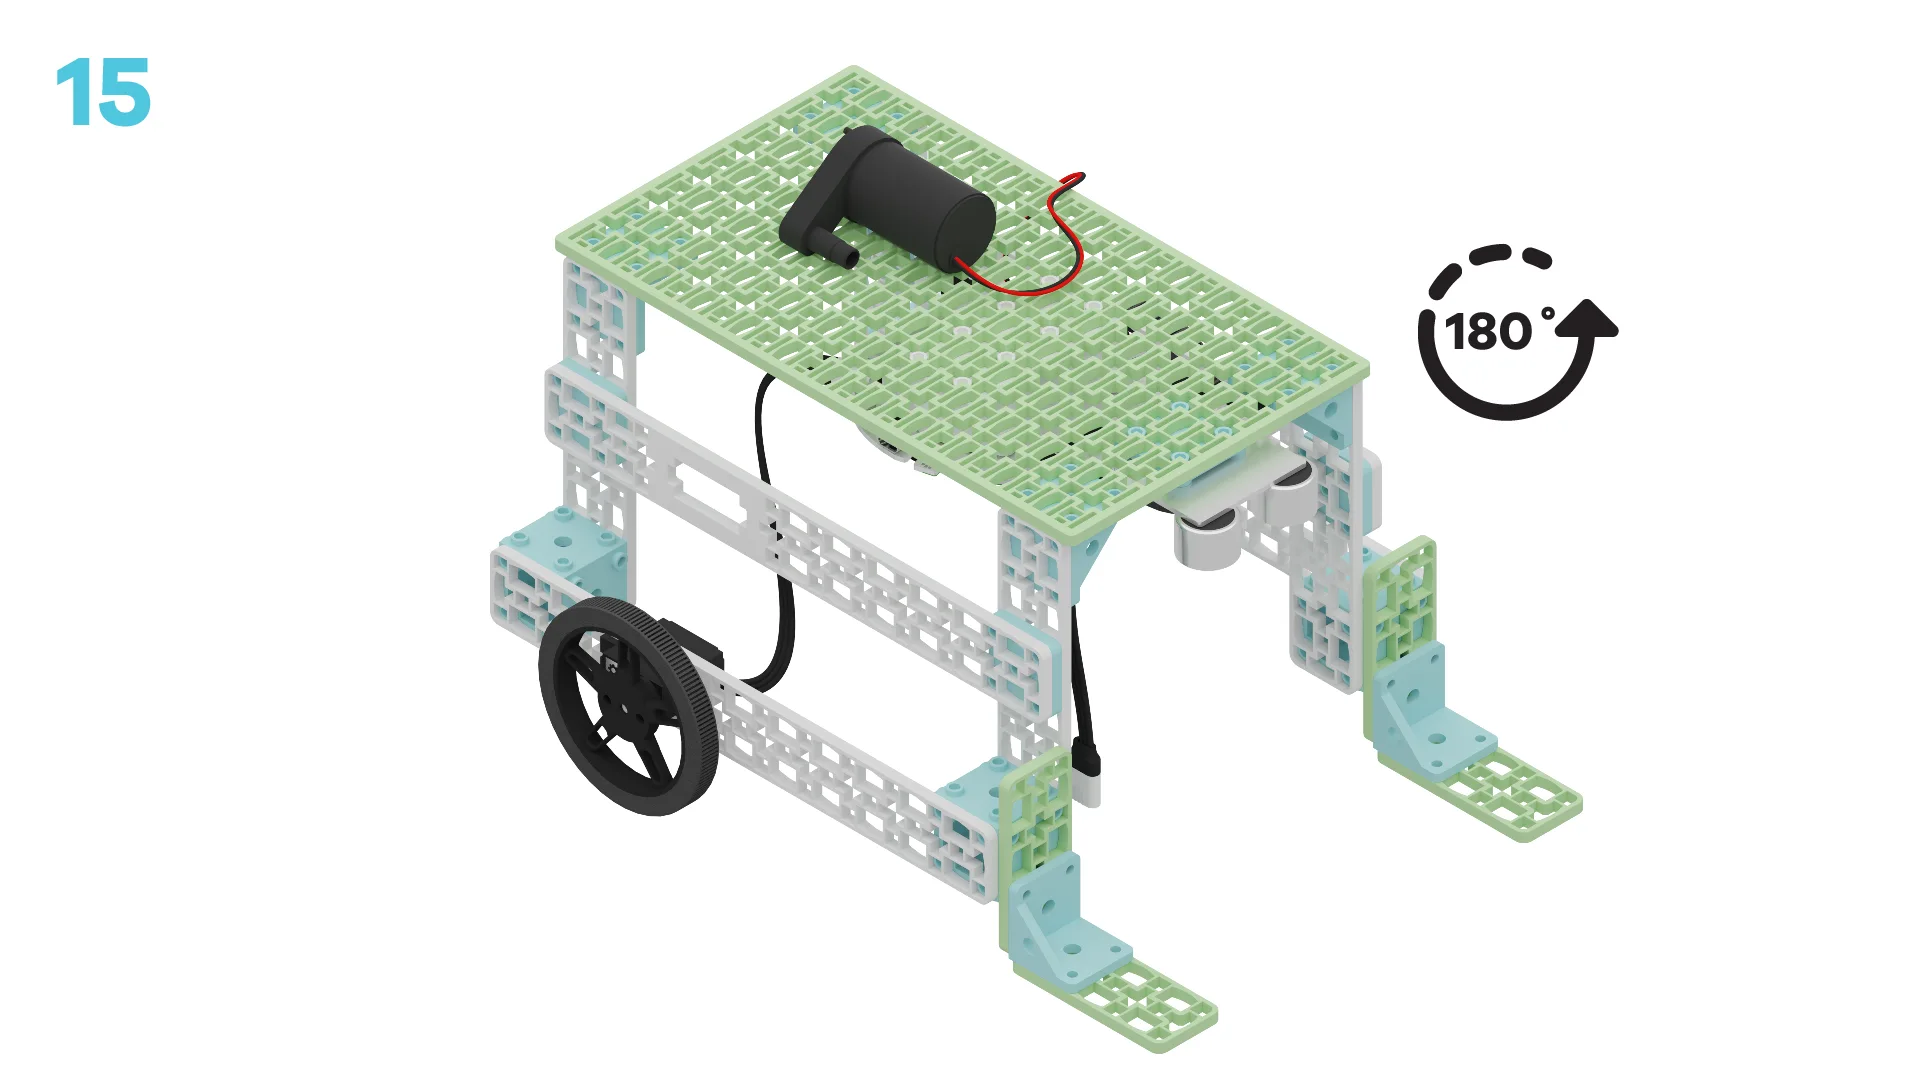
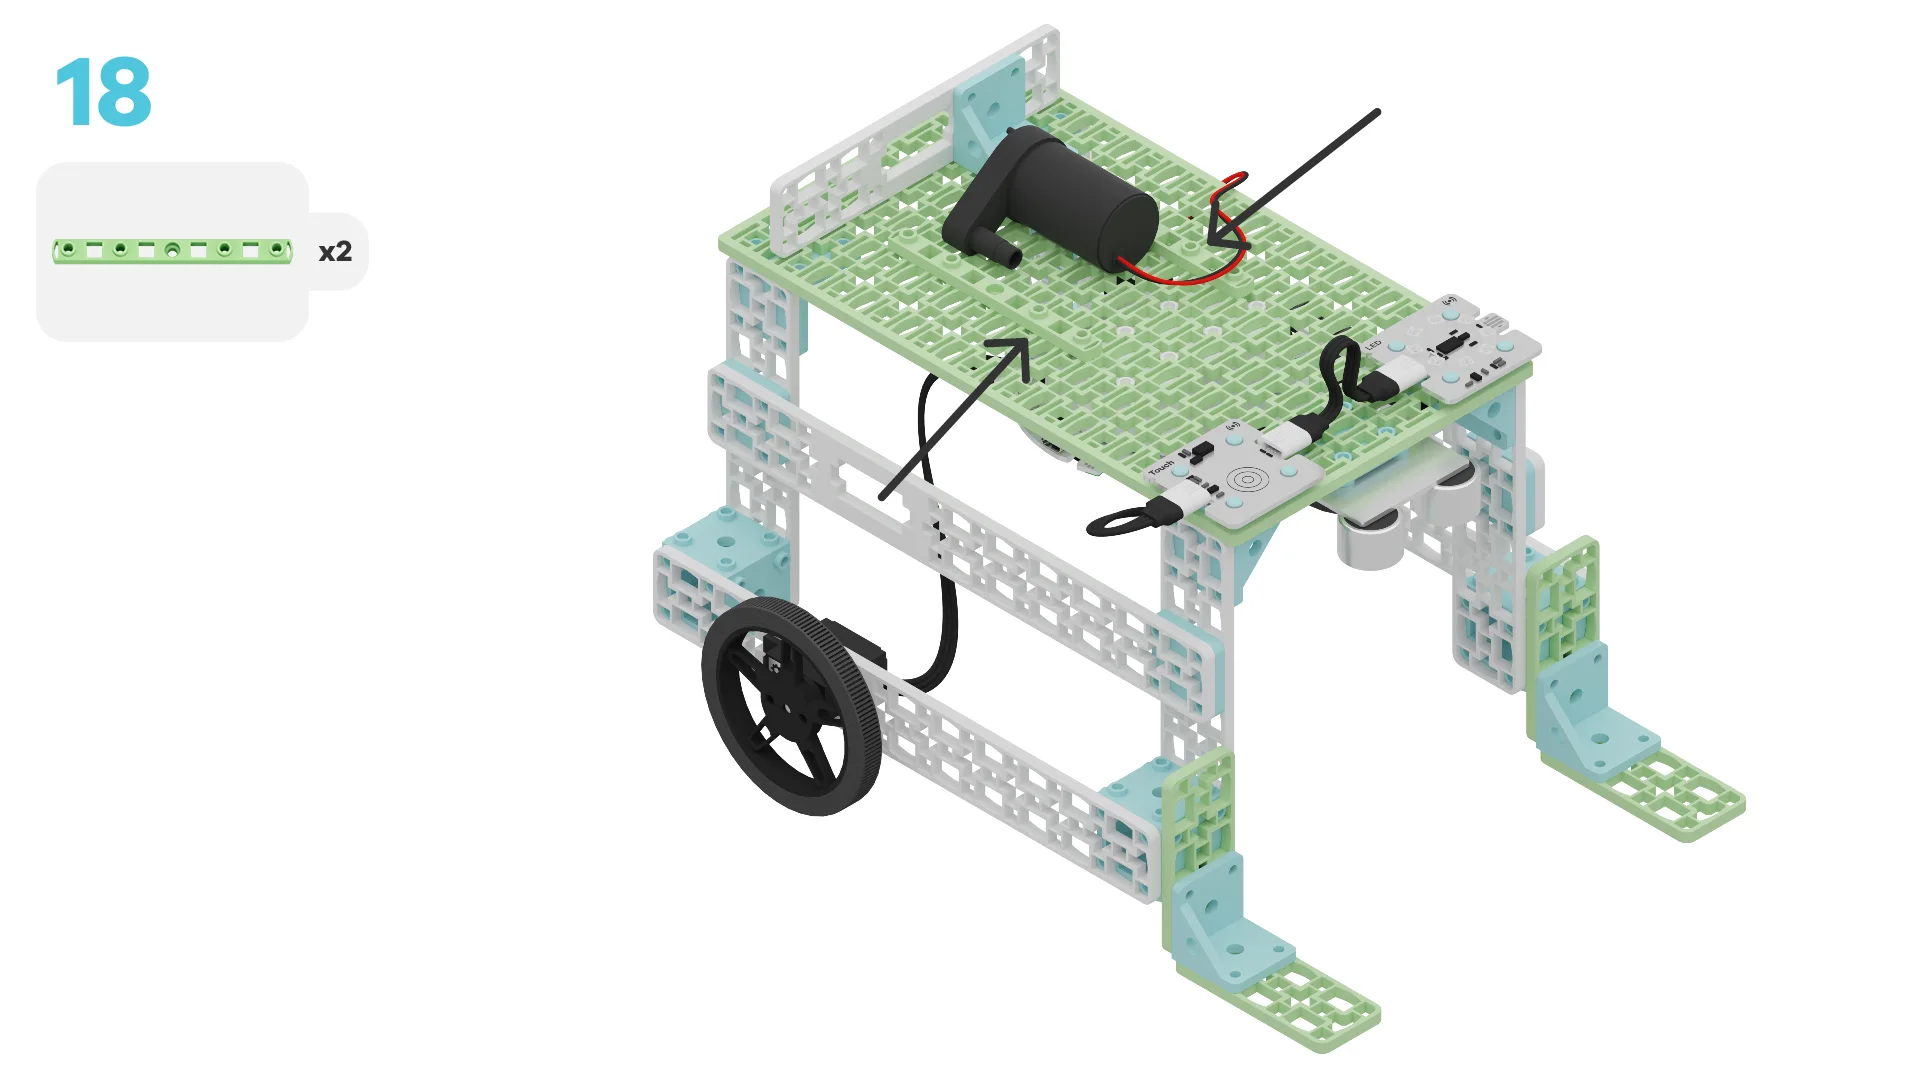
Note: Simply place the pump on top of the vehicle. We will not use water while testing the prototype.
Note: If you'd like to attach the plastic tubing to the pump, you may secure it around this medium frame and pass it through the servo hole. This will help ensure the water comes from the back of the vehicle.
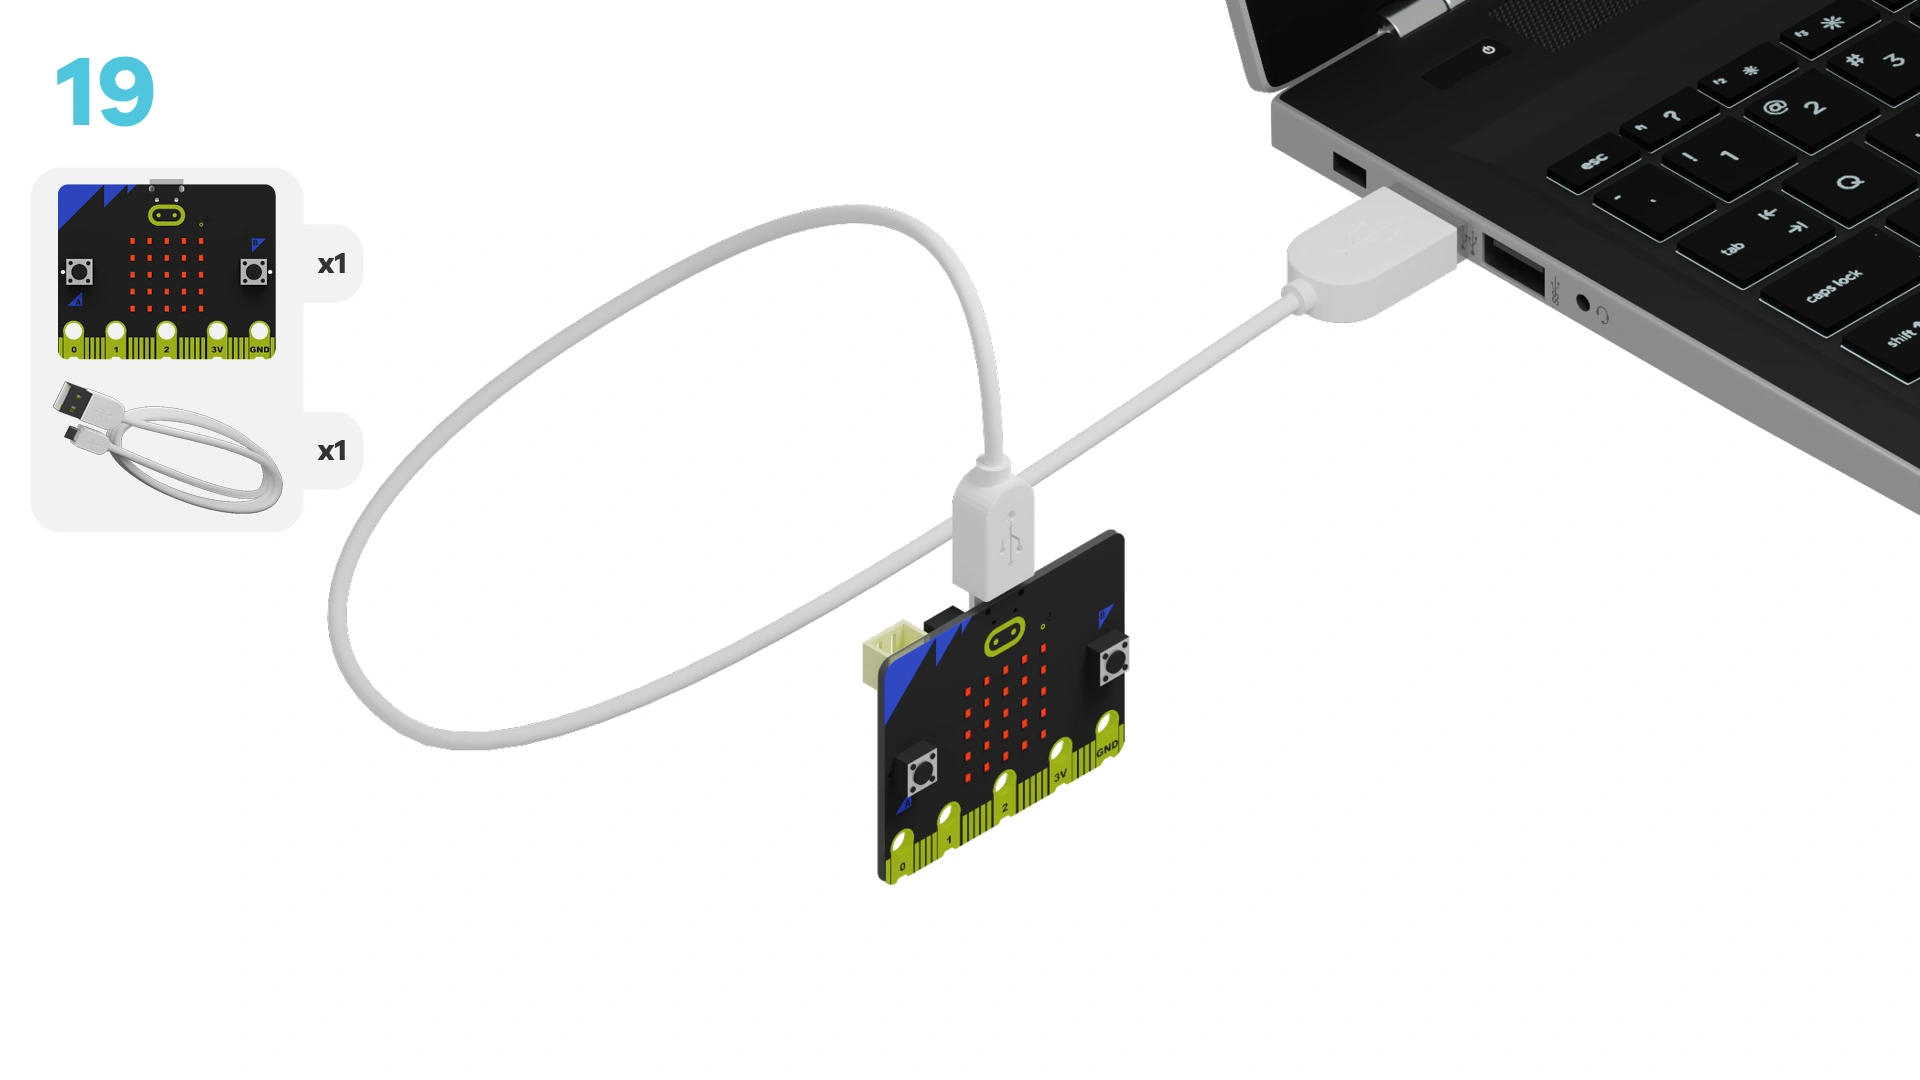
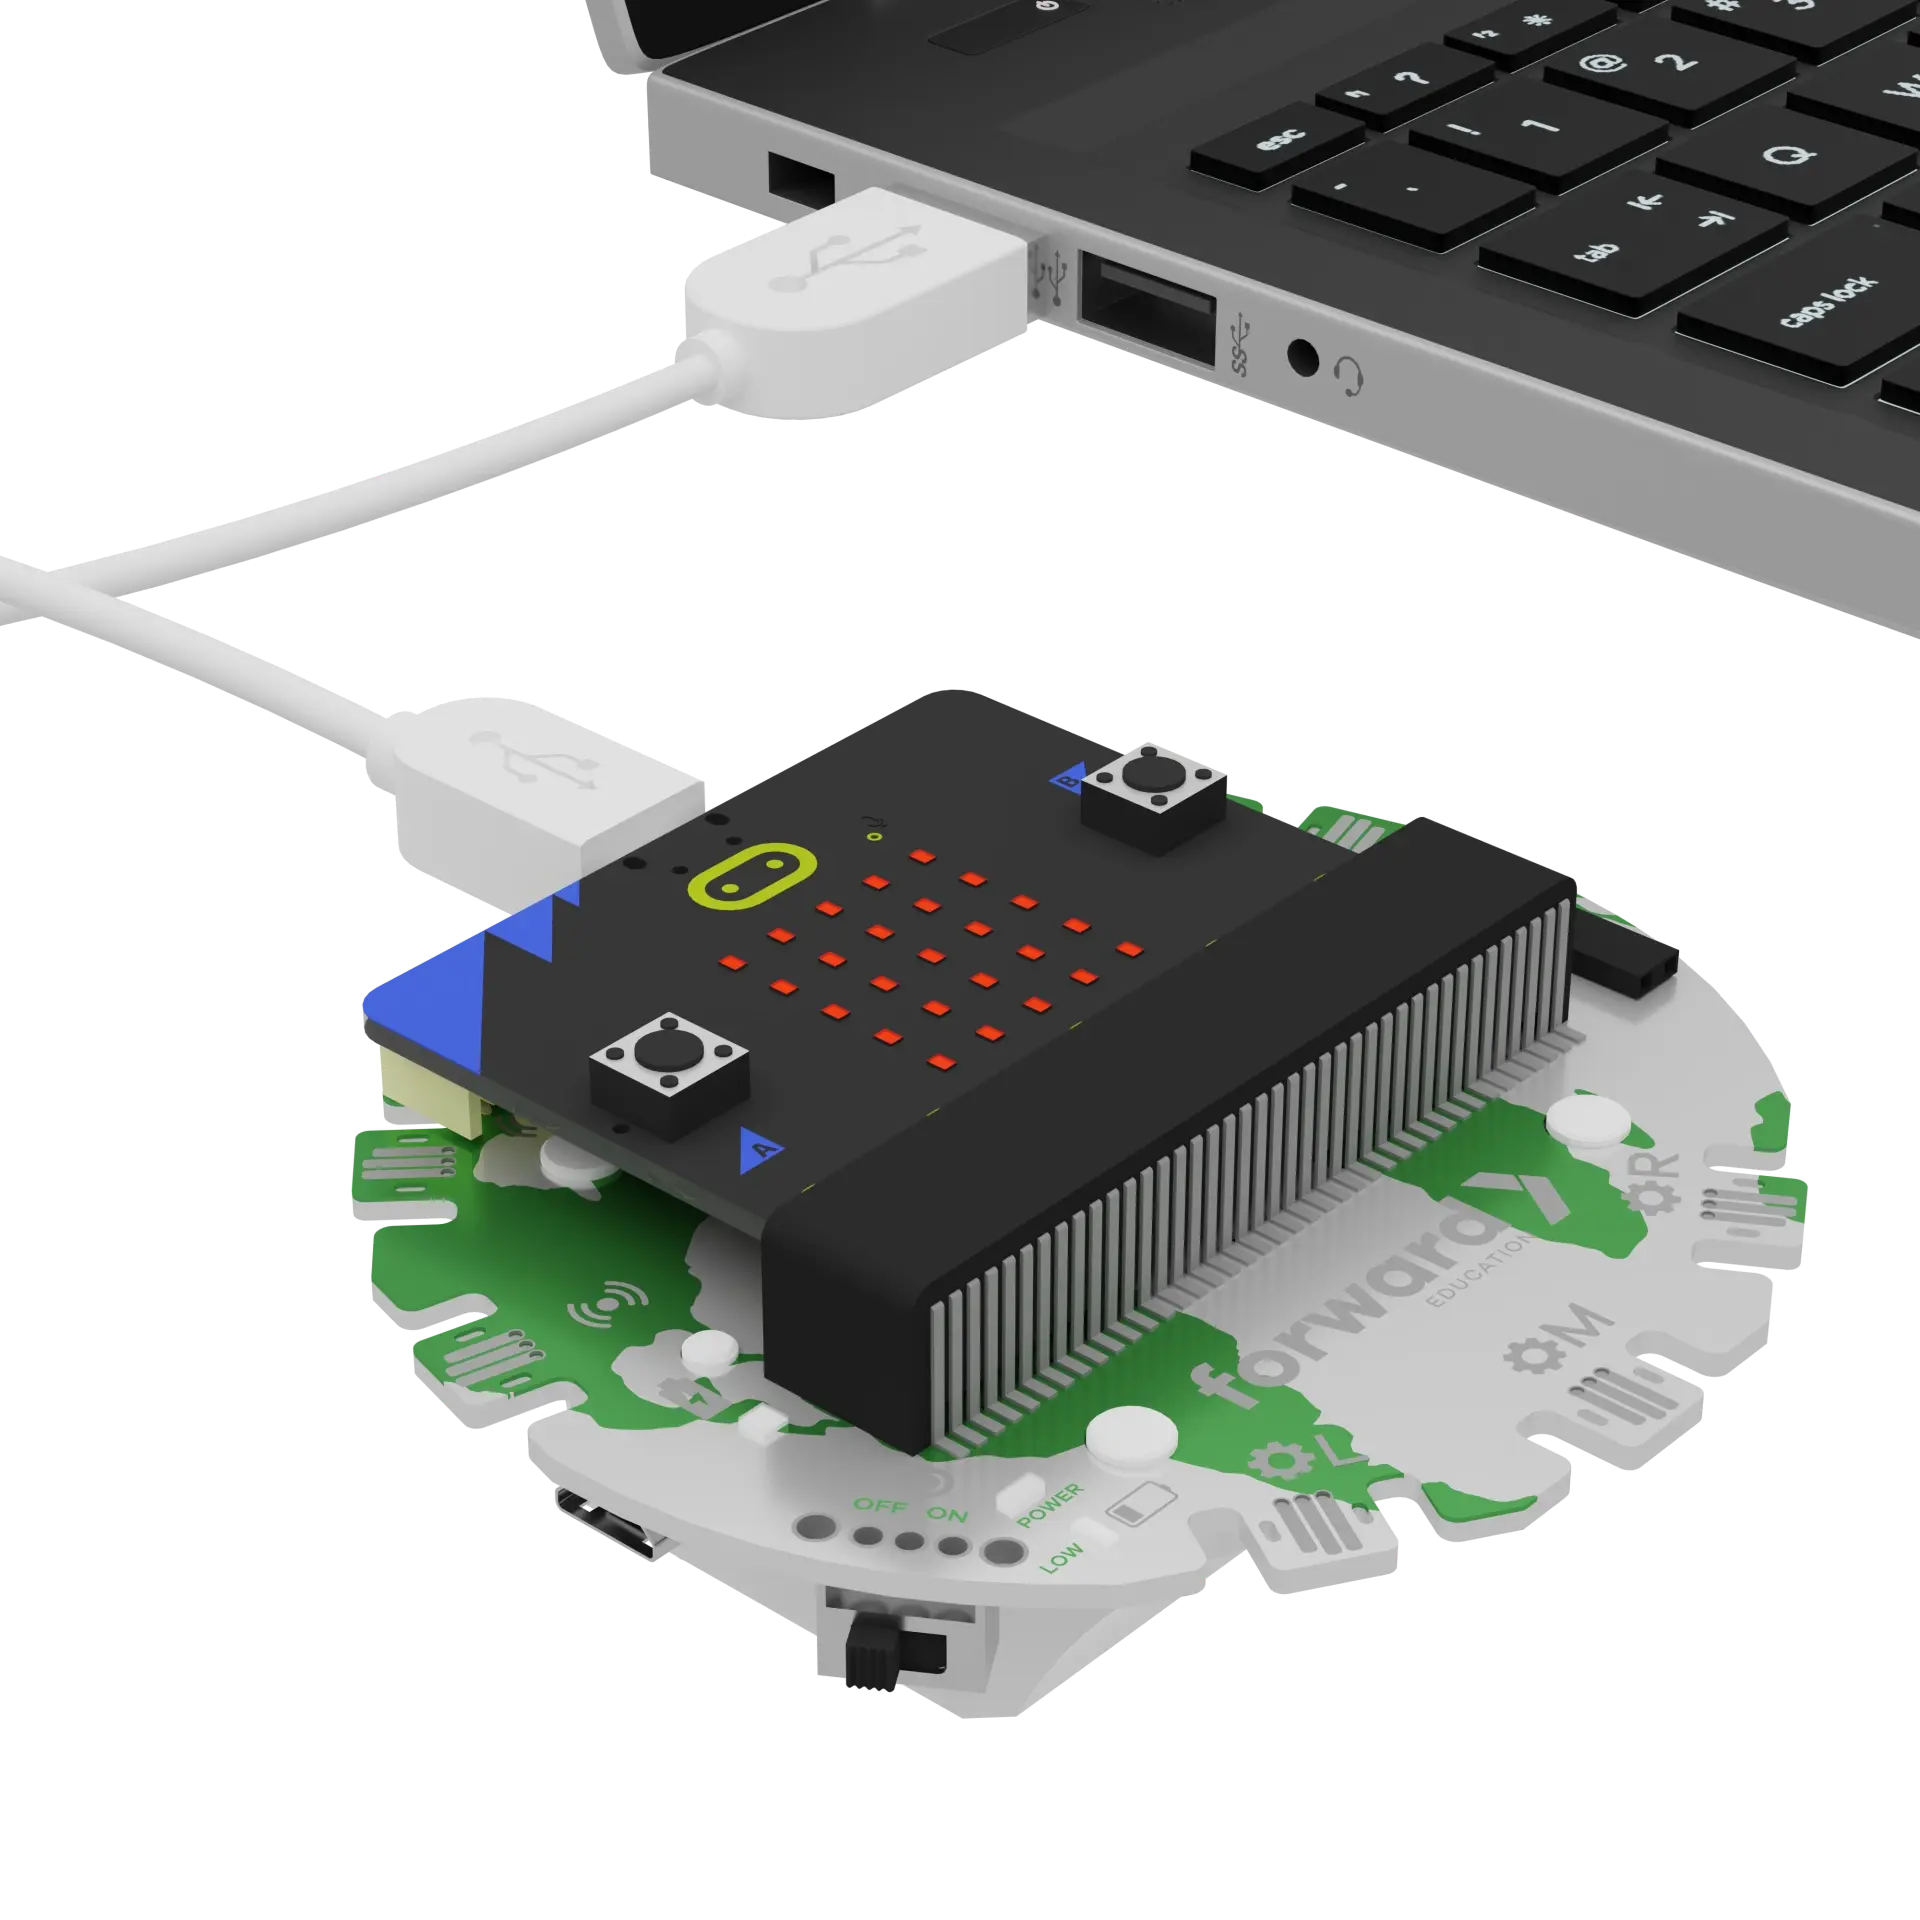
We need to connect our project to the computer to make it come to life with code!
The code will be the instructions that tell our micro:bit what to do.
IMPORTANT! Make sure your Climate Action Kit Breakout Board is turned on and your micro:bit is plugged into your computer.
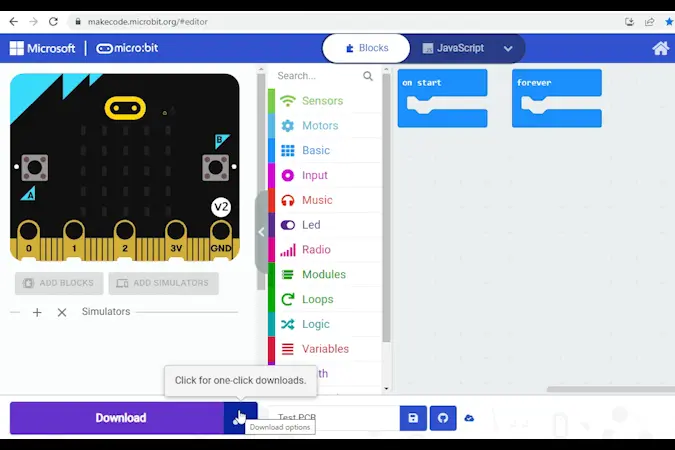
Click the three dots beside the |Download| button, then click on Connect Device.
Next, follow the steps to pair your micro:bit.
Next, click the |Download| button to download the code to your project.
We are now ready to modify our mobile irrigation system!
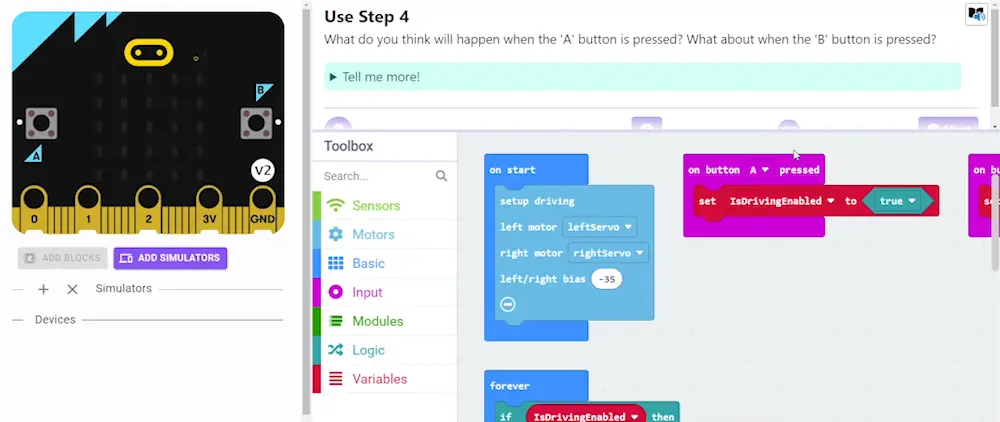
Tutorial Tips
- Follow the steps at the top of the screen.
- When you are ready for more detail, click 'Tell me more!'
- If you need help with the code, click the lightbulb!
- Don't forget to
|Download|and test out any changes you make!
Run the vehicle by pressing the touch sensor. Observe and document what happens.
Pay attention to how the vehicle responds. When does it stop to water? What do the LEDs indicate?
~hint Tell me more! When the touch sensor is activated, the vehicle follows these steps:
- Drives forward for 3 seconds.
- Stops.
- Turns on the green LEDs to indicate watering is about to happen.
- Runs the pump for 1.5 seconds to water the crops.
- Turns on the red LEDs to indicate watering is complete.
This process repeats 4 times. hint~
fwdSensors.touch.fwdOnTouch(jacdac.ButtonEvent.Down, function () {
    for (let index = 0; index < 4; index++) {
        fwdMotors.drive(fwdMotors.DrivingDirection.Forward, 25)
        basic.pause(3000)
        fwdMotors.stop()
        fwdSensors.ledRing.fwdSetAllPixelsColour(0x00ff00)
        fwdMotors.pump.fwdTimedRun(1500)
        basic.pause(3000)
        fwdSensors.ledRing.fwdSetAllPixelsColour(0xff0000)
    }
})
What do you think would happen if you changed the values in the ||basic:pause|| blocks? Make a prediction.
Let's experiment with changing the value in one ||basic:pause|| block at a time.
Change the pause duration in one block, |Download| the new code and observe how it influences the vehicle's behavior. Test different values and note what happens.
fwdSensors.touch.fwdOnTouch(jacdac.ButtonEvent.Down, function () {
    for (let index = 0; index < 4; index++) {
        fwdMotors.drive(fwdMotors.DrivingDirection.Forward, 25)
        // @highlight
        basic.pause(10000)
        fwdMotors.stop()
        fwdSensors.ledRing.fwdSetAllPixelsColour(0x00ff00)
        fwdMotors.pump.fwdTimedRun(1500)
        // @highlight
        basic.pause(500)
        fwdSensors.ledRing.fwdSetAllPixelsColour(0xff0000)
    }
})
How do these changes influence the vehicle's watering output? What happens when you increase or decrease the pause time?
~hint Tell me more!
- The first
||basic:pause||block comes before the||fwdMotors:stop motors||block. It controls how far the vehicle drives before it stops to water the crops. Increasing the pause here means the vehicle drives further between watering points, using less water. - The second
||basic:pause||block comes after the||fwdMotors:run pump||block. It allows for an appropriate delay between watering and driving forward. Decreasing this value too much (e.g. 500 ms) causes the vehicle to move forward while the pump is still running. This makes watering less precise. hint~
fwdSensors.touch.fwdOnTouch(jacdac.ButtonEvent.Down, function () {
    for (let index = 0; index < 4; index++) {
        fwdMotors.drive(fwdMotors.DrivingDirection.Forward, 25)
        // @highlight
        basic.pause(10000)
        fwdMotors.stop()
        fwdSensors.ledRing.fwdSetAllPixelsColour(0x00ff00)
        fwdMotors.pump.fwdTimedRun(1500)
        // @highlight
        basic.pause(500)
        fwdSensors.ledRing.fwdSetAllPixelsColour(0xff0000)
    }
})
Right now, the vehicle stops at regular intervals to water the crops. What if it only stopped after detecting a plant? This would conserve even more water!
What changes would you need to make to the code to ensure the vehicle stops to water only after a crop is detected?
Look at the conditional statement that is already provided in the code.
What condition is being evaluated? How can this help us detect plants?
~hint Tell me more!
- Remember: sonar sensors determine how far away an object (like a plant) is by sending out sound waves and measuring how long it takes for them to bounce back.
- The pre-written conditional statement checks the distance measured by the sonar sensor. It asks if that distance is greater than 0.075 m (7.5 cm).
- In this build, the sensor is about 0.1 m (10 cm) above the ground. If there’s no plant, the sensor will measure a distance of 0.1 m, which triggers the code in the conditional statement.
- If there is a plant, the sensor will measure a distance less than 0.1 m. This triggers the
||logic:else||part of the conditional statement. hint~
basic.forever(function () {
    if (fwdSensors.sonar1.fwdDistancePastThreshold(0.075, fwdSensors.ThresholdDirection.Over)) {

    } else {

    }
})
Your task is to move the blocks inside the ||loops:repeat 4 times|| loop into the ||logic:if-then-else|| block, so that the vehicle only stops to water when it detects a plant beneath the sonar sensor.
First think about which blocks inside the loop need to be moved into the main part of the conditional statement.
In other words, what should happen when no plant is present?
~hint Tell me more!
- When no plant is present, the vehicle should continue to move forward. hint~
basic.forever(function () {
    if (fwdSensors.sonar1.fwdDistancePastThreshold(0.075, fwdSensors.ThresholdDirection.Over)) {
        // @highlight
        fwdSensors.ledRing.fwdSetAllPixelsColour(0xff0000)
        // @highlight
        fwdMotors.drive(fwdMotors.DrivingDirection.Forward, 25)
    } else {

    }
})
Now, think about which blocks inside the loop should be executed when there is a plant.
~hint Tell me more!
- When a plant is detected, the vehicle must stop and water the plant.
- Blocks that execute these actions should be placed in the
||logic:else||part of the conditional statement. hint~
basic.forever(function () {
    if (fwdSensors.sonar1.fwdDistancePastThreshold(0.075, fwdSensors.ThresholdDirection.Over)) {

    } else {
        // @highlight
        basic.pause(2000)
        // @highlight
        fwdMotors.stop()
        // @highlight
        fwdSensors.ledRing.fwdSetAllPixelsColour(0x00ff00)
        // @highlight
        fwdMotors.pump.fwdTimedRun(1500)
        // @highlight
        basic.pause(3000)
    }
})
Let's spend some time optimizing our vehicle to conserve even more water!
We've arbitrarily chosen 0.075 m as our threshold for plant detection, but you can adjust the distance in the conditional statement to reflect the items you are using to represent plants.
How far is the top of your "plant" from the sonar sensor? Experiment with different values to find the optimal distance for detecting a plant. What distance allows the vehicle to detect the plant reliably? More reliable detection will lead to increased water savings.
basic.forever(function () {
    // @highlight
    if (fwdSensors.sonar1.fwdDistancePastThreshold(0.06, fwdSensors.ThresholdDirection.Over)) {
        fwdSensors.ledRing.fwdSetAllPixelsColour(0xff0000)
        fwdMotors.drive(fwdMotors.DrivingDirection.Forward, 25)
    } else {
        basic.pause(2000)
        fwdMotors.stop()
        fwdSensors.ledRing.fwdSetAllPixelsColour(0x00ff00)
        fwdMotors.pump.fwdTimedRun(1500)
        basic.pause(3000)
    }
})
Since the water is pumped from the back of the vehicle, it shouldn’t stop as soon as it detects a plant. The vehicle should drive forward slightly prior to turning the pump on.
Adjust how long the vehicle drives after it detects a plant. Experiment with the delay time to find the best setting for effective watering. What delay ensures the plant is watered effectively after detection?
basic.forever(function () {
    // @hightlight
    if (fwdSensors.sonar1.fwdDistancePastThreshold(0.075, fwdSensors.ThresholdDirection.Over)) {
        fwdSensors.ledRing.fwdSetAllPixelsColour(0xff0000)
        fwdMotors.drive(fwdMotors.DrivingDirection.Forward, 25)
    } else {
        // @highlight
        basic.pause(2000)
        fwdMotors.stop()
        fwdSensors.ledRing.fwdSetAllPixelsColour(0x00ff00)
        fwdMotors.pump.fwdTimedRun(1500)
        basic.pause(3000)
    }
})
Setup a field of "crops" with your objects. Then, run the vehicle with the modified code.
Observe its behavior. Does it stop to water when it detects a plant? If not, refine your code.
Consider how much water this prototype will conserve compared to a vehicle that waters continuously or at regular intervals.
How might you mathematically model water usage in this prototype?
You've completed the activity!
What challenges did you face during this activity? How did you overcome them?
What did you learn about using conditional statements and timing to control a system?
In the next step, you can click the |Done| button to finish the tutorial.
