Swing's core approach to visualizing large sets of data as lists, trees or tables is to use renderers that "rubber stamp" individuals cells during the drawing pass.
For example, a table with 20 rows and 10 columns does not contain 200 child views (or one for each cell). Instead, the JTableColumn.setCellRenderer and JTable.setDefaultRenderer APIs are used to configure the renderer(s) for specific data types (checkbox for boolean values, labels for strings, etc). At runtime, the same renderer instance is used to paint (or rubber stamp) the visuals for all the cells in the column or of the specific data type. Transitioning to the edit mode (usually double-clicking a cell) adds an actual interactive child hierarchy configured by JTableColumn.setCellEditor, JTable.setDefaultEditor and JTable.setCellEditor.
The org.pushingpixels.radiance.theming.api.renderer package provides base renderer classes for consistent layout metrics and visuals. The following classes extend the matching default core renderers and apply consistent margins, paddings, fonts, foreground and background colors (including highlight animations), as well as odd-even background striping:
RadianceDefaultListCellRendererforJListRadianceDefaultComboBoxRendererforJComboBoxRadianceDefaultTreeCellRendererforJTreeRadianceDefaultTableCellRendererforJTableRadianceDefaultTableHeaderCellRendererforJTableHeader
If you do not configure a custom renderer for one of your data containers, a matching default renderer provided by Radiance will be used. Otherwise, it is highly recommended to extend the matching renderer classes for consistent visuals throughout your app.
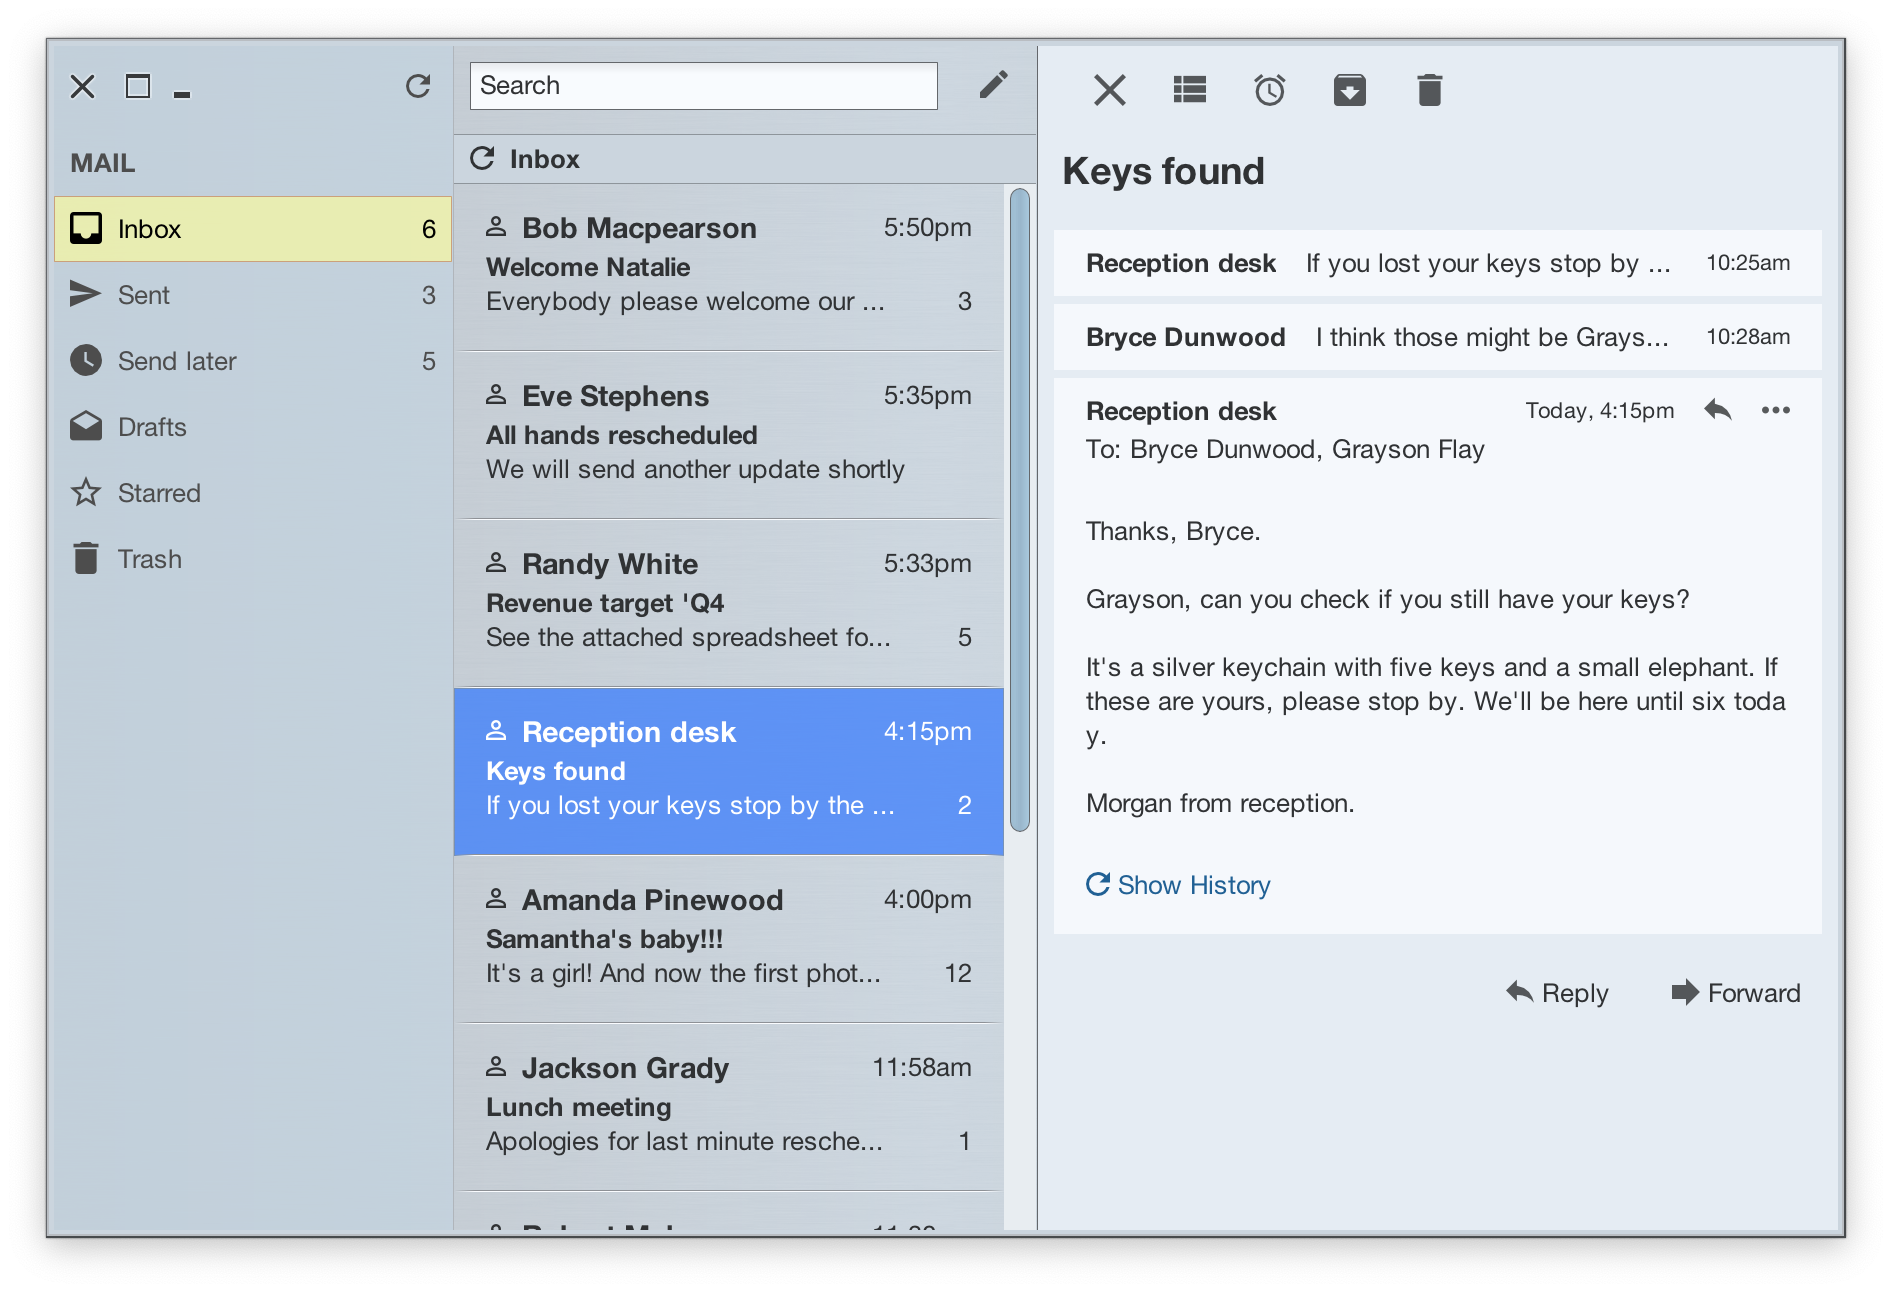
VisorMail demo app illustrates the usage of RadiancePanelListCellRenderer base class for more complex JList content. It is used in the destinations list on the left to host three labels (icon, destination name, unread count) and in the threads list in the middle to host six labels across three rows.
In both cases the highlights configured on the matching decoration areas provide "special" visuals for highlighted rows - those that are in selected, rollover, armed or pressed state. In addition to configuring the background and foreground colors for the highlights at the skin level, the flow of layout and data binding when you use the RadiancePanelListCellRenderer base class is:
- In your renderer constructor, add all sub-components to your renderer and define the layout constraints.
- In
bindData(JList, Object, int)bind the relevant data fields to those sub-components. - Use
registerThemeAwareLabelsWithText(JLabel...)in the constructor to "mark" those sub-component labels that should participate in highlight animations on their text based on the current state (rollover, selection, etc). In case a specific label is using a fixed foreground / text color for some of the rows in your list, useregisterThemeAwareLabelsWithText(JLabel...)andunregisterThemeAwareLabelsWithText(JLabel...)inonPreRender(JList, Object, int)instead of in the constructor. - Use
registerThemeAwareLabelWithIcon(JLabel, RadianceIcon.Factory, Dimension)}in the constructor to "mark" those sub-component labels that should participate in highlight animations on their icons based on the current state (rollover, selection, etc). In case a specific label is using a fixed icon for some of the rows in your list or different icon sources for different rows, useregisterThemeAwareLabelWithIcon(JLabel, RadianceIcon.Factory, Dimension)andunregisterThemeAwareLabelWithIcon(JLabel)inonPreRender(JList, Object, int)instead of in the constructor.
Here is how this flow looks like for the leftmost destinations list. The data model content is configured statically in this sample app:
JList<DestinationInfo> destinationList = new JList<>(new DestinationListModel(
    new DestinationInfo(ic_inbox_black_24px.factory(), "Inbox", 6),
    new DestinationInfo(ic_send_black_24px.factory(), "Sent", 3),
    new DestinationInfo(ic_watch_later_black_24px.factory(), "Send later", 5),
    new DestinationInfo(ic_drafts_black_24px.factory(), "Drafts", -1),
    new DestinationInfo(ic_star_border_black_24px.factory(), "Starred", -1),
    new DestinationInfo(ic_delete_black_24px.factory(), "Trash", -1)));
destinationList.setCellRenderer(new DestinationRenderer());
We extend the base Radiance panel-based renderer:
private static class DestinationRenderer extends
        RadiancePanelListCellRenderer<DestinationInfo> {
    private JLabel iconLabel;
    private JLabel titleLabel;
    private JLabel unreadLabel;
The constructor uses FormLayout to configure the layout constraints and registers the three labels to be theme-aware so that at runtime these labels will participate in correct highlight animation sequences driven by Radiance:
public DestinationRenderer() {
    FormBuilder builder = FormBuilder.create().
          columns("center:pref, 4dlu, fill:pref:grow, 4dlu, center:pref").
          rows("p").
          padding(new EmptyBorder(8, 8, 8, 8));

    this.iconLabel = new JLabel();
    this.titleLabel = new JLabel();
    this.unreadLabel = new JLabel();
    builder.add(this.iconLabel).xy(1, 1);
    builder.add(this.titleLabel).xy(3, 1);
    builder.add(this.unreadLabel).xy(5, 1);

    // Register the text labels so that they get the right colors on rollover,
    // selection and other highlight effects
    this.registerThemeAwareLabelsWithText(this.iconLabel, this.titleLabel, this.unreadLabel);

    this.setLayout(new BorderLayout());
    this.add(builder.build(), BorderLayout.CENTER);

    this.setOpaque(false);
}
The data binding pass wires the data from the data model to the labels that are part of our renderer:
@Override
protected void bindData(JList<? extends DestinationInfo> list,
        DestinationInfo value, int index) {
    this.titleLabel.setText(value.title);
    this.unreadLabel.setText(value.unread > 0 ? Integer.toString(value.unread) : "");
}
And finally, we configure the icon factory for the renderer based on the data model so that it is properly colorized for highlight animations:
@Override
protected void onPreRender(JList<? extends DestinationInfo> list,
        DestinationInfo value, int index) {
    // Register the matching icon factory here without setting the actual icon. The
    // icon will be created and colorized by Radiance runtime based on the highlight
    // state of the specific row at render time
    this.registerThemeAwareLabelWithIcon(this.iconLabel, value.iconFactory,
            new Dimension(16, 16));
}
At runtime, the highlighted destination is using the light-yellow background fill and slightly darker text / icon foreground colors. The same flow applies to the threads list that is using white-on-blue highlight visuals for its content.
For more complex JTree content, use RadiancePanelTreeCellRenderer with the same flow of layout and data binding as for complex lists:
- In your renderer constructor, add all sub-components to your renderer and define the layout constraints.
- In
bindData(JTree, Object, int)bind the relevant data fields to those sub-components. - Use
registerThemeAwareLabelsWithText(JLabel...)in the constructor to "mark" those sub-component labels that should participate in highlight animations on their text based on the current state (rollover, selection, etc). In case a specific label is using a fixed foreground / text color for some of the rows in your tree, useregisterThemeAwareLabelsWithText(JLabel...)andunregisterThemeAwareLabelsWithText(JLabel...)inonPreRender(JTree, Object, int)instead of in the constructor. - Use
registerThemeAwareLabelWithIcon(JLabel, RadianceIcon.Factory, Dimension)}in the constructor to "mark" those sub-component labels that should participate in highlight animations on their icons based on the current state (rollover, selection, etc). In case a specific label is using a fixed icon for some of the rows in your list or different icon sources for different rows, useregisterThemeAwareLabelWithIcon(JLabel, RadianceIcon.Factory, Dimension)andunregisterThemeAwareLabelWithIcon(JLabel)inonPreRender(JTree, Object, int)instead of in the constructor.
