-
-
Notifications
You must be signed in to change notification settings - Fork 1.3k
Behringer Cmd Studio 2A
This is the Work in progress page of Behringer CMD Studio 2a mapping for Mixxx
Ultra-Portable Dual-Deck DJ MIDI Controller with 4-Channel Audio Interface

The Behringer CMD Studio 2a is a 2 deck DJ MIDI controller and has a 4 channel (one stereo master, one stereo headphones) USB sound card built in.
- Mixxx Forum Thread
- Manufacturer's product page
- Manufacturer's product downloads page
- Manufacturer's quick start guide
- Master output: channels 1-2
- Headphone output: channels 3-4
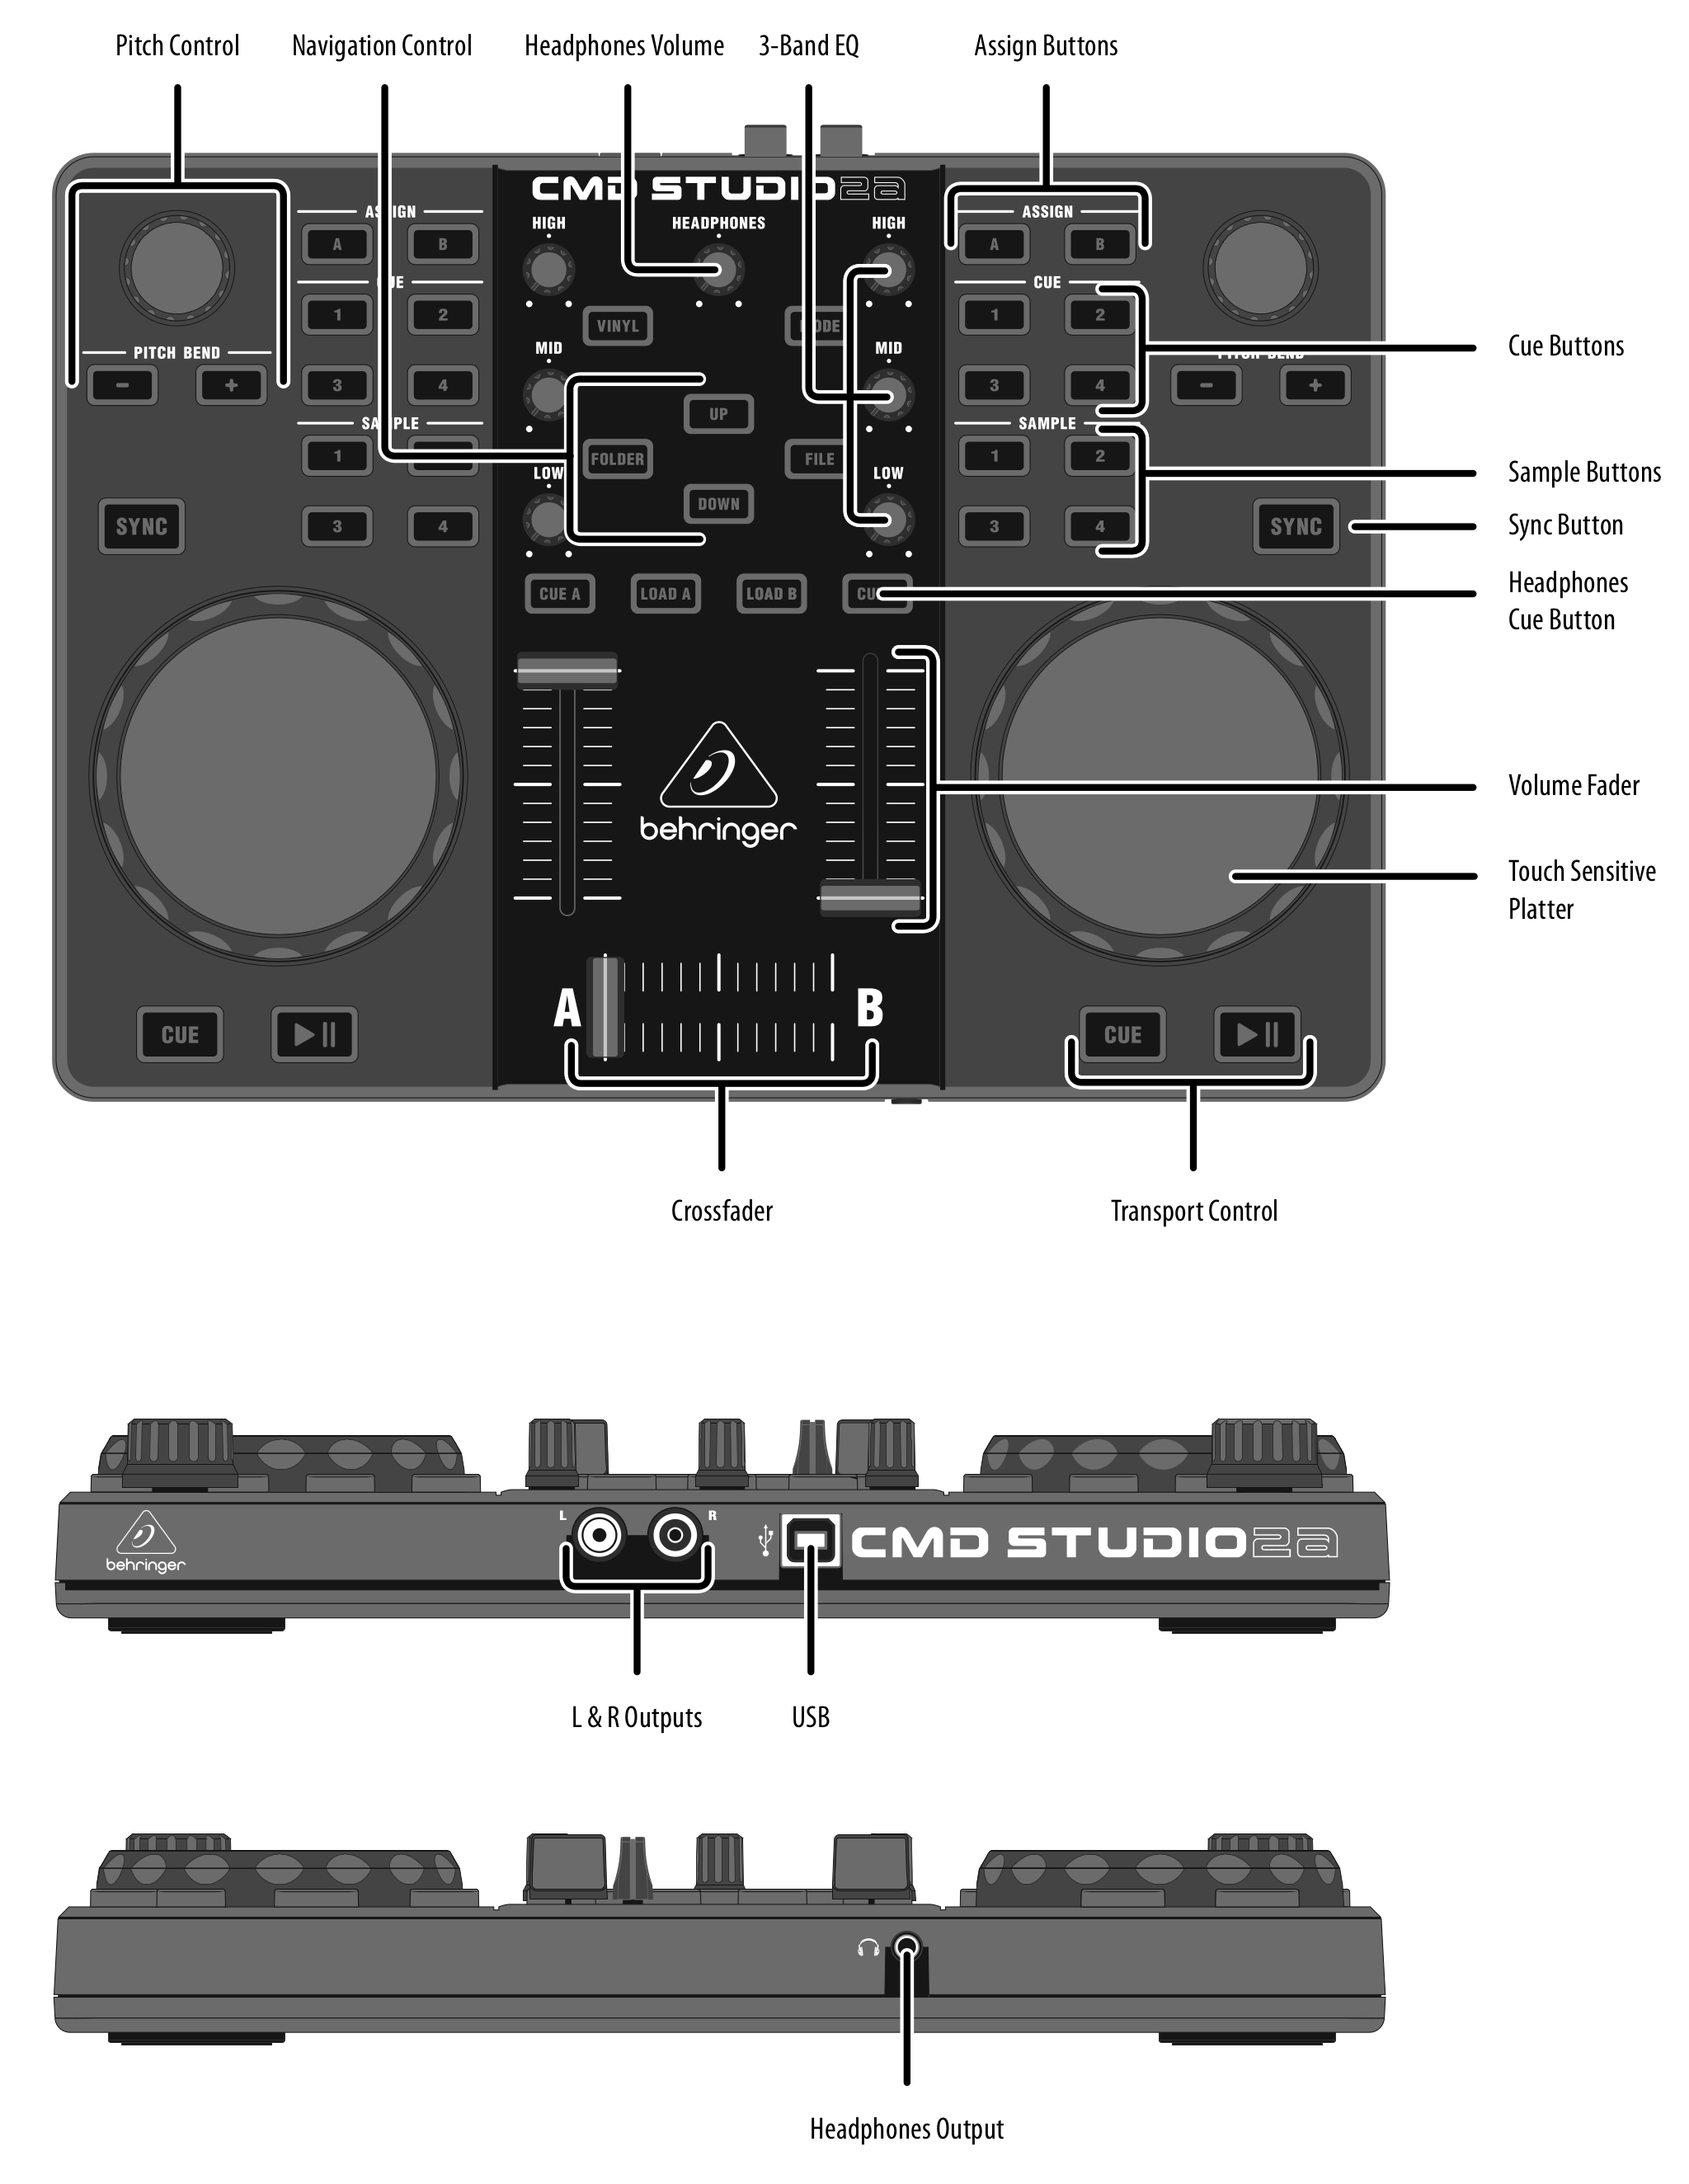
All the buttons and knobs on the controller behave as they are labelled:

However, some buttons (Mode, Vinyl, Assign A and Assign B) require extra explanations.
- The HIGH, MID, and LOW EQ knobs, deck faders, crossfader, CUE A and CUE B buttons (headphone monitoring), and headphone knob (head gain), all operate as labelled.
- The FOLDER button focus on folders tree and expand/collapses library items.
- The FILE button focus on files list.
- The UP and DOWN buttons change the selected item (file or folder) up or down one by one. If MODE button is active, file selection moves up or down ten by ten.
- The LOAD A and LOAD B buttons will load the currently highlighted track in the library window into deck A or B.
- The deck CUE, PLAY and SYNC buttons work as labelled (SYNC toggles master sync for the deck).
- While a track is playing, spinning the wheels temporarily speeds up or slows down the track.
- When a track is stopped, spinning the wheels results in a fast search.
- When the top wheel surface is touched the wheels act as as a precision jog.
- When the VINYL button is activated, moving the wheel while touching the top surface scratches the track.
- If not currently set, pressing a HOT CUE button sets that hot cue at the current playback position.
- If already set, pressing a HOT CUE button jumps to that hot cue position.
- If the MODE button is active, pressing an already set HOT CUE button will clear that hot cue.
- The pitch knobs control the pitch sliders in Mixxx and change the tempo permanently.
- The PITCH BEND +/- buttons step the playback rate up or down temporally while pressed.
- The PITCH BEND +/- buttons reset the tempo to normal rate when both are pressed simultaneously.
- ASSIGN A button activates loop mode.
- ASSIGN B button toggles loop enabled.
- When loop mode is active, +/- buttons set loop in and loop out points.
- The MODE button has three states: off, shifted and locked. When off, led is orange. When shifted, led is blinking blue. When locked, led is blue.
- Pressing the MODE button once activates shifted mode. Pressing the button twice activates the locked mode. Pressig again toggles mode off.
- When MODE is shifted, next action will determine a different MODE state. Navigation up or down into library sets the state to locked. Other actions sets to off.
- Tapping either of the 2 FX ASSIGN buttons on each deck will toggle the deck's output to one (or both) of two effects in the (default) 4-unit effects rack. The left deck (A or C) can be assigned to effect units 1 and/or 2. The right deck (B or D) can be assigned to effect units 3 and/or 4.
- *Holding* an FX ASSIGN button allows the effect in that effect unit to be changed using the BROWSE LEFT/RIGHT buttons.
DEL-mode is activated by *tapping* the deck's hot cue DEL button (the button will light up blue). This is equivalent to a shift button on other controllers and so changes the behaviour of a number of the controller buttons as follows:
- The HOT CUE buttons act as auto-loop triggers (when *held*) in DEL-mode. The button layout follows the default "LateNight" skin (i.e. top row = [1/8] to [1], bottom row = [2] to [16] beats). Longer auto-loops can be "locked" (so the HOT CUE button doesn't have to be held) by pressing the LOOP ON/OFF button after an auto-loop is selected, (locked/playing auto-loops can also be resized by selecting a different auto-loop and then re-locking the new size with the LOOP ON/OFF button).
- The CUE button triggers reverse playback (while *held*).
- The PLAY button triggers reverse-slip playback (while *held*). NB: if you already have slip-mode activated before you trigger reverse-slip playback, (e.g. by having pressed FX-Control button 1), then slip-mode will be turned off as soon as you release the PLAY button (and you will return to the playback point where you would have been if you hadn't altered the playback).
- The PITCH BEND +/- buttons step the key up/down without altering the playback rate. If both PITCH BEND buttons are pressed together, the playback key is reset to normal.
There are no "slip-mode aware" skins in Mixxx yet so the auto-loop behaviour of this controller (which *is* "slip-mode aware") may be a little different than you might expect to take advantage of this feature.
- Auto-loop buttons are (by default) only active when held.
- In slip-mode, releasing an auto-loop button will immediately "re-sync" playback (by disabling, then immediately re-enabling slip mode), you may see the slip-mode button flash briefly when this happens. This allows for some very interesting "slip-auto-loop" effects.
Mixxx is a free and open-source DJ software.
Manual
Hardware Compatibility
Reporting Bugs
Getting Involved
Contribution Guidelines
Coding Guidelines
Using Git
Developer Guide
Creating Skins
Contributing Mappings
Mixxx Controls
MIDI Scripting
Components JS
HID Scripting
