-
Notifications
You must be signed in to change notification settings - Fork 2.5k
New issue
Have a question about this project? Sign up for a free GitHub account to open an issue and contact its maintainers and the community.
By clicking “Sign up for GitHub”, you agree to our terms of service and privacy statement. We’ll occasionally send you account related emails.
Already on GitHub? Sign in to your account
Consider Integration of KubeBlocks for Enhanced Database Management in OpenIM #1088
Comments
|
This issue is stale because it has been open 60 days with no activity. Remove stale label or comment or this will be closed in 7 days. |
KubeBlocks 学习和调研报告服务非常专业,非常热情 安装非常方便 基于 Kubernetes ,https://console.apecloud.cn/ 选择下面这个 KubeBlocks Anywhere Kubeblock 会 询问你一些问题,然后引导你下载 YAML 运行 一旦安装了引导YAML文件,目标的状态将反映在状态面板中。一般需要1-2分钟完成注册。 速度非常快,没有障碍。 安装的步骤:
为什么需要我们知道,因为 OpenIM 的数据库非常多,现在为止,用到了 Mysql,Redis,Mongo Kubernetes 最开始是并不合适做有状态数据库管理的。 Deployment 中滚动更新和升级中哪个 Pod 能下线是不能随便选择的,可能数据库有主从模式,这种场景下光靠 Deployment 自己就很难应对了。 虽然 Kubernetes 提供了另一个抽象方式,帮助我们应对其他一些用 Deployment 无法处理的应用编排场景,这个设计就是对有状态应用的管理,StatefulSet Deployment 不足以颠覆所有的应用问题,deployment 对应用做了一个简单的假设,所有的应用 pod 都是一样的,相互之间没有顺序,也无所谓在哪台宿主机上运行。需要时 Deployment 就可以通过 Pod 模板创建新的 Pod 。不需要的时候可以随时终结一个 Pod。 但是分布式应用中,它的多个实例往往有多种关系,比如说 主从关系,主备关系;还有数据库存储类应用。它的多个实例往往会在本地磁盘上保存一份数据,而这些实例一旦被结束,即使重建出来,实例和数据之间对应的关系也已经丢失,导致应用失败。 所以说,实例之间有一种不平等的关系,以及实例对外部数据有依赖的应用,就称之为有状态应用。 Kubernetes 对 Deployment 基础上扩展了对有状态应用的基本支持,编排功能就是 StatefluSet 它抽象出来了两种情况:
与云提供商集成的困难,缺乏可靠的运营商,以及学习的难度 K8S曲线KubeBlocks提供了一个开源选项,可以帮助应用程序开发人员和平台 工程师为RDBMS、NoSQL、流媒体和分析系统设置了功能丰富的服务。 不需要成为K8的专业人士,任何人都可以建立一个完整的堆栈,生产就绪型数据基础架构。 Enhanced stateful workloadsKubeBlocks扩展了K8的StatefulSet功能,支持ReplicationSet和PocksusSet工作负载。 他们知道数据库集群中的不同角色,并选择对业务连续性影响最小的最佳更新策略,监控数据复制状态并自动修复错误和延迟。 KubeBlocks处理复杂性,并为MySQL,PostgreSQL,Redis和MongoDB提供最先进的管理体验。 它提供了按需配置、扩展、监控、备份和恢复,降低了数据库管理的风险和从开发到生产所需的时间。 强大而直观的CLI ClickOps以耗时和容易出错而闻名。KubeBlocks为生产力提供了kblog。您可以安装KubeBlocks,并使用单个命令在桌面或云端上启动游乐场环境。kbstrike简化了在Kubernetes中使用data infra的学习曲线。 KubeBlocks 解决了哪些问题(参考官方文档)Kubernetes已经成为容器编排的事实标准。它通过ReplicaSet提供的可扩展性和可用性以及Deployment提供的推出和回滚功能来管理数量不断增加的无状态工作负载。 然而,管理有状态工作负载对Kubernetes提出了巨大的挑战。虽然StatefulSet提供了稳定的持久存储和唯一的网络标识符,但这些能力对于复杂的有状态工作负载来说还远远不够。 为了应对这些挑战,并解决复杂性问题,KubeBlocks引入了ReplicationSet和ReplicsusSet,具有以下功能:
关键特征
安装 kbcup只需要一条命令部署: curl -fsSL https://kubeblocks.io/installer/install_cli.sh | bash尝试KubeBlocks的最快方法是创建一个新的Kubernetes集群,并使用playground安装KubeBlocks。但是,生产环境更加复杂,应用程序运行在不同的命名空间中,并且具有资源或权限限制。 命令 kbcli kubeblocks install查看可用版本。 kbcli kubeblocks list-versions使用 kbcli kubeblocks install --version=x.x.x验证: kbcli kubeblocks status除此之外,还可以 使用Helm安装KubeBlocks 如果你用Helm安装KubeBlocks,要卸载它,你也必须使用Helm。 helm repo add kubeblocks https://apecloud.github.io/helm-charts
helm repo update
helm install kubeblocks kubeblocks/kubeblocks \
--namespace kb-system --create-namespace运行以下命令,检查KubeBlocks是否安装成功。 kbcli kubeblocks status升级升级对于用户来说是尤为重要的,我们来看下 kubeblocks 如何升级 KubeBlocks 0.6版本与0.5版本相比有许多图像更改。升级过程中,如果集群中有多个数据库实例,同时拉取镜像可能会导致实例长时间不可用。 链接数据库在部署KubeBlocks并创建集群之后,数据库将作为Pod在Kubernetes上运行。您可以通过客户端接口或
在测试环境中连接数据库程序1.使用kblog cluster connect命令 您可以使用 kbcli cluster connect ${cluster-name}下面的命令实际上是 程序2.使用CLI或SDK客户端连接数据库 执行以下命令,获取目标数据库的网络信息,并使用打印的IP地址进行连接。 kbcli cluster connect --show-example ${cluster-name}打印的信息包括数据库地址,端口号,用户名密码下图是MySQL数据库网络信息示例。
在生产环境中连接数据库在生产环境中,通常使用CLI和SDK客户端连接数据库。有三种情况。
请参阅下图以获得网络位置的清晰图像。 步骤3.连接同一Kubernetes集群中的数据库 您可以使用数据库连接的域名或网址。要检查数据库端点,请使用 kbcli cluster describe x可观测性通过内置的数据库可观察性,您可以观察数据库的健康状态,并实时跟踪和测量数据库,以优化数据库性能。本节向您展示数据库监控工具如何与KubeBlocks一起工作以及如何使用该函数。 KubeBlocks通过插件的方式集成了Prometheus、AlertManager、Grafana等开源监控组件,并采用自定义的 KubeBlock Playground支持以下内置监控插件:
查看所有内置加载项并确保已启用监视加载项。 # View all add-ons supported
kbcli addon list
...
grafana Helm Enabled true
alertmanager-webhook-adaptor Helm Enabled true
prometheus Helm Enabled alertmanager true
...查看仪表板列表。 kbcli dashboard list
>
NAME NAMESPACE PORT CREATED-TIME
kubeblocks-grafana kb-system 13000 Jul 24,2023 11:38 UTC+0800
kubeblocks-prometheus-alertmanager kb-system 19093 Jul 24,2023 11:38 UTC+0800
kubeblocks-prometheus-server kb-system 19090 Jul 24,2023 11:38 UTC+0800打开并查看监控仪表板的Web控制台。比如说, kbcli dashboard open kubeblocks-grafana启用监控功能KubeBlocks提供了一个插件
|
KubeBlocks Learning and Research ReportServeVery professional and very enthusiastic InstallVery convenient Based on Kubernetes, https://console.apecloud.cn/ Select the following KubeBlocks Anywhere Kubeblock will ask you some questions and then guide you to download YAML Run Once the bootstrap YAML file is installed, the status of the target will be reflected in the status panel. It usually takes 1-2 minutes to complete registration. Very fast and no obstacles. Installation steps:
Why is it needed?We know that because OpenIM has many databases, so far, Mysql, Redis, and Mongo have been used. Kubernetes was not suitable for stateful database management at first. Which Pod can go offline during rolling updates and upgrades in a Deployment cannot be chosen arbitrarily. The database may have a master-slave mode. In this scenario, it is difficult for the Deployment alone to cope with it. Although Kubernetes provides another abstraction method to help us deal with other application orchestration scenarios that cannot be handled by Deployment, this design is the management of stateful applications, StatefulSet Deployment is not enough to solve all application problems. Deployment makes a simple assumption about the application. All application pods are the same, there is no order between them, and it does not matter which host they are running on. Deployment can create new Pods through Pod templates when needed. You can terminate a Pod at any time when it is no longer needed. However, in distributed applications, multiple instances often have multiple relationships, such as master-slave relationship, master-slave relationship; and database storage applications. Its multiple instances often save a copy of data on the local disk. Once these instances are terminated, even if they are rebuilt, the corresponding relationship between the instances and the data has been lost, causing the application to fail. Therefore, applications that have an unequal relationship between instances and have dependencies on external data are called stateful applications. Kubernetes extends basic support for stateful applications based on Deployment. The orchestration function is StatefluSet It abstracts two situations:
Difficulty integrating with cloud providers, lack of reliable operators, and difficulty learning K8S Curve KubeBlocks provides an open source option to help application developers and platforms Engineers set up feature-rich services for RDBMS, NoSQL, streaming and analytics systems. No need to be a K8 pro, anyone can build a full-stack, production-ready data infrastructure. Enhanced stateful workloadsKubeBlocks extends K8’s StatefulSet functionality to support ReplicationSet and PocksusSet workloads. They know the different roles in a database cluster and select the best update strategy with minimal impact on business continuity, monitor data replication status and automatically fix errors and delays. KubeBlocks handles complexity and provides a state-of-the-art management experience for MySQL, PostgreSQL, Redis and MongoDB. It provides on-demand configuration, scaling, monitoring, backup and recovery, reducing the risk of database management and the time required to go from development to production. Powerful and intuitive CLI ClickOps has a reputation for being time-consuming and error-prone. KubeBlocks provides kblog for productivity. You can install KubeBlocks and launch a playground environment on your desktop or cloud with a single command. kbstrike simplifies the learning curve of using data infra in Kubernetes. What problems does KubeBlocks solve (refer to official documentation)Kubernetes has become the de facto standard for container orchestration. It manages the increasing number of stateless workloads through the scalability and availability provided by ReplicaSets and the rollout and rollback capabilities provided by Deployments. However, managing stateful workloads poses significant challenges to Kubernetes. Although StatefulSet provides stable persistent storage and unique network identifiers, these capabilities are not enough for complex stateful workloads. To address these challenges and address complexity issues, KubeBlocks introduces ReplicationSet and ReplicsusSet with the following features:
Key Features
Install kbcupOnly one command is needed to deploy: curl -fsSL https://kubeblocks.io/installer/install_cli.sh | bashThe fastest way to try KubeBlocks is to create a new Kubernetes cluster and use the playground to install KubeBlocks. However, production environments are more complex, with applications running in different namespaces and with resource or permission restrictions. The command kbcli kubeblocks installView available versions. kbcli kubeblocks list-versionsUse kbcli kubeblocks install --version=x.x.xverify: kbcli kubeblocks statusIn addition, you can also use Helm to install KubeBlocks If you installed KubeBlocks using Helm, to uninstall it you must also use Helm. helm repo add kubeblocks https://apecloud.github.io/helm-charts
helm repo update
helm install kubeblocks kubeblocks/kubeblocks \
--namespace kb-system --create-namespaceRun the following command to check whether KubeBlocks is installed successfully. kbcli kubeblocks statusupgradeUpgrading is particularly important for users. Let’s take a look at how to upgrade kubeblocks KubeBlocks version 0.6 has many image changes compared to version 0.5. During the upgrade process, if there are multiple database instances in the cluster, pulling images at the same time may cause the instances to be unavailable for a long time. Link to databaseAfter KubeBlocks is deployed and the cluster is created, the database will run as a Pod on Kubernetes. You can connect to the database through the client interface or
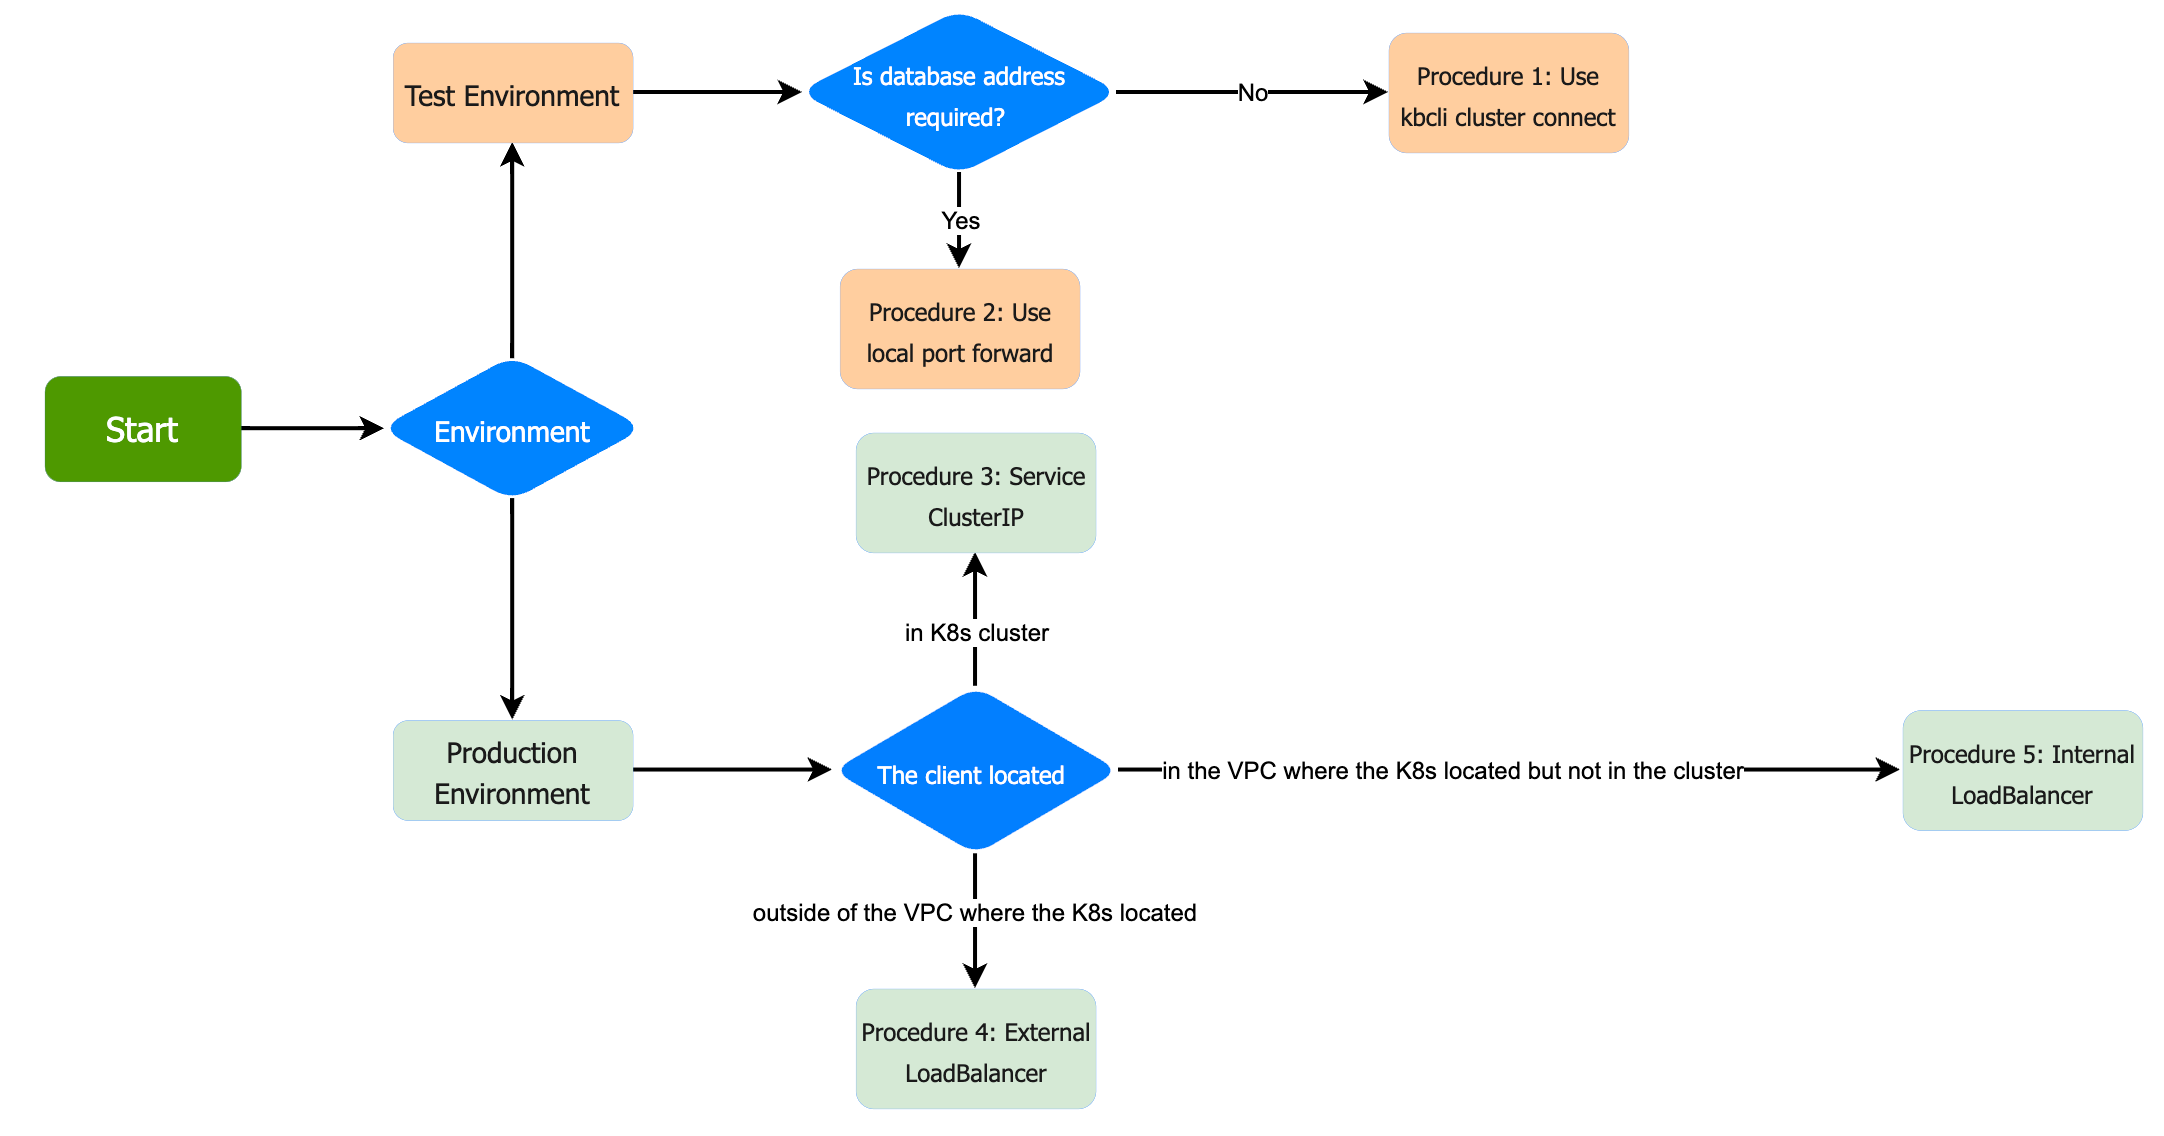
Connect to the database in the test environmentProcedure 1. Use kblog cluster connect command You can use the kbcli cluster connect ${cluster-name}The command below is actually Procedure 2. Connect to the database using CLI or SDK client Execute the following command to obtain the network information of the target database and connect using the printed IP address. kbcli cluster connect --show-example ${cluster-name}The printed information includes database address, port number, user name and password. The following figure is an example of MySQL database network information.
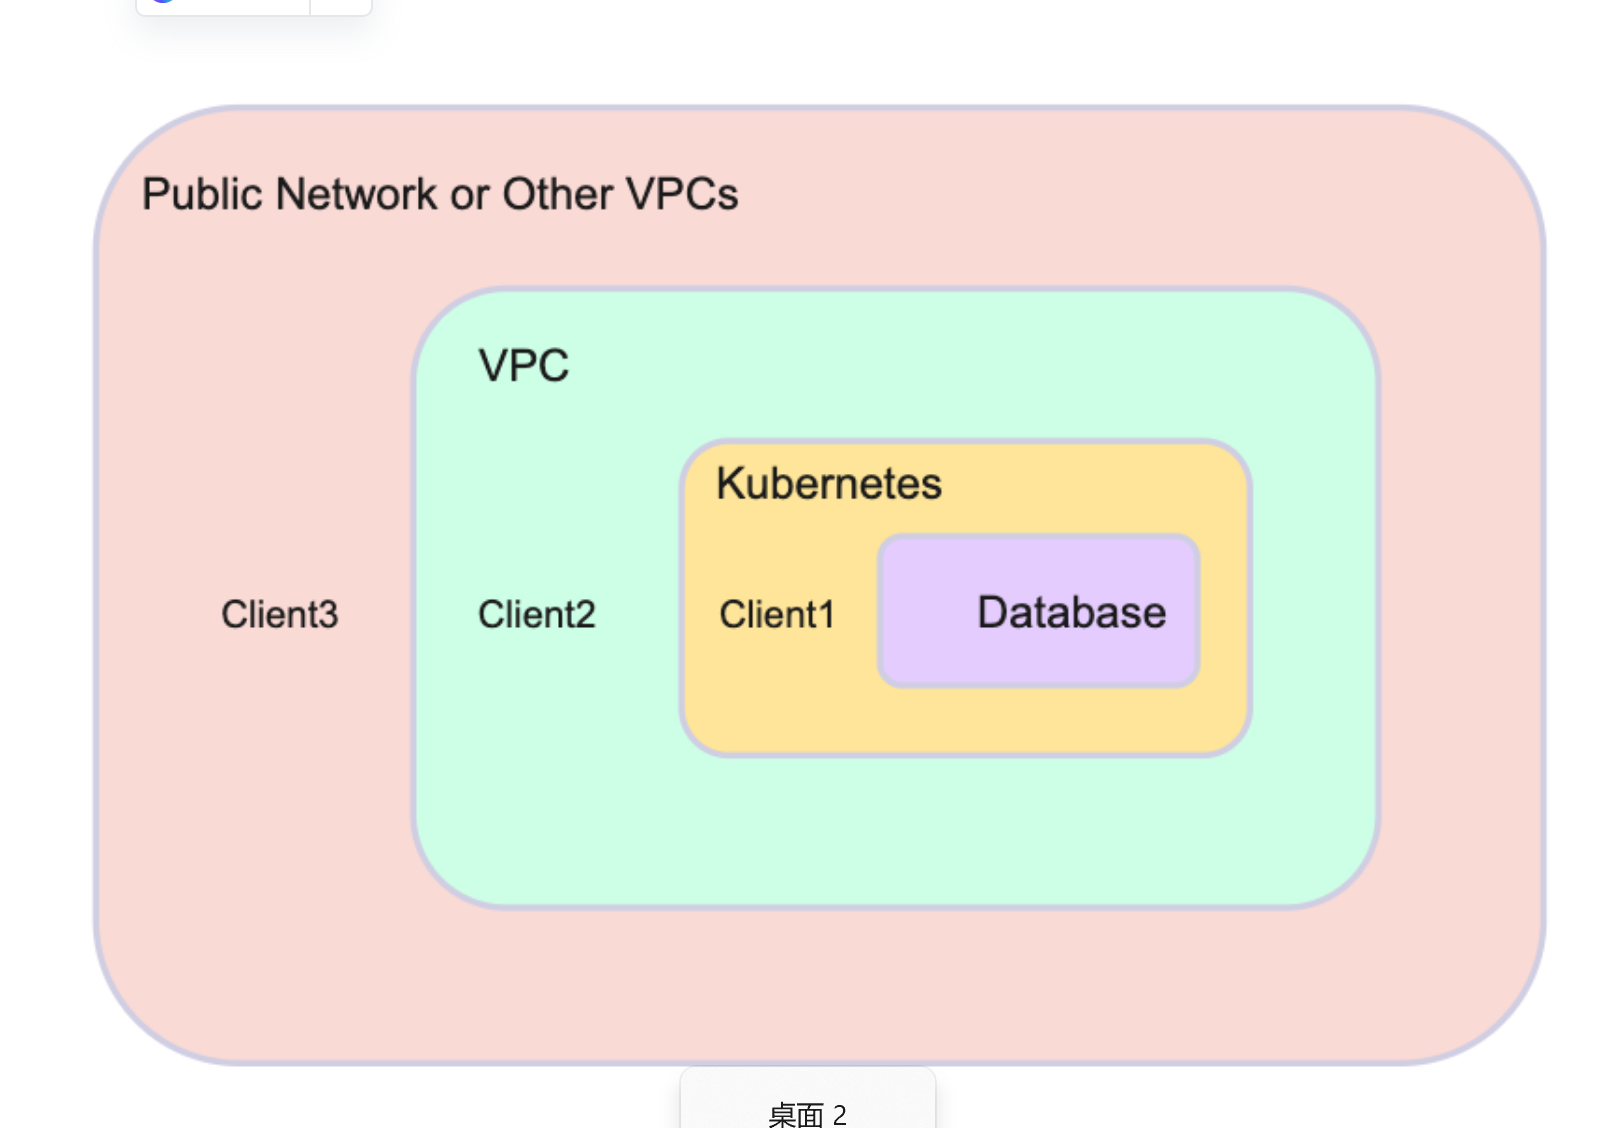
Connect to the database in a production environmentIn a production environment, the CLI and SDK clients are typically used to connect to the database. There are three situations.
See the image below to get a clear image of the network location. Step 3. Connect to the database in the same Kubernetes cluster You can use the domain name or URL of the database connection. To check the database endpoint, use kbcli cluster describe xObservabilityWith built-in database observability, you can observe the health of your database and track and measure your database in real time to optimize database performance. This section shows you how database monitoring tools work with KubeBlocks and how to use this function. KubeBlocks integrates open source monitoring components such as Prometheus, AlertManager, and Grafana through plug-ins, and uses a customized KubeBlock Playground supports the following built-in monitoring plugins:
Review all built-in add-ons and make sure the monitoring add-on is enabled. # View all add-ons supported
kbcli addon list
...
grafana Helm Enabled true
alertmanager-webhook-adaptor Helm Enabled true
prometheus Helm Enabled alertmanager true
...View the list of dashboards. kbcli dashboard list
>
NAME NAMESPACE PORT CREATED-TIME
kubeblocks-grafana kb-system 13000 Jul 24,2023 11:38 UTC+0800
kubeblocks-prometheus-alertmanager kb-system 19093 Jul 24,2023 11:38 UTC+0800
kubeblocks-prometheus-server kb-system 19090 Jul 24,2023 11:38 UTC+0800Open the web console and view the monitoring dashboard. For example, kbcli dashboard open kubeblocks-grafanaEnable monitoring functionKubeBlocks provides a plug-in
|
|
This issue is stale because it has been open 60 days with no activity. Remove stale label or comment or this will be closed in 7 days. |
|
This issue is stale because it has been open 60 days with no activity. Remove stale label or comment or this will be closed in 7 days. |


Description: OpenIM has shown consistent performance in managing real-time communication. However, as we look to scale and improve our database management system across various cloud platforms, it's essential to explore potential solutions that align with our goal of providing a seamless experience to our users.
In our quest for robustness, scalability, and ease of maintenance, the introduction of KubeBlocks, a Kubernetes operator for managing databases, seems promising. KubeBlocks offers simplified operations for relational databases, NoSQL, vector databases, and stream databases, potentially making it an ideal fit for OpenIM's diverse data management needs.
Reasons for Consideration:
Proposed Plan:
Conclusion:
As we continue to grow, ensuring our backend is as efficient, scalable, and maintainable as possible will be crucial. The integration of a solution like KubeBlocks may pave the way for this. I encourage the team to share their insights and concerns to make an informed decision.
The text was updated successfully, but these errors were encountered: