This repository provides a snakemake-based pipeline for the analyses of ChIP-seq data. The methods, programs and versions used are Zwart Lab approved for ChIP-seq analysis. The repository allows the mapping of fastq files (both paired- and single-end) as well as other downstream analyses starting from the bam files (i.e., mapping, filtering, sample correlation, peak calling).
In this repository you can find:
- config directory: contains the configuration .yaml files for the different pipelines. These files contains al the pre-set parameters that in most of the cases do not require any change.
- resources directory: here are collected example files (e.g.
peakCalling_sampleConfig_example.txt), the workflow diagrams and the wz-number renaming script from Joe. - workflow directory: includes all the .snakefile files of the different pipelines.
To install the pipeline it is required to download this repository and use conda for installation.
If never done before proceed to the following steps:
- initialize conda in your environment by:
/opt/miniconda3/bin/conda init - actualize the terminal with:
source ~/.bashrc
On your terminal, it should appear (base) your.name@harris:~$. If this is not the case, run conda activate base.
Ensure you have the proper conda path (/opt/miniconda3/bin/conda) by running: which conda
To avoid packages version incompatibility a yam file with fixed packages versions is provided in this repository.
For the installation, follow the following steps:
- Place yourself in the directory where the repository should be downloaded with
cd </target/folder> - download the GitHub repository with
git clone https://github.com/sebastian-gregoricchio/ChIP_Zwart, or click on Code > Download ZIP on the GitHub page - install the conda environment from the yaml environment file contained in the repository:
conda env create -f </target/folder>/ChIP_Zwart/workflow/envs/chip_zwart_condaEnv_stable.yaml - activate the environment:
conda activate chip_zwart(if the env is not activated the pipeline won't work!):
(chip_zwart) your.name@harris:~$
The snakemake pipeline requires at least two files: a) the .snakefile, containing all the rules that will be run; b) the configfile.yaml file, in which the user can define and customize all the parameters for the different pipeline steps.
Hereafter, the running commands for DNA-mapping and ChIP-seq peak calling will be described for both single and paired-end data.
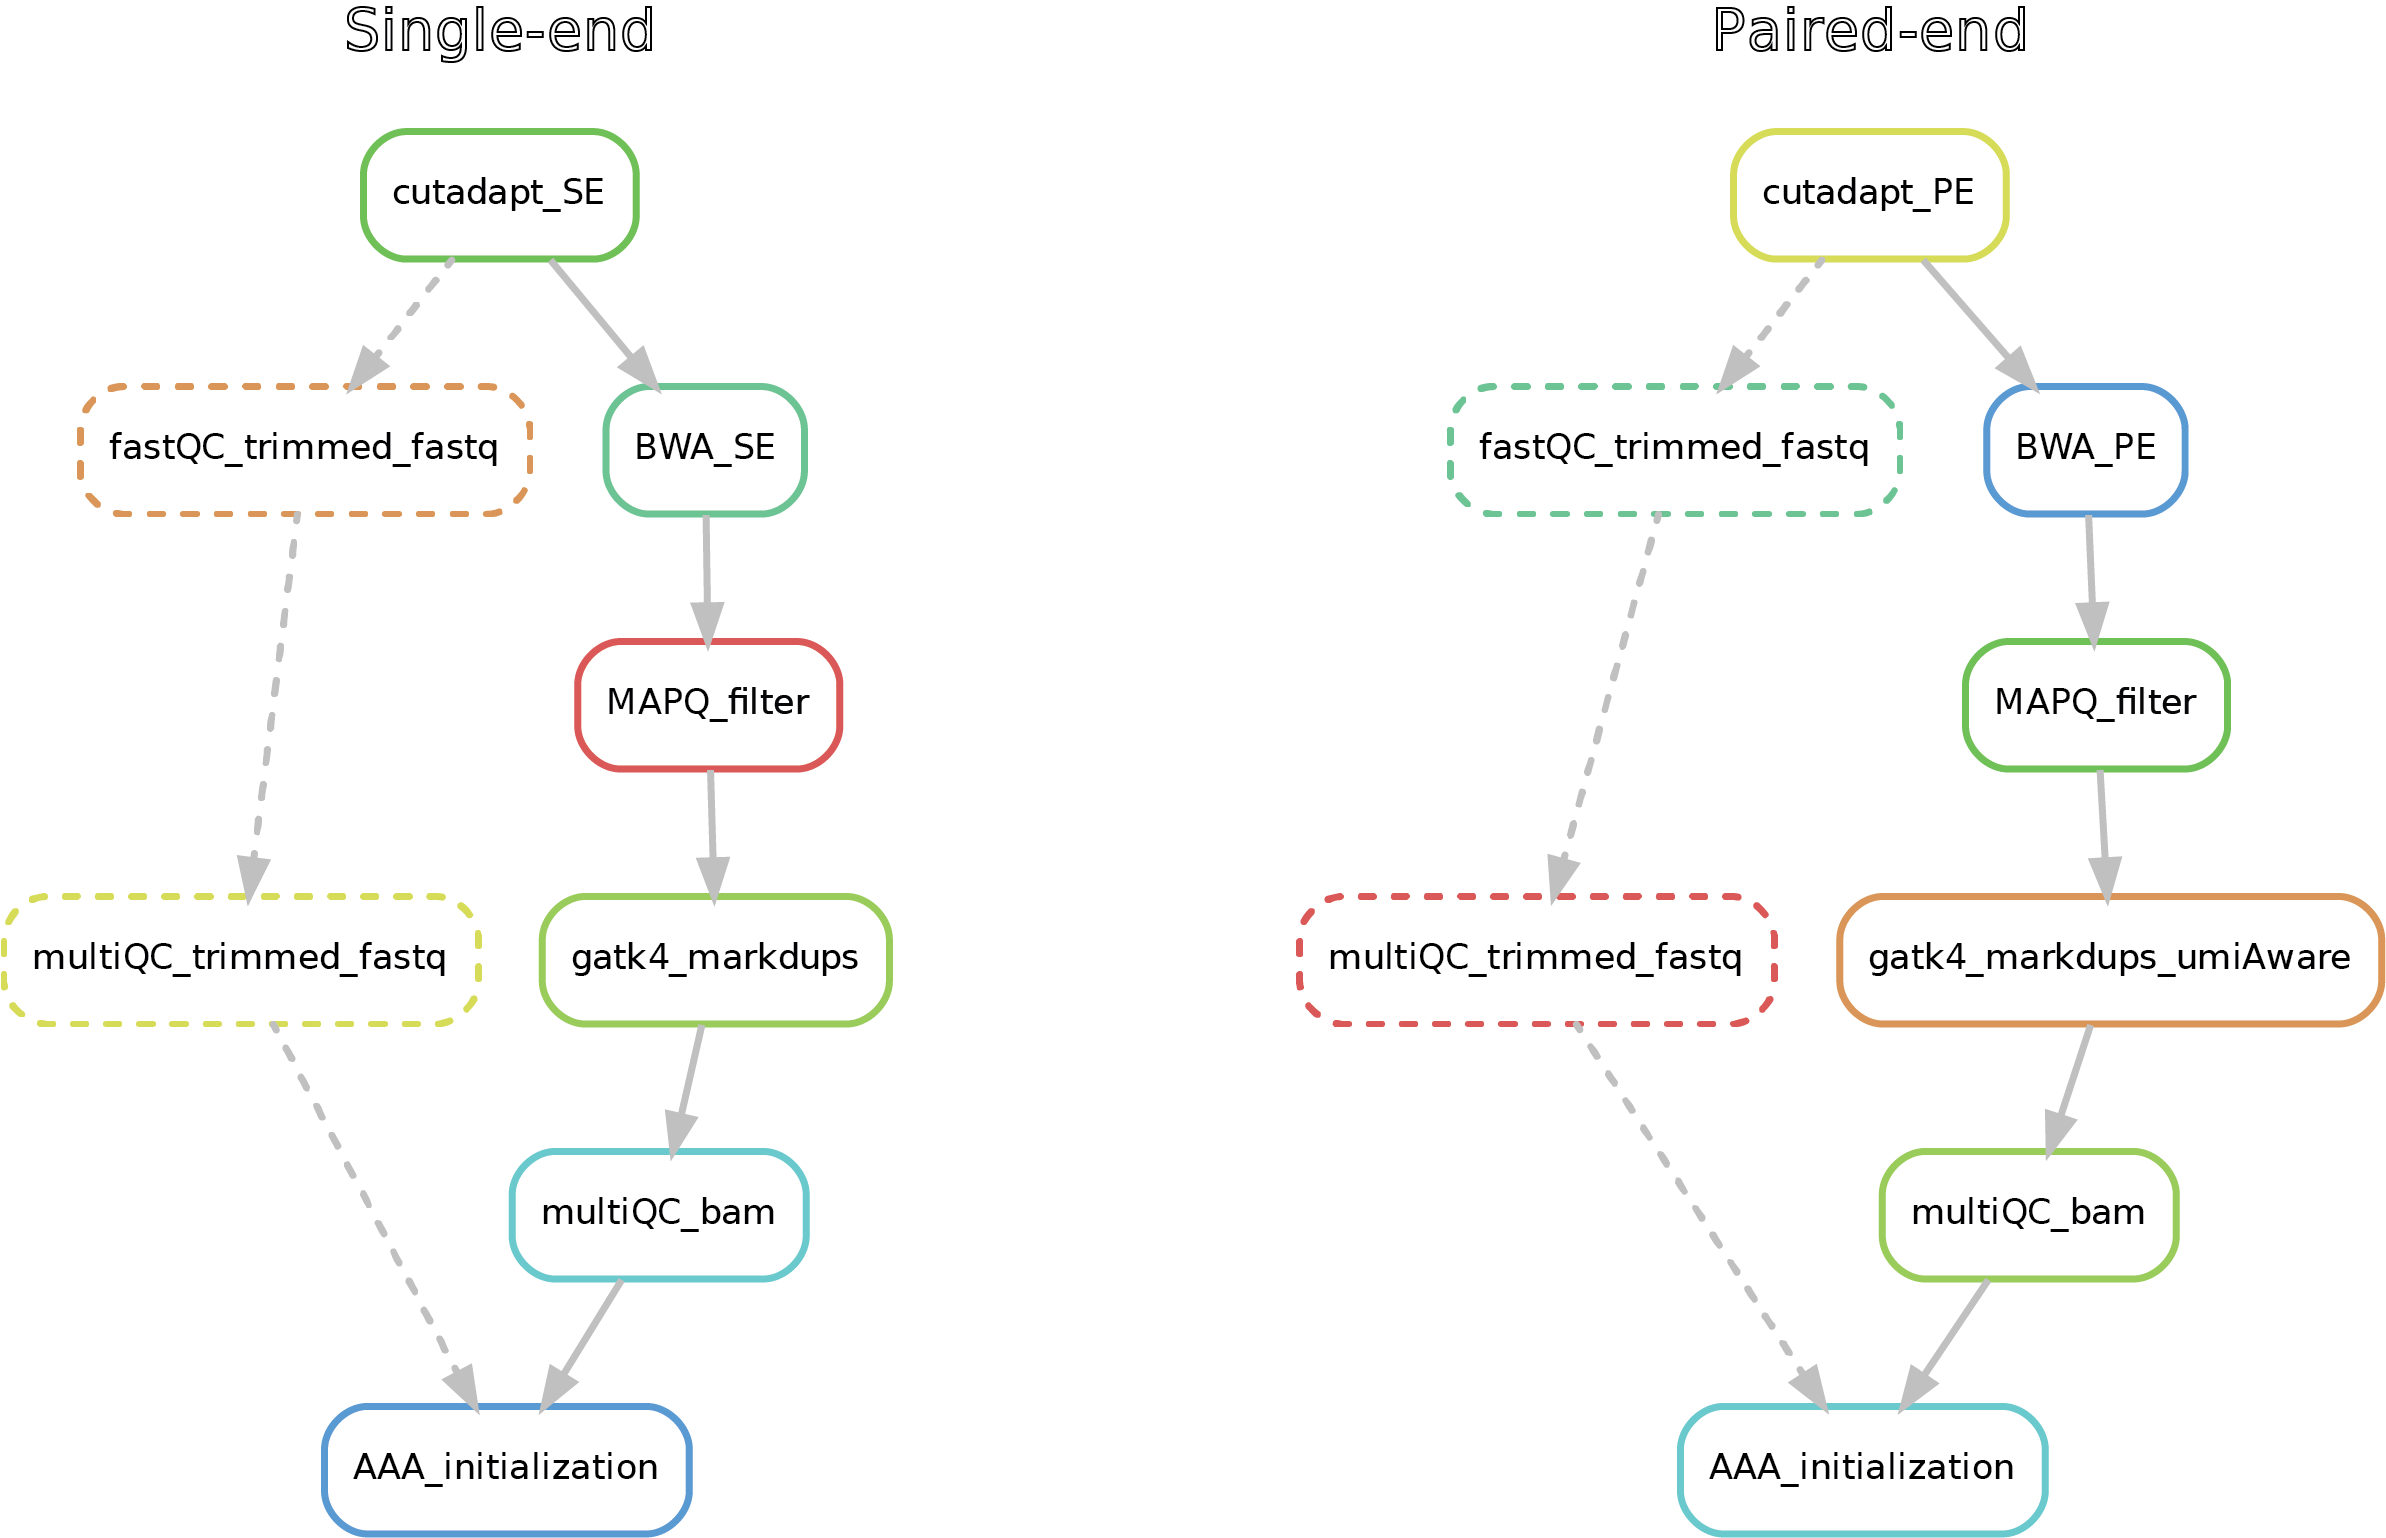
This short pipeline performs the mapping (alignment) to a reference genome upon trimming of the adapter sequences from the raw fastq reads by cutadapt in the same way the GCF does for alignments. Further, a filter on the mapping quality (MAPQ) is applied and duplicated reads are marked. Zwart lab filter is MQ20. Changing this filter is not advised, but possible in the configfile_DNAmapping.yaml file if necessary. Notice that in the case of paired-end reads, when present, UMIs (Unique Molecule Identifiers) sequence is added to the index sequences in the read name. This is allows the marking of the duplicated reads in a UMI-aware manner (reads/fragments that have exactly the same sequence but different UMI-sequence are not marked as duplicates).
Additional information must be provided to the pipeline in the command line:
- the source fastq directory
- the output directory where you want your results to be stored (if not already available, the pipeline will make it for you)
- whether your data are paired- or single-end
- the genome to use (available options: a) GCF-genomes:
hg38,hg19,rn6; b) UCSC-genomes:hg38_ucsc,hg19_ucsc,mm10,mm9)
All the other parameters are already available in the configfile_DNAmapping.yaml file or hard-coded in the snakemake file.
To partially avoid unexpected errors during the execution of the pipeline, a so called 'dry-run' is strongly recommended. Indeed, adding a -n flag at the end of the snakemake running command will allow snakemake to check that all links and file/parameters dependencies are satisfied before to run the "real" processes. This command will therefore help the debugging process.
Always activate your environment, otherwise the pipeline won't be able to find the packages required for the analyses.
Paired-end (the \ must be used every time you go to a new line)
snakemake \
--cores 20 \
-s </target/folder>/ChIP_Zwart/workflow/DNAmapping.snakefile \
--configfile </target/folder>/ChIP_Zwart/config/configfile_DNAmapping.yaml \
--config \
fastq_directory="/path/to/pairedEnd/fastq_data" \
output_directory="/path/to/results/directory/" \
paired_end="True" \
genome="hg38" \
-n
Single-end (the \ must be used every time you go to a new line)
snakemake \
--cores 20 \
-s </target/folder>/ChIP_Zwart/workflow/DNAmapping.snakefile \
--configfile </target/folder>/ChIP_Zwart/config/configfile_DNAmapping.yaml \
--config \
fastq_directory="/path/to/singleEnd/fastq_data" \
output_directory="/path/to/results/directory/" \
paired_end="False" \
genome="hg19" \
-n
If no errors occur, the pipeline can be run with the same command but without the final -n flag:
Notice that the absence of errors does not mean that the pipeline will run without any issues; the "dry-run" is only checking whether all the resources are available.
Here after you can see the full potential workflow of the single-end and paired-end DNA-mapping pipeline:
The results structure is the following:
- 01_trimmed_fastq -> fastq.gz files that underwent trimming by cutadapt
- 02_BAM -> mapped reads (bam) filtered for MAPQ, mate-fixed, duplicates marked and eventually UMI-fixed
- 03_quality_controls -> here you can find the fastQC on the trimmed fastq (if required), with the corresponding multiQC report, as well the multiQC report (flagstat + MarkDuplicates) for the filtered bams
Here an example directory tree (paired-end run):
output_folder
├── 01_trimmed_fastq
│   ├── sample_R1_trimmed.fastq.gz
│   └── sample_R2_trimmed.fastq.gz
│
├── 02_BAM
│   ├── sample_mapq20_mdup_sorted.bam
│   ├── sample_mapq20_mdup_sorted.bai
│   ├── BWA_summary
│   │   └── sample.BWA_summary.txt
│   ├── flagstat
│   │   └── sample_mapq20_mdup_sorted_flagstat.txt
|   ├── MarkDuplicates_metrics
│   │   └── sample_MarkDuplicates_metrics.txt
│   └── umi_metrics  ### (if UMI present) ##
│       └── sample_UMI_metrics.txt
|
└── 03_quality_controls
    ├── multiQC_bam_filtered
    │   └── multiQC_bam_filtered.html
    ├── trimmed_fastq_fastqc
    │   ├── sample_R1_trimmed_fastqc.html
    │   ├── sample_R1_trimmed_fastqc.zip
    │   ├── sample_R2_trimmed_fastqc.html
    │   └── sample_R2_trimmed_fastqc.zip
    └── 05_Quality_controls_and_statistics
        └── multiQC_report_trimmed_fastq.html
Hereafter there are some details of additional parameters available in the configfile_DNAmapping.yaml. However, default parameters are already pre-set and should not be changed without expert advices.
If you wish to make changes, just make a copy of the config file and provide the path to the new file in the snakemake running command line.
| Parameter | Description |
|---|---|
| umi_present | Default: True. True/False to indicate whether the data contain UMIs (ignored for single-end data). |
| fastq_suffix | Default: ".fastq.gz". String with the suffix of the source fastq files. |
| read_suffix | Default: ['_R1','_R2']. A python-formatted list with two strings containing the suffix used to indicate read1 and read2 respectively. In the case of single end reads, only the first value will be read. If your single data do not have any read-prefix set this parameter to: ['',''] (blank). |
| cutadapt_trimm_options | Default: '' (blank). String indicating additional user-specific values to pass to cutadapt. |
| fw_adapter_sequence | Default: "AGATCGGAAGAGC". Sequence of the adapter1 (flag -a of cutadapt). |
| rv_adapter_sequence | Default: "AGATCGGAAGAGC". Sequence of the adapter2 (flag -A of cutadapt). |
| run_fastq_qc | Default: False. True/False to indicate whether to run the fastQC on the trimmed fastq file. |
| use_bwamem2 | Default: False. True/False to define whether to run bwa-mem2 instead of bwa. |
| bwa_options | Default: '' (blank). String indicating additional user-specific values to pass to bwa. |
| remove_duplicates | Default: False. True/False to define whether remove the duplicates from the bam files (if true the tag in the bams will be _dedup instead of _mdup). |
| MAPQ_threshold | Default: 20. All reads with a mapping quality (MAPQ) score lower than this value will be filtered out from the bam files. |
It may happen that you start with .cram files provided by the GCF. However, the peak-calling pipeline works only with .bam files. Therefore, to convert the crams to bams you can use the mini-pipeline provided in this repository. You can also ask to the pipeline to rename your files with the "wz number" indicating rename_zwart="True" (otherwise use rename_zwart="False"):
snakemake \
--cores 10 \
-s </target/folder>/ChIP_Zwart/workflow/cramToBam.snakefile \
--config \
cram_directory="/path/to/input/cram_folder" \
bam_out_directory="/path/to/output/bam_folder" \
genome="hg38" \
rename_zwart="True"
(the \ must be used every time you go to a new line)
NOTE: remember that the genome used for the conversion must match with the one used to generate the crams. Hence, if the crams do not come from the NKI-GCF please ask for assistance. Available options for the genome are: a) GCF-genomes: hg38, hg19, rn6; b) UCSC-genomes: hg38_ucsc, hg19_ucsc, mm10, mm9.
To facilitate the analyses of the ChIP-seq analyses in the Zwart lab, it is strongly recommended to rename your files so that the files contain the wz number.
If your already run the cramToBam pipeline with the rename_zwart="True" flag, this renaming step has been already done.
Otherwise, to do that you can find the original section Renaming files from Joe's GitHub also in this repository at resources/renaming_wzNumbers_Joe. More details and the rename_files.R script can be found in this folder as well. Briefly, to run the script, move it to your folder with your bams or fastqs and run Rscript rename.R.
The pipeline requires a sample configuration file which provides information about ChIP-Input pairs and the type of peak calling to perform (broad or narrow).
This configuration file must be in a tab-delimited txt file format (with column names) containing the following information (respect the column order):
| target_id | input_id | broad |
|---|---|---|
| sample_A | input_A-B | False |
| sample_B | input_A-B | False |
| sample_C | input_C | True |
A dummy-table could be found in resources/peakCalling_sampleConfig_example.txt.
Additional information must be provided to the pipeline in the command line:
- the source bam directory (e.g. rename folder)
- the output directory where you want your results to be stored (if not already available, the pipeline will make it for you)
- whether your data contain UMIs
- whether your data are paired- or single-end
- the genome to use (available options:
hg38,hg19,hg38_ucsc,hg19_ucsc,mm10,mm9,rn6) - the path to the sample configuration table
All the other parameters are already available in the configfile_peakcalling.yaml file or hard-coded in the snakemake file.
To partially avoid unexpected errors during the execution of the pipeline, a so called 'dry-run' is strongly recommended. Indeed, adding a -n flag at the end of the snakemake running command will allow snakemake to check that all links and file/parameters dependencies are satisfied before to run the "real" processes. This command will therefore help the debugging process.
Always activate your environment, otherwise the pipeline won't be able to find the packages required for the analyses.
NOTE: if the bam files derive from the DNA-mapping pipeline you can save time by adding the flag skip_bam_filtering="True" (MAPQ filter and MarkDuplicates are skipped). Notice that you may need to add/modify the flag for the bam suffix to bam_suffix="_mapq20_mdup_sorted.bam" in order to match the extension of the output files of the DNA-mapping pipeline.
Single-end (the \ must be used every time you go to a new line)
snakemake \
--cores 10 \
-s </target/folder>/ChIP_Zwart/workflow/peakcalling.snakefile \
--configfile </target/folder>/ChIP_Zwart/config/configfile_peakCalling.yaml \
--config \
runs_directory="/path/to/rename" \
output_directory="/path/to/results/directory/" \
sample_config_table="/path/to/sample_configuration.txt" \
paired_end="False" \
genome="hg19" \
-n
Paired-end (the \ must be used every time you go to a new line)
snakemake \
--cores 10 \
-s </target/folder>/ChIP_Zwart/workflow/peakcalling.snakefile \
--configfile </target/folder>/ChIP_Zwart/config/configfile_peakCalling.yaml \
--config \
runs_directory="/path/to/rename" \
output_directory="/path/to/results/directory/" \
sample_config_table="/path/to/sample_configuration.txt" \
paired_end="True" \
umi_present="True" \
genome="hg38" \
-n
If no errors occur, the pipeline can be run with the same command but without the final -n flag:
Notice that the absence of errors does not mean that the pipeline will run without any issues; the "dry-run" is only checking whether all the resources are available.
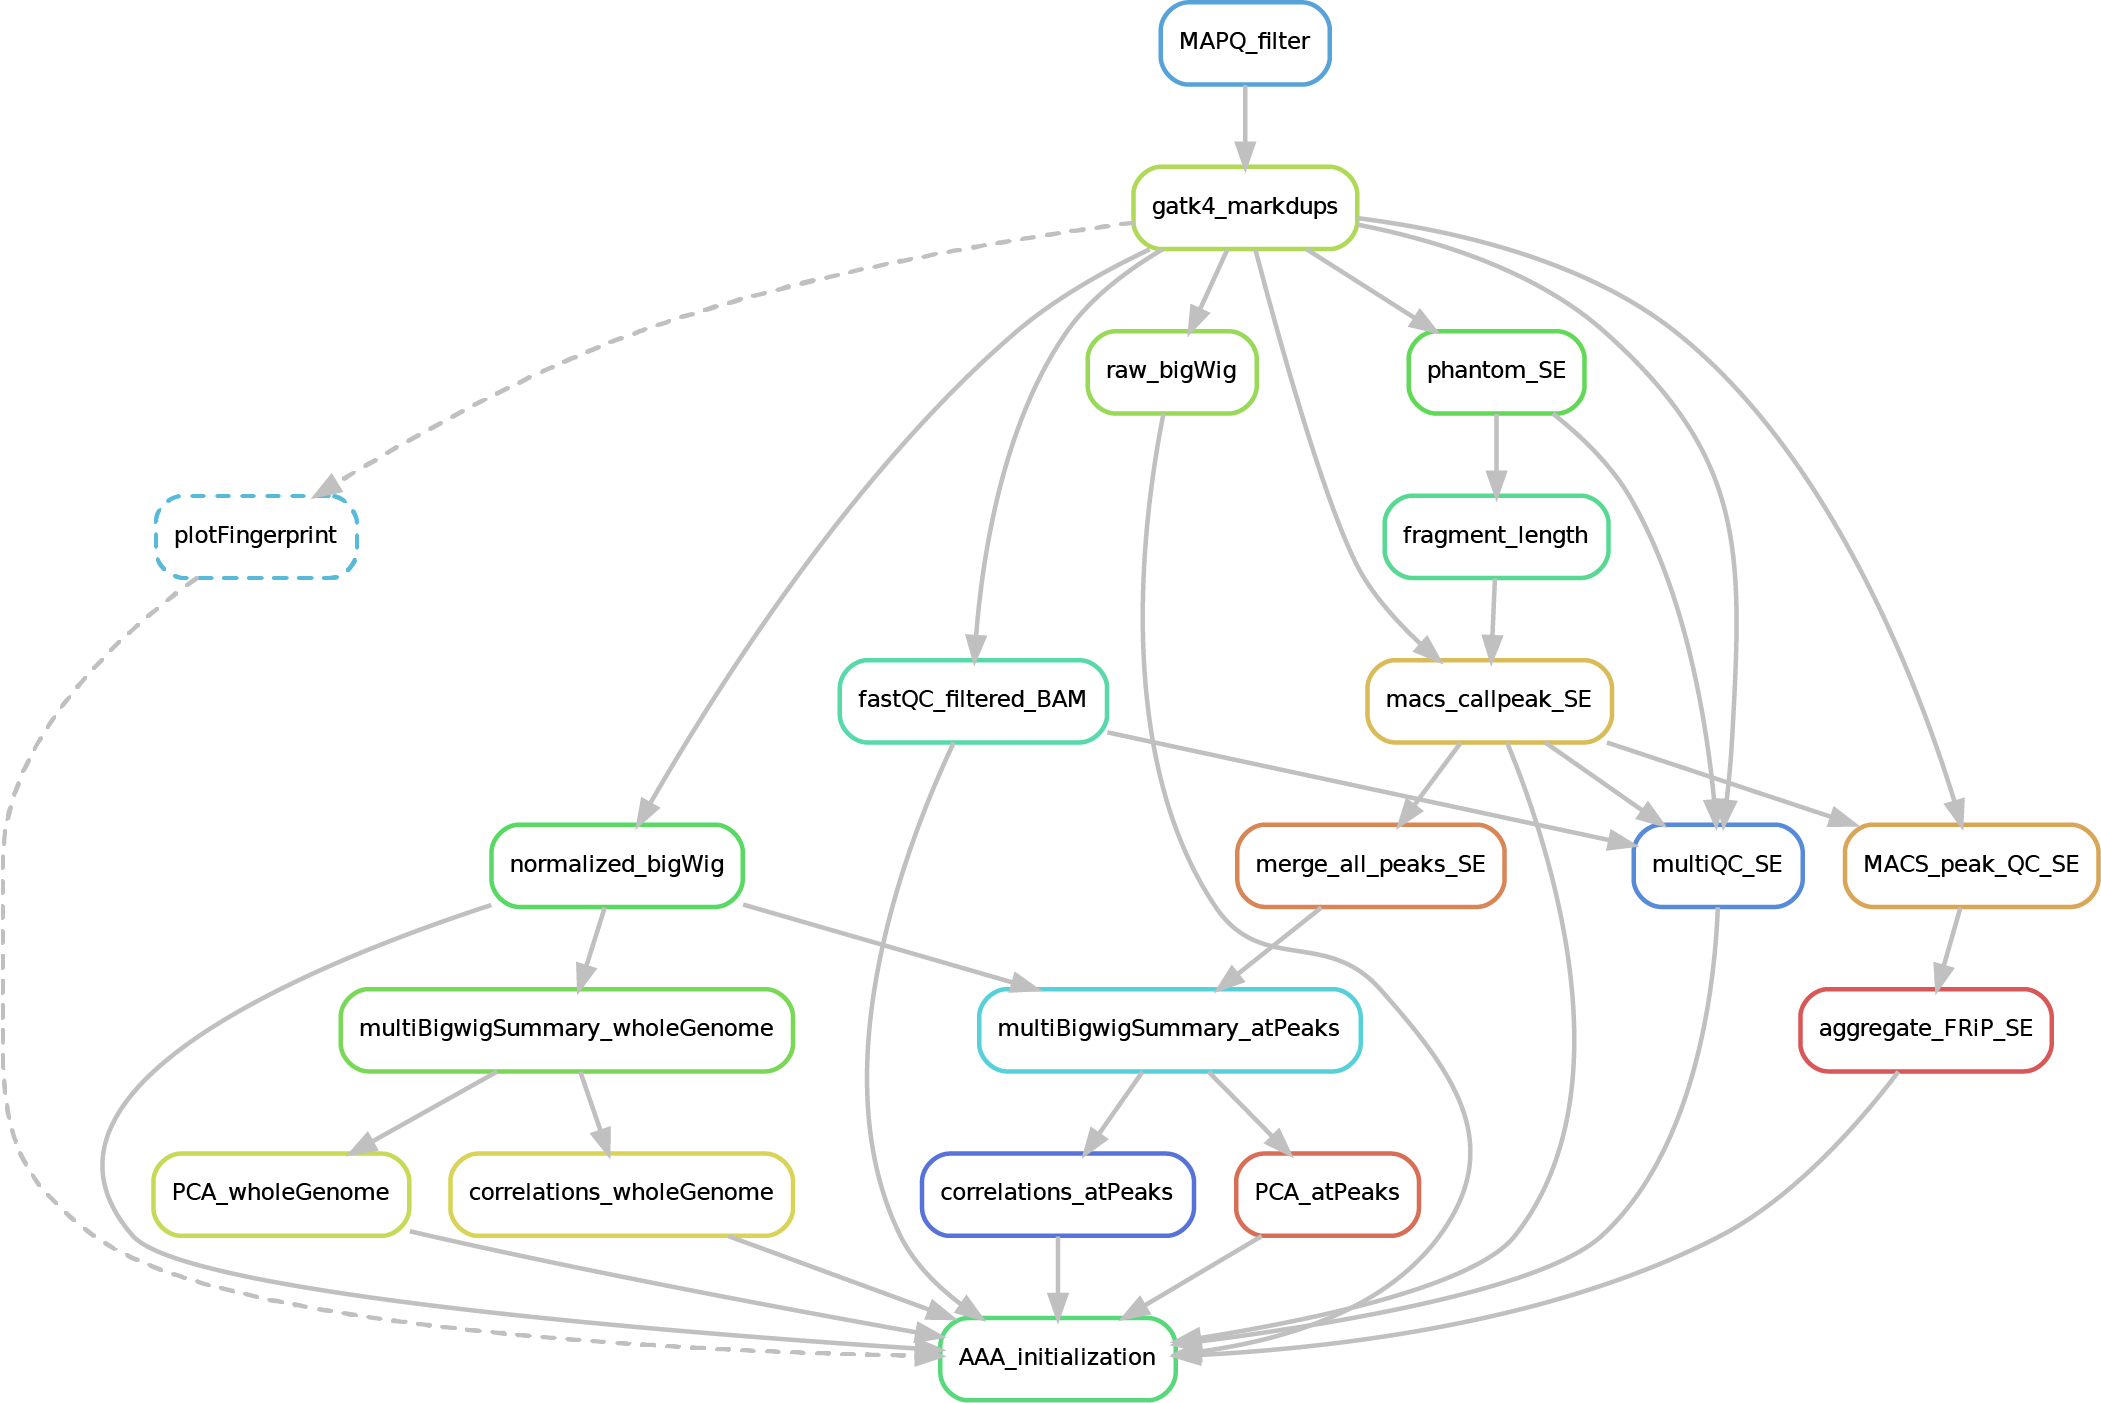
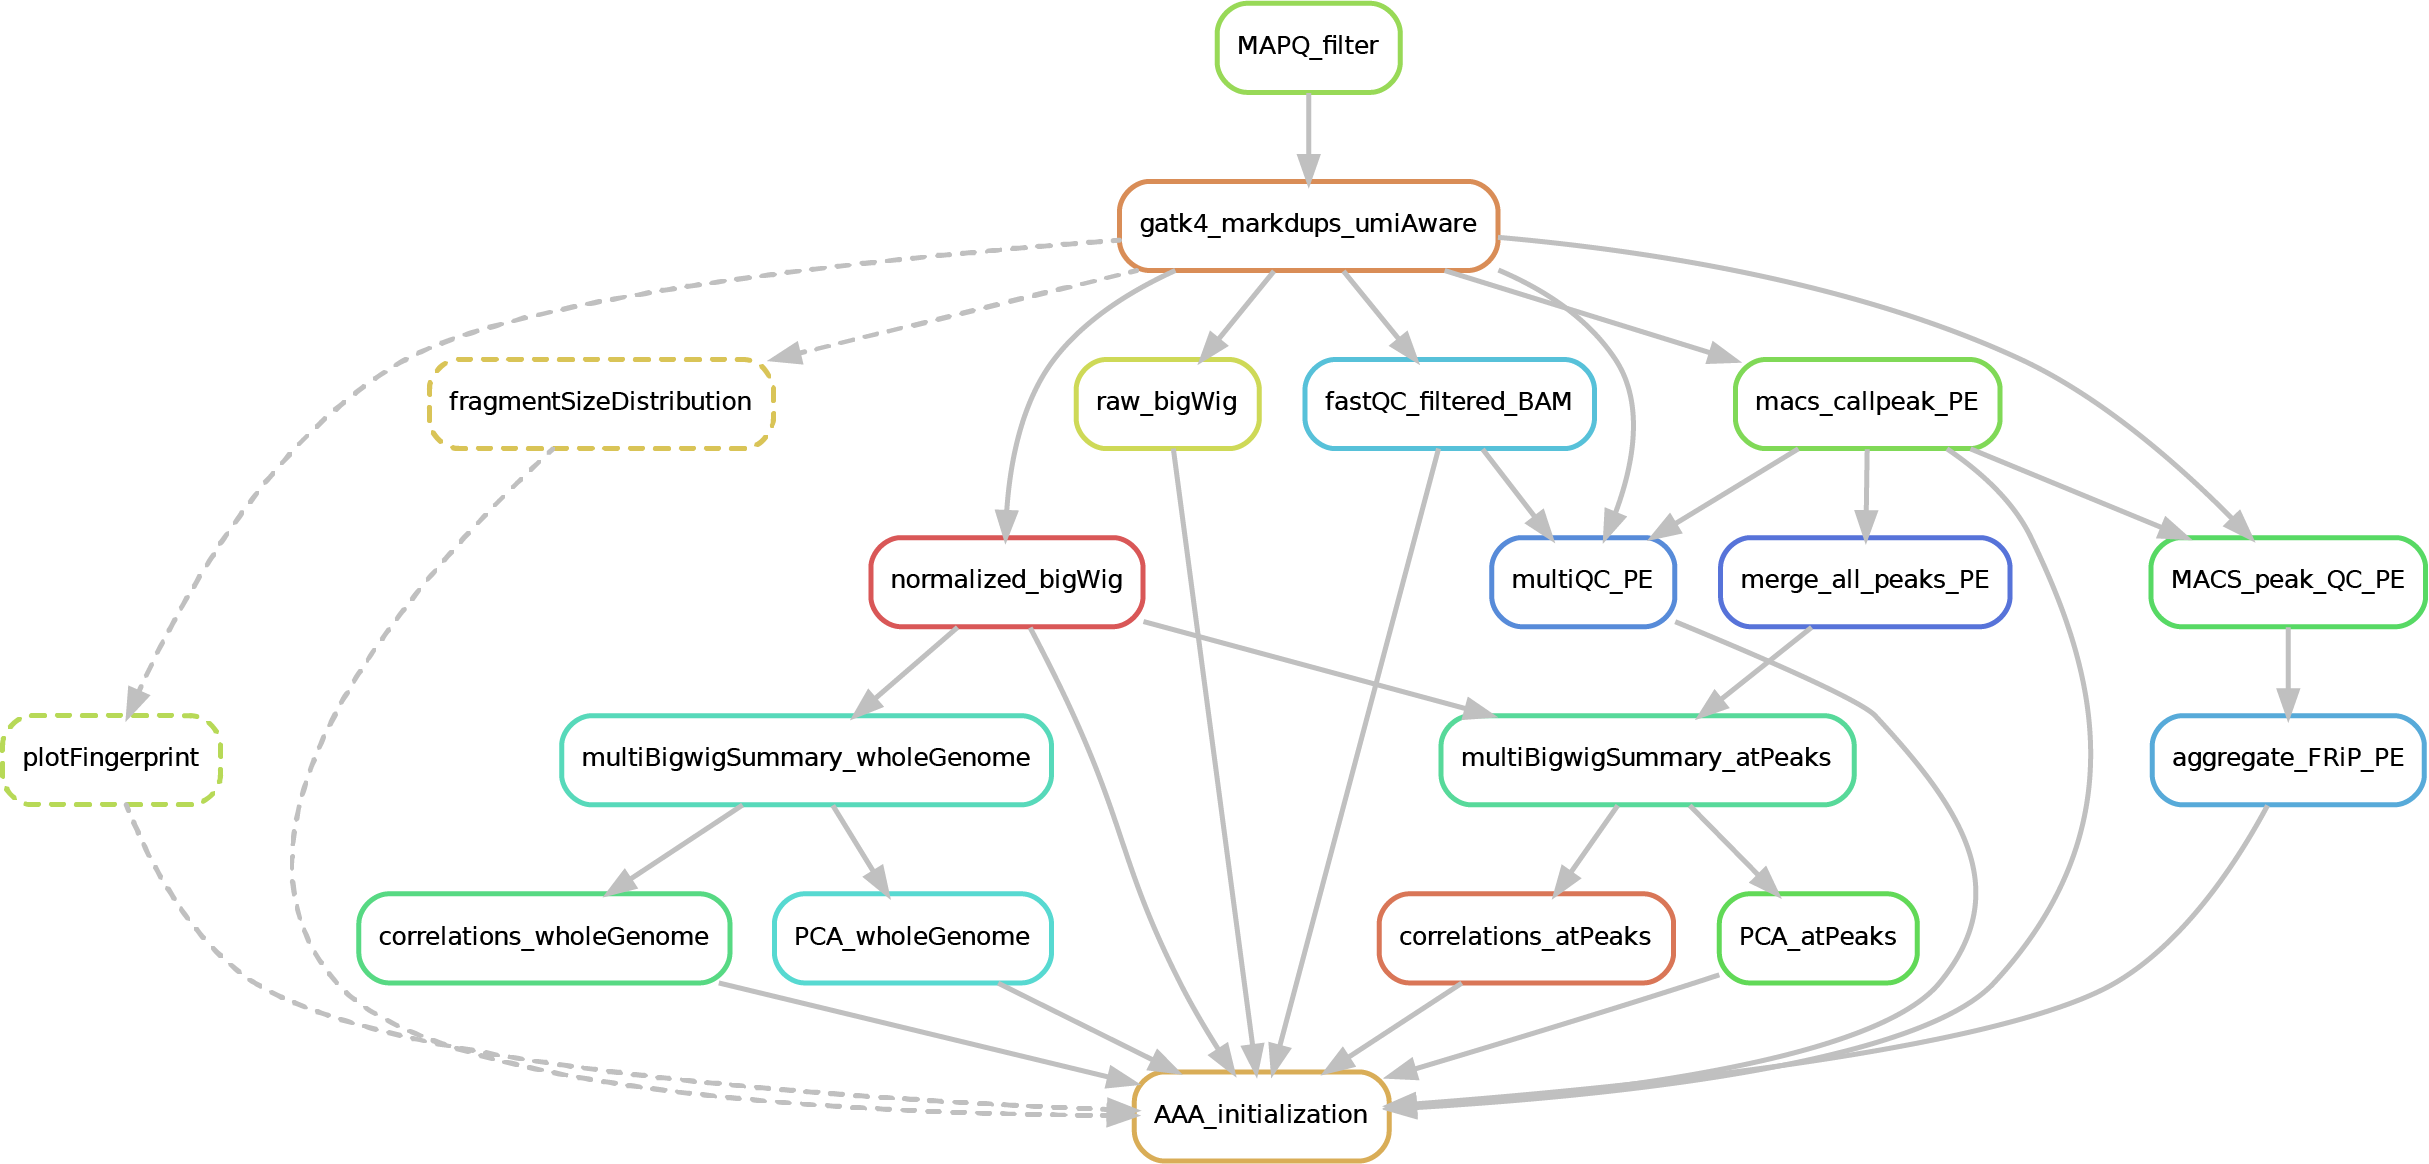
Here after you can see the full potential workflow of the paired-end and single-end ChIP-seq pipeline:
The results structure is the following:
- 01_BAM_filtered -> bams filtered for mapping quality (MAPQ) and with the duplicates marked/removed
- 02_fastQC_on_BAM_filtered -> individual fastQC for each filtered bam
- 03_bigWig_bamCoverage -> bigWig of the bam coverage normalized (RPGC = Reads Per Genomic Content) or not (raw_coverage) depending on the sequencing depth
- 04_Called_peaks -> peaks called with macs2 (de-blacklisted in hg38 but not hg19 - for backwards compatibility of older Zwart lab data -). If single-end, it can be found also a folder with the output of
phantompeakqualtoolsas the calculated fragment length is used for running macs2 with single-end data. If the bed file does not contain already the 'chr' for the "canonical" chromosomes, it will be added in a separated file ending by_chr.narrow/broadPeak - 05_Quality_controls_and_statistics -> this folder contains sample correlations heatmaps and PCAs, a multiQC report containing multiple info (number of reads, duplicates, peak counts and fragmenth lenght, phantom results), statistics on the called peaks (FRiP, number, etc.)
Here an example directory tree:
output_folder
├── 01_BAM_filtered
│   ├── sample_mapq20_mdup_sorted.bam
│   ├── sample_mapq20_mdup_sorted.bai
│   ├── flagstat
│   │   └── sample_mapq20_mdup_sorted_flagstat.txt
|   ├── MarkDuplicates_metrics
│   │   └── sample_MarkDuplicates_metrics.txt
│   └── umi_metrics  ### (if UMI present) ##
│       └── sample_UMI_metrics.txt
|
├── 02_fastQC_on_BAM_filtered
│   ├── sample_sorted_woMT_dedup_fastqc.html
│   └── sample_sorted_woMT_dedup_fastqc.zip
|
├── 03_bigWig_bamCoverage
│   ├── raw_coverage
│   │   └── sample_mapq20_mdup_raw.coverage_bs10.bw
│   └── RPGC_normalized
│       └── sample_mapq20_mdup_RPGC.normalized_bs10.bw
│
├── 04_Called_peaks   ### BAM if Single-End ###
│   ├──phantom
│   │   └── sample.phantom.ssp.out
│   ├── sample.filtered.BAMPE_peaks_chr.narrowPeak
│   ├── sample.filtered.BAMPE_peaks.narrowPeak
│   └── sample.filtered.BAMPE_peaks.xls
|
└── 05_Quality_controls_and_statistics
    ├── multiQC
    │   └── multiQC_report.html
    ├── peaks_stats
    │    └── all_samples_FRiP_report.tsv
    ├── plotFingerprint   ### optional ###
    |   ├── quality_metrics
    |   │   └── em>sample_fingerPrinting_quality_metrics.txt
    |   └── em>sample_fingerPrinting_plot.pdf
    ├── sample_comparisons_atPeaks
    │   ├── all_peaks_merged_sorted.bed
    │   ├── multiBigWigSummary_matrix_atPeaks.npz
    │   ├── sample_pearson.correlation_heatmap_atPeaks.pdf
    │   ├── sample_spearman.correlation_heatmap_atPeaks.pdf
    │   ├── sample_correlation_PCA.1-2_heatmap_atPeaks.pdf
    │   └── sample_correlation_PCA.2-3_heatmap_atPeaks.pdf
    └── sample_comparisons_wholeGenome
        ├── all_peaks_merged_sorted.bed
        ├── multiBigWigSummary_matrix_atPeaks.npz
        ├── sample_pearson.correlation_heatmap_wholeGenome.pdf
        ├── sample_spearman.correlation_heatmap_wholeGenome.pdf
        ├── sample_correlation_PCA.1-2_heatmap_wholeGenome.pdf
        └── sample_correlation_PCA.2-3_heatmap_wholeGenome.pdf
Hereafter there are some details of additional parameters available in the configfile_peakCalling.yaml. However, default parameters are already pre-set and should not be changed without expert advices.
If you wish to make changes, just make a copy of the config file and provide the path to the new file in the snakemake running command line.
| Parameter | Description |
|---|---|
| bam_suffix | Default: ".bam". String with the suffix of the source bam files. |
| skip_bam_filtering | Default: False. True/False to indicate whether the bam MAPQ filtering and MarkDuplicates should be skipped. Useful to save computation when the bam files have been generated by the DNA-mapping pipeline. The bams will be linked in a folder, while the .bai index and the flagstat are re-computed. |
| umi_present | Default: True. True/False to indicate whether the data contain UMIs (ignored for single-end data). |
| remove_duplicates | Default: False. True/False to define whether remove the duplicates from the bam files (if true the tag in the bams will be _dedup instead of _mdup). |
| MAPQ_threshold | Default: 20. All reads with a mapping quality (MAPQ) score lower than this value will be filtered out from the bam files. |
| bigWig_binSize | Default: 50. Size, in bp, of the bins used to compute the normalized bigWig files. |
| use_macs3 | Default: False. True/False to define whether to run macs3 instead of macs2. |
| macs_qValue_cutoff | Default: 0.01. False Discovery Ratio (FDR) (q-value) cutoff used by MACS to filter the significant peaks. |
| perform_plotFingerprint | Default: False. True/False to define whether perform the finger printing (Lorenz curve). |
| perform_fragmentSizeDistribution | Default: False. True/False to define whether to plot the fragment size distribution (Paired-end only). |
| fragment_length | Default: 200. Size in bp of the virtual fragment length at which each read should be extended in order to perform the plotFingerprint. |
| correlation_heatmap_colorMap | Default: 'PuBuGn'. A string indicating the color gradient pattern to use for the correlation heatmaps. This value is passed to matplotlib/seaborn. Therefore, available options (see matplotlib page for examples) are the following: 'Accent', 'Blues', 'BrBG', 'BuGn', 'BuPu', 'CMRmap', 'Dark2', 'GnBu', 'Greens', 'Greys', 'OrRd', 'Oranges', 'PRGn', 'Paired', 'Pastel1', 'Pastel2', 'PiYG', 'PuBu', 'PuBuGn', 'PuOr', 'PuRd', 'Purples', 'RdBu', 'RdGy', 'RdPu', 'RdYlBu', 'RdYlGn', 'Reds', 'Set1', 'Set2', 'Set3', 'Spectral', 'Wistia', 'YlGn', 'YlGnBu', 'YlOrBr', 'YlOrRd', 'afmhot', 'autumn', 'binary', 'bone', 'brg', 'bwr', 'cividis', 'cool', 'coolwarm', 'copper', 'cubehelix', 'flag', 'gist_earth', 'gist_gray', 'gist_heat', 'gist_ncar', 'gist_rainbow', 'gist_stern', 'gist_yarg', 'gnuplot', 'gnuplot2', 'gray', 'hot', 'hsv', 'icefire', 'inferno', 'jet', 'magma', 'mako', 'nipy_spectral', 'ocean', 'pink', 'plasma', 'prism', 'rainbow', 'rocket', 'seismic', 'spring', 'summer', 'tab10', 'tab20', 'tab20b', 'tab20c', 'terrain', 'twilight', 'twilight_shifted', 'viridis', 'vlag', 'winter'. |
It may happen that the piepline returns errors saying that certain python or R packages are not found even though the chip_zwart conda environment is loaded.
To solve this problem it is sufficient to unload all the conda environments (included the base one) by typing conda deactivate until all the environment are detached: your.name@harris:~$
Now load again the ChIP pipeline environment by typing conda activate chip_zwart.
Check then that the pipeline is using the correct python version by typing which python.
The command should return something like /home/your.name/.conda/envs/chip_zwart/bin/python instead of /usr/bin/python.
A list of all releases and respective description of changes applied could be found here.
For any suggestion, bug fixing, commentary please report it in the issues/request tab of this repository.
This repository is under a GNU General Public License (version 3).


