-
Notifications
You must be signed in to change notification settings - Fork 76
User management with Wireguard User Management Script
What is it?
Wireguard User Management Script is a simple WireGuard user management script using on VPN server. Client config file and qrcode are generated. Forked from faicker.
Install Wireguard User Management Script:
pi@raspberrypi:~ $ sudo apt-get install git qrencode
pi@raspberrypi:~ $ git clone https://github.com/adrianmihalko/wg_config.git
Cloning into 'wg_config'...
remote: Enumerating objects: 17, done.
remote: Counting objects: 100% (17/17), done.
remote: Compressing objects: 100% (15/15), done.
remote: Total 17 (delta 4), reused 10 (delta 1), pack-reused 0
Unpacking objects: 100% (17/17), done.
Generate server keys (private, public):
pi@raspberrypi:~ $ cd wg_config
pi@raspberrypi:~/wg_config $ wg genkey | tee server_private.key | wg pubkey > server_public.key
pi@raspberrypi:~/wg_config $ cat server_private.key
aA+iKGr4y/j604LtNT+MQJ76Pvz5Q5E+qQBLW40wXnY=
pi@raspberrypi:~/wg_config $ cat server_public.key
5lFoBBjeLcJWC9xqS/Kj9HVwd0tRUBX/EQWW2ZglbDs=
Edit server details:
pi@raspberrypi:~/wg_config $ cp wg.def.sample wg.def
pi@raspberrypi:~/wg_config $ nano wg.def
_INTERFACE=wg0
_VPN_NET=192.168.99.0/24
_SERVER_PORT=51820
_SERVER_LISTEN=your.publicdns.com:$_SERVER_PORT
_SERVER_PUBLIC_KEY=5lFoBBjeLcJWC9xqS/Kj9HVwd0tRUBX/EQWW2ZglbDs=
_SERVER_PRIVATE_KEY=aA+iKGr4y/j604LtNT+MQJ76Pvz5Q5E+qQBLW40wXnY=
Edit client template:
pi@raspberrypi:~/wg_config $ nano client.conf.tpl
[Interface]
Address = $_VPN_IP
PrivateKey = $_PRIVATE_KEY

[Peer]
PublicKey = $_SERVER_PUBLIC_KEY
AllowedIPs = 192.168.99.1/32, 192.168.1.0/24
Endpoint = $_SERVER_LISTEN
192.168.1.0/24 is my remote LAN subnet, if you add here your own network subnet, you can access remote LAN devices from the client.
Bring up WireGuard interface:
pi@raspberrypi:~/wg_config $ sudo touch /etc/wireguard/wg0.conf
pi@raspberrypi:~/wg_config $ sudo wg-quick up wg0
[#] ip link add wg0 type wireguard
[#] wg setconf wg0 /dev/fd/63
[#] ip link set mtu 1420 up dev wg0
pi@raspberrypi:~/wg_config $ sudo wg
interface: wg0
  listening port: 37165
Add our first user:
pi@raspberrypi:~/wg_config $ sudo ./user.sh -a client1
[QR CODE HERE]
You can scan QR code right from mobile client or config clients manually from wg_config/users/ directory.
Exploring users directory:
pi@raspberrypi:~/wg_config $ cd users/client1/
pi@raspberrypi:~/wg_config $ ls
client1.png  client.conf  privatekey  publickey
pi@raspberrypi:~/wg_config $ cat client.conf
[Interface]
Address = 192.168.99.2/24
PrivateKey = gFSP5e8ta66tnwFOe1G4BDEikMkdfOiQ/OoYal2lv14=

[Peer]
PublicKey = 5lFoBBjeLcJWC9xqS/Kj9HVwd0tRUBX/EQWW2ZglbDs=
AllowedIPs = 192.168.99.1/32, 192.168.1.0/24
Endpoint = your.publicdns.com:51820
Restart WireGuard:
pi@raspberrypi:~/wg_config $ sudo wg-quick down wg0
[#] ip link delete dev wg0
[#] iptables -D FORWARD -i wg0 -j ACCEPT; iptables -D FORWARD -o wg0 -j ACCEPT; iptables -t nat -D POSTROUTING -o eth0 -j MASQUERADE
iptables: Bad rule (does a matching rule exist in that chain?).
pi@raspberrypi:~/wg_config $ sudo wg-quick up wg0
Enable automatic start of wg0 interface on boot:
pi@raspberrypi:~/wg_config $ sudo systemctl enable wg-quick@wg0
Created symlink /etc/systemd/system/multi-user.target.wants/[email protected] → /lib/systemd/system/[email protected].
Additional info:
To delete an user from the server:
pi@raspberrypi:~/wg_config $ sudo ./user.sh -d madrianTo view generated QR code for an user:
pi@raspberrypi:~/wg_config $ sudo ./user.sh -v madrianYou will need to install wireguard on clients as well. Wireguard does not have separate apps for server and client, just differences in the configuration file. On Debian based distros (Ubuntu, Debian etc.) you just run sudo apt-get install wireguard.
For installing on other systems, please visit WireGuard website.
We generated credentials for one user above.
Example configuration on client, in this case on a Mac:
madrian@MacBook-Pro:/Volumes$ sudo mkdir /etc/wireguard/
madrian@MacBook-Pro:/Volumes$ sudo nano /etc/wireguard/wg0.conf
#[PASTE CONTENT FROM client.conf FROM THE wg_config/users/youruser/ directory]
#Example: users/client1/client.conf
[Interface]
Address = 192.168.99.2/24
PrivateKey = gFSP5e8ta66tnwFOe1G4BDEikMkdfOiQ/OoYal2lv14=

[Peer]
PublicKey = 5lFoBBjeLcJWC9xqS/Kj9HVwd0tRUBX/EQWW2ZglbDs=
AllowedIPs = 192.168.99.1/32, 192.168.1.0/24
Endpoint = your.publicdns.com:51820
Additional INFO:
If you put 0.0.0.0/0 in AllowedIPs, all traffic will be redirected through this interface.
Start WireGuard interface:
madrian@MacBook-Pro:/Volumes$ sudo wg-quick up wg0
Warning: `/private/etc/wireguard/wg0.conf' is world accessible
[#] wireguard-go utun
WARNING WARNING WARNING WARNING WARNING WARNING WARNING
W                                                     G
W   This is alpha software. It will very likely not   G
W   do what it is supposed to do, and things may go   G
W   horribly wrong. You have been warned. Proceed     G
W   at your own risk.                                 G
W                                                     G
WARNING WARNING WARNING WARNING WARNING WARNING WARNING
INFO: (utun3) 2018/12/19 00:14:21 Starting wireguard-go version 0.0.20181018
[+] Interface for wg0 is utun3
[#] wg setconf utun3 /dev/fd/63
[#] ifconfig utun3 inet 192.168.99.2/24 192.168.99.2 alias
[#] ifconfig utun3 mtu 1416
[#] ifconfig utun3 up
[#] route -q -n add -inet 192.168.99.1/32 -interface utun3
[+] Backgrounding route monitor
Check if Wireguard is working:
madrian@MacBook-Pro:/Volumes$ sudo wg
interface: utun3
  public key: ht4+w8Tk28hFQCpXWnL4ftGAu/IwtMvD2yEZ+1hp7zA=
  private key: (hidden)
  listening port: 53694

peer: Aj2HHAutB2U0O56jJBdkZ/xgb9pnmUPJ0IeiuACLLmI=
  endpoint: your.publicdns.com:51820
  allowed ips: 192.168.99.1/32, 192.168.1.0/24
madrian@MacBook-Pro:/Volumes$ ping 192.168.99.1
PING 192.168.99.1 (192.168.99.1): 56 data bytes
64 bytes from 192.168.99.1: icmp_seq=0 ttl=64 time=13.447 ms
^C
--- 192.168.99.1 ping statistics ---
3 packets transmitted, 3 packets received, 0.0% packet loss
round-trip min/avg/max/stddev = 4.565/8.495/13.447/3.697 ms
It’s working.
Setup mobile clients (iOS):
Download and install official Wireguard app: Wireguard beta is available in the App Store.
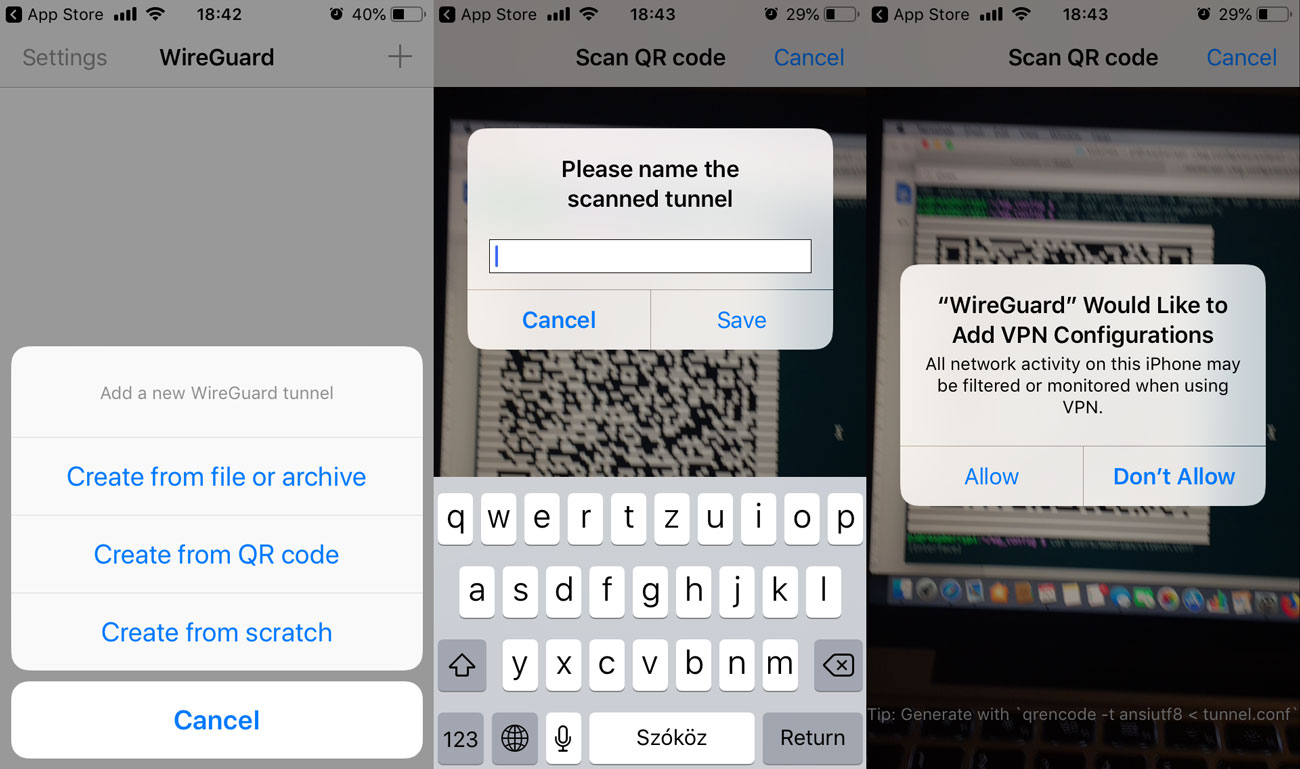
Launch the app, click on + sign in the right corner and choose Create from QR code.

When you are adding a client on the server, it should show a scannable QR code right in the terminal and QR code is saved in the user config directory in png format (wg_conf/users/youruser/youruser.png):

Alternatively you can show user config anytime by calling sudo ./user.sh -v username. Output will be showing two QR codes, one with AllowedIPs you set in client.conf.tpl and one with AllowedIPs set to 0.0.0.0/0 (send all traffic trough VPN).
Q&A:
Q: No network problems if the lans are in the same dhcp range?
A: You can't have same dhcp range on both sides. There are workarounds, but it is not trivial to set up.
Q: Do you need port forward?
A: Yes, you need to forward one port, type: UDP. In example we used port 51820.
Q: Can you make a VM with Wireguard instead of a Raspberry Pi?
A: Of course you can, there is no restriction, the configuration is the same. Virtual machine, physical machine, doesn’t matter.
Resources:
WireGuard website: https://www.wireguard.com
WireGuard presentation https://www.wireguard.com/talks/eindhoven2018-slides.pdf
Actual version of this guide is available at: https://github.com/adrianmihalko/raspberrypiwireguard/