Push is a file transfer extension built with with the goal of being both easy to use and reliable.
- Features
- ️️️Quick setup
- Extension settings
- Using push
- Service settings files
- Available services
- Reporting bugs
- Contributing
- Push in your language
It currently provides:
- Transfer of individual files.
- Transfer of folders.
- Queueing (and transfer after save bulk).
- Watching of files within the project.
- SFTP gateway support - connect via an SSH gateway/bastion to your SFTP server.
Push supports many options and configuration modes. The most common of which is a single SFTP setup for an active workspace. The following steps will help you get set up in no time:
- Install Push from the VS Code extension marketplace.
- In the command palette, choose Create/Edit Push configuration and confirm the location (usually your workspace root), then choose the SFTP template.
- Fill in the missing details within the settings file. At minimum, you will need a
host,username, apasswordif not using keys, and therootpath which will contain the workspace files, starting at the root defined by the location of thepush.settings.jsoncfile. - You should then be able to upload files within the workspace by using the explorer menu, title bars, or command palette.
For more complete setup and configuration details, feel free to read on.
This extension contributes the following settings:
| Setting | Default | Description |
|---|---|---|
locale |
en-gb |
Language to use. See "Push in your language". |
settingsFilename |
.push.settings.jsonc |
Settings file name. Defaults to .push.settings.jsonc. |
settingsFileGlob |
.push.settings.json* |
A glob used to find settings files based on their potential name. Defaults to .push.settings.json*. This glob must match files named with settingsFilename. |
privateSSHKey |
(Empty) | Set the location of your private .ssh key. Will attempt to locate within the local .ssh folder by default. |
privateSSHKeyPassphrase |
(Empty) | If you're using a private key with a passphrase, enter it here. |
uploadQueue |
true |
If enabled, uses an upload queue, allowing you to upload all saved files since the last upload. |
ignoreGlobs |
**/.DS_Store,**/Thumbs.db,**/desktop.ini,**/.git/\*,**/.svn/* |
A list of file globs to ignore when uploading. |
queueCompleteMessageType |
status |
Choose how to be notified on queue completion. Either status, or message for a permanent reminder. |
statusMessageColor |
statusBar.foreground |
Choose the colour of the queue completion status message. |
queueWatchedFiles |
false |
When set to true, Push will queue watched files with changes detected instead of immediately uploading them. |
autoUploadQueue |
false |
When set to true, Push will automatically upload files that enter the queue. This allows for changes within VS Code to be uploaded on save, while not uploading changes from outside VS Code (like a watcher would). |
persistWatchers |
false |
When test to true, Push will retain up to 50 watchers between a restart of VS Code. See Watcher Persistence |
useEnvLabel |
true |
Set false to disable the currently active environment label within the status bar. |
envColours |
dev: #62defdstage: #ffd08aprod: #f7ed00 |
The currently defined transfer environments (and their status bar colours). VS Code's theme colours can also be used here. |
envReminderTimeout |
30 |
The number of seconds before a reminder for the active environment is displayed when transferring files. See reminder in the general service settings. |
Push has three main modes of operation: 1) As a standard, on-demand uploader, 2) as a queue-based uploader on save, or 3) as a file watching uploader. All three methods may be combined as your preferences dictate.
When Push transfers a file within the workspace, it does a few things to make sure the file gets into the right place — regardless of which service is used:
- Find the nearest
.push.settings.jsonc(or equivalent) to the file being transferred. Push will look upwards along the ancestor tree of the file to find this. - Connect to the service required and find the root path as defined.
- Use the root path as a basis for transferring the file at its own path, relative to the workspace.
- Transfer the file, optionally presenting overwrite options to the user.
Root path resolving can be a tricky concept if you've not used it before. Simply put, it is a method by which Push figures out where the files should go, relative to where they are in your project.
For example: an SFTP connection has been defined in the .push.settings.jsonc file for your workspace folder, and it has a root setting of /home/myaccount/public.
If your workspace root was /Users/myusername/Projects/myproject/, the push.settings.jsonc file was directly within myproject/, and the file you uploaded was at <workspace>/contact/index.php, then it would end up being uploaded to /home/myaccount/public/contact/index.php.
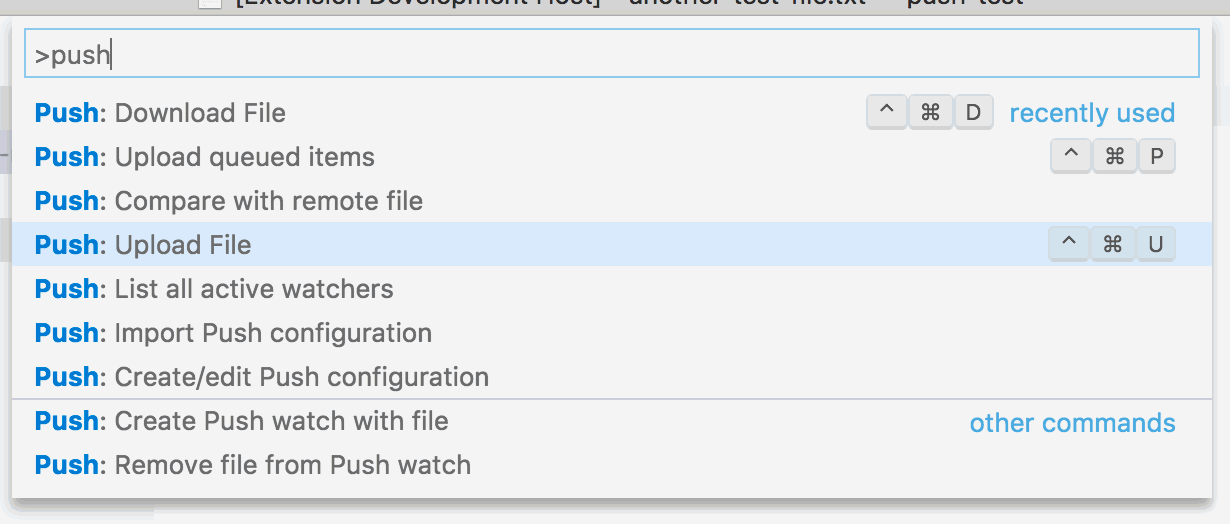
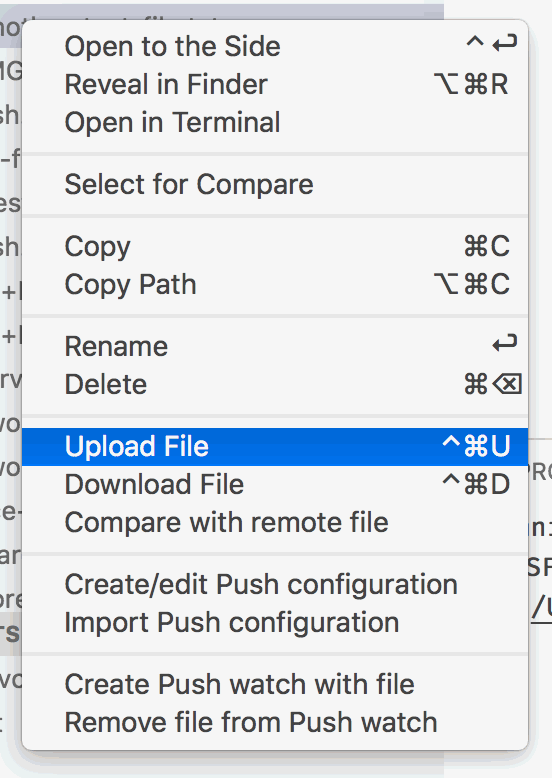
There are a few methods you can use to transfer files on demand. Two of which are the command palette, and the context menu in the file explorer, seen below:
Command palette:
Context menu:
Right click on a file or folder within the explorer to see the following options:
The same two methods can be used to perform downloads, as well as most of the other features of Push.
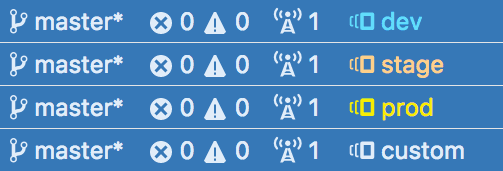
A benefit of using the on demand transfers feature combined with environment aware service configurations is that the currently active environment will show in the status bar. For example, the following environments are configured by default with Push:
When a file is being edited, Push will remind you of the environment to which the open file would be transferred should you use on demand transfers. Note - This does not affect queued uploading or file watchers. The environment they are uploaded to will be determined by the individual file during the upload process.
The default environments are optimised to work well with the VS Code default "blue" status bar, and if you would like to use your own colours, or even your own environment labels, the setting envColours can be edited.
Another great feature of Push is that it will keep a list of all files you have edited or are being watched within VS Code and let you upload them with a single shortcut. This defaults to cmd-alt-p (or ctrl-alt-p on Windows).
Whenever a file is saved, and the queue is enabled, a 
Use the above shortcut, or select Upload queued items in the command palette to upload all of the files within the queue in a single operation.
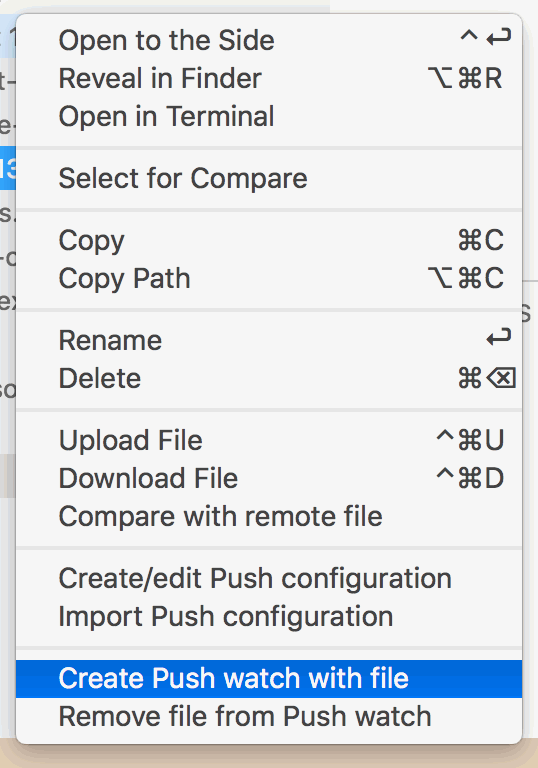
A third method of uploading files is to use the watch tool. This can be accessed from the explorer context menu:
Selecting this option will create a watcher for the file, or in the case of a folder, all of the files within it. Whenever any one of them is altered or created by either VS Code or another app, Push will attempt to upload them.
If queueWatchedFiles is set to true, then Push will instead queue the file for upload alongside any other items within the queue.
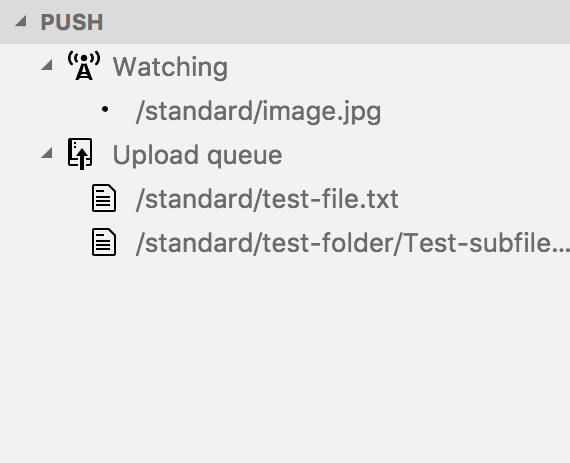
If you loose track of which files and folders are being watched, either click on the 
You can also remove items from the watch list or the upload queue from within this window, or clear the upload queue entirely.
If desired, watchers can persist across sessions of vscode. This means that when a watch is created, it will be recalled in its previous state if vscode is restarted or launched. To enable this feature, see the Push's persistWatchers setting.
When enabled, up to 50 watchers are stored. If this limit is reached, watchers created or used the least recently will be removed and will need to be recreated as needed.
To clear the entire list of stored watchers, see the Purge all stored watchers command in the palette.
To customise the server settings for a workspace, either use the context menu in the file explorer and choose Create/edit Push configuration, or add a file (by default, called .push.settings.jsonc) to your workspace with the following format:
{
	"env": "[active_env_name]",
	"[env_name]": {
		...
	},
	"[another_env_name]": {
		...
	}
}
Each available service has its own set of settings which are within the [options] object within a single environment object. For instance, if using the SFTP service, your config might look something like this:
{
	"env": "dev",
	"dev": {
		// "SFTP" here matches the service name
		"service": "SFTP",
		"options": {
			// SFTP Specific options
			"host": "upload.bobssite.com",
			"username": "bob"
			"password": "xxxxxxx",
			"root": "/home/bob",
			// Global service options
			"collisionUploadAction": "overwrite"
		}
	}
}Service settings files support the concept of environments, i.e. multiple services and options to use in a single settings file. This means that you can change the active environment by altering the env property, avoiding the need to rewrite the settings file each time.
For example, a service settings file may have two environments - dev and prod. This can be defined in the following manner:
{
	"env": "dev",
	"dev": {
		"service": "SFTP",
		"options": {
			// ... settings
		}
	},
	"prod": {
		"service": "File",
		"options": {
			// ... settings
		}
	}
}
In the above example, the dev environment is active, and any files transferred within the scope of these settings will use the options defined within the dev object. Change the env property to prod, and files will then be transferred using the prod object.
As with the above example, the service does not have to be the same for all of the environments. You could, for instance, upload to an SFTP server in dev, and to a File location in prod.
The upload queue and watchers ultimately use the same process as the on demand uploader, including resolving a service settings file and using its data to perform a file transfer. The only thing to keep in mind is that if you have the environment label within the status bar enabled, it only applies to the currently edited file.
If you don't need the environment label, or would prefer not to have it, it can be removed by altering the useEnvLabel setting.
To change the active environment for a service settings scope, simply choose "Push: Set service environment" from within the command menu. You can also edit the settings file manually.
When defining a server settings file, placing it in the root of your workspace will define those settings for the whole workspace. Push also supports adding server settings files to sub-diretories within your workspace. When uploading files from within any directory, Push will look for the nearest server settins file and use it for server-specific settings.
This is a very powerful feature which means multiple settings files can be defined within one workspace to upload to either different servers, define different options per folder, or to use entirely different services across a project. For example, the following setup defines two services:
<workspace root>
├── dir1
│   ├── .push.settings.json
│   └── filename.txt
├── dir2
│   ├── .push.settings.json
│   ├── filename2.txt
│   └── another-file.jpg
In the scenario above, if filename.txt and filename2.txt were both edited, the upload queue would have 2 items in it, and both would be uploaded using their individual settings files.
Note: While this is a very useful feature, it does have one drawback - you cannot upload a path containing more than one settings file at a time. I.e. if a folder base has two subfolders, each with their own .push.settings.jsonc file, the base folder cannot not be uploaded via the context menus.
The SFTP service will upload files to remote SSH/SFTP servers.
| Setting | Default | Description |
|---|---|---|
host |
Hostname or IP of the remote host. | |
username |
Username of the authenticated user. | |
password |
Password for the authenticated user. Leave blank if using keys. | |
privateKey |
Private key path, if using keys. Defaults to the global privateSSHKey setting (If using sshGateway, see notes below). |
|
keyPassphrase |
Private key passphrase, if needed. Defaults to the global privateSSHKeyPassphrase setting. |
|
root |
/ |
The root path to upload to. All files within the workspace at the same level or lower than the location of the server settings file will upload into this path. |
keepaliveInterval |
3000 |
How often, in milliseconds, to send keep-alive packets to the server. Set 0 to disable. |
fileMode |
If required, a mode can be applied to files when they are uploaded. Numeric modes are accepted. E.g: "700" to give all access to the owner only. An array of modes is also supported. (See below.) |
|
sshGateway |
If you can't connect directly to an SSH server, and must instead connect via an intermediary server — commonly known as a Gateway host — you can enter its details in here. The properties available are detailed below. | |
debug |
false |
In debug mode, extra information is sent from the underlying SSH client to the console. |
Please note that the underlying SSH library does not support configurable authentication orders, which means that it is currently fixed. An order mismatch may prevent successful connections. For reference, the order is:
- `password`
- `publickey`
- `keyboard-interactive` (not currently supported)
This is the order in which authentication methods should be defined within the SSH daemon configuration, if possible.
The fileMode setting of the SFTP service can also be expressed as an array of glob strings and modes required. For instance:
	"fileMode": [{
		"glob": "*.txt",
		"mode": "600"
	}, {
		"glob": "*.jpg",
		"mode": "700"
	}, {
		"glob": "**/*/",
		"mode": "655"
	}]
The above example will perform the following:
- Files with names ending in .txt will be given the mode
600 - Files with names ending in .jpg will be given the mode
700 - All directories will be given the mode
655
For those interested, the underlying glob matching is performed by micromatch, and any glob pattern it supports can be used here.
If you are in an environment in which you must connect to the SFTP server through another gateway or host server, you can use the sshGateway option to define this requirement.
The following settings are available:
| Setting | Default | Description |
|---|---|---|
host |
Hostname or IP of the gateway. | |
username |
Username of the authenticated user. | |
password |
Password for the authenticated user. Leave blank if using keys. | |
privateKey |
Private key path, if using keys. Defaults to the global privateSSHKey setting. |
|
keyPassphrase |
Private key passphrase, if needed. Defaults to the global privateSSHKeyPassphrase setting. |
|
keepaliveInterval |
3000 |
How often, in milliseconds, to send keep-alive packets to the server. Set 0 to disable. |
debug |
false |
In debug mode, extra information is sent from the underlying SSH client to the console. |
The settings within sshGateway work in a similar way to the general SFTP settings.
The privateKey setting for the parent SFTP object is assumed to be a file on the gateway itself. That is, when connecting to the gateway using the sshGateway settings, a connection is then made to the server using the parent SFTP settings. For instance:
	"SFTP": {
		"host": "sftphost.com",
		"port": 22,
		"username": "sftpuser",
		"password": "",
		"privateKey": "/home/gatewayuser/.ssh/id_rsa",
		"root": "/home/someuser",
		"sshGateway": {
			"host": "gatewayhost.local",
			"username": "gatewayuser",
		}
	}
In the above example:
- A connection will be made to
gatewayhost.localwith the usergatewayuserand any default key defined in the Push settings, sourced from your local environment. - The key on
gatewayhost.localwill be found in the path/home/gatewayuser/.ssh/id_rsaand stored. - A connection will be made from
gatewayhost.localtosftphost.comusing the key found on the gateway host. - The connection will then be piped back to your local environment.
The File service will upload files to another location on your computer. This is done with a standard copy operation. It might seem fairly basic, but can potentially be quite powerful if combined with other syncing solutions or mapped drives (e.g. uploading to /Volumes/xyz.)
| Setting | Default | Description |
|---|---|---|
root |
/ |
The root path to upload to. All files within the workspace at the same level or lower than the location of the server settings file will upload into this path. |
The following options are available to all services:
| Setting | Default | Description |
|---|---|---|
testCollisionTimeDiffs |
true |
If this option is set to false, the service will assume newer files collide, which means all files that exist on the remote will produce a collision warning. |
collisionUploadAction |
(Prompt) | Sets how to proceed when colliding with the same remote file. Set one of stop (Stop transfer entirely), skip (Skip the file), overwrite (Overwrite the file), or rename (Keep both files by renaming the source file). This option is ignored if the file type (directory or file) does not match the target. |
collisionDownloadAction |
(Prompt) | Identical in options to collisionUploadAction, sets how to proceed when colliding with the same local file. |
timeZoneOffset |
0 |
The offset, in hours, the time is set to on the origin relative to the local device. I.e. if the origin is GMT+1 and the device is GMT-1, the offset would be 2 |
followSymlinks |
false |
If supported, the contents of symlinks may be included when uploading files. This will likely not affect downloads due to the nature of how they are normally represented on remote servers, as well as the potential for not having access to the linked-to files. |
reminder |
true |
If true, will remind you when reminderTimeout (or envReminderTimeout in the workspace config) has passed if this environment is active. This time is shortened if you switch away from VS Code. |
reminderTimeout |
null |
A server-specific timeout setting, in seconds. See envReminderTimeout in the main configuration. |
- SFTP may have trouble connecting to SSH servers with interactive authentication. This is possibly an issue with the underlying libraries and I am looking to solve this in the future.
- Some localised strings may not translate until VS Code is reloaded.
Found a bug? Great! Let me know about it in the Github issue tracker and I'll try to get back to you within a few days. It's a personal project of mine so I can't always reply quickly, but I'll do my best.
First of all, that's terrible and of course I wouldn’t wish this on anyone. Secondly, if you do have a method by which I can replicate the problem, do let me know in a bug report and I will give it priority over any new features.
Thirdly, please understand that I am not liable for any potential data loss on your server should you use this plugin. Push is not designed or coded to perform deletions of files (except for when it overwrites a file with a new one), and I have tested this plugin constantly during development, but there may still be bugs which could potentially cause data loss.
If you are working in a production environment or have sensitive or mission critical files, it is always recommended to either use a dedicated file transfer application or a fixed, peer reviewed deployment process.
If you would like to contribute, Huzzah! Thank you, and please check out the Contributing Guide first
master |
develop |
|---|---|
Currently, Push supports the following languages which can be selected within the configuration:
| Language | Code | Quality | Contributor |
|---|---|---|---|
| 🇬🇧 English (British) | en_gb |
High | (Built in) |
| 🇯🇵 Japanese | ja |
Poor | (Built in) |
| 🇮🇹 Italian | it |
Low-Medum | (Built in) |
If you'd like to help improve the quality of the existing translations, or add your own translation, please let me know and I would be happy to accommodate you. There are around 70 strings currently set into Push, and can be translated in a few hours by a native speaker.
Get in touch via the issues if you're interested in helping to localise Push.
