-
Notifications
You must be signed in to change notification settings - Fork 68
Improved Import for Magento 2 Manual
Improved Import and Export extension allows importing csv/xml/txt files with products data and product images to Magento 2. The files can be imported from a remote FTP / SFTP server, Dropbox, direct URL of a source CSV file, and starting from 2.1.1 version Google Sheets (Read about Google Sheet Master Table). In addition, the extension offers a dedicated category import from CSV files, import of attribute values and new attributes on the fly, import job scheduling with cron jobs , and other.
Besides, you get advanced export capabilities, including order export and export jobs, with attribute and table field mapping.
Complete features list of Improved Import/Export Magento 2 Extension features:
- Import csv/xml/txt files from a remote FTP / SFTP server, Dropbox, direct URL or Google Sheets;
- Import product images from a remote FTP / SFTP server, Dropbox or via a direct URL;
- Dedicated category import from a CSV file for selected categories (default M2 store allows importing categories only together with assigned products);
- Creation of new product attributes on the fly during import process;
- Creation of new attribute values on the fly: if attribute values don’t exist in Magento 2 database, they are created during the import process;
- Full support of Google Sheets – paste links and import directly from the sheets;
- Tier price import with products – imports both products and tier prices from a single file;
- Configurable products can be created on the fly – specify SKU of parent product for a simple product and configurable will be created automatically;
- Asynchronous import and export process for data heavy tables – now you can easily import and export data heavy tables from your bowser;
- Cron jobs for any kind of import (products , categories, customers, stock, attributes, etc.) – flexible and extremely powerful feature of Magento 2 Enterprise Edition is now available for Community Edition!
- Full support for configurable products: files can be placed locally or imported from a remote URL source;
- Fields mapping (in Magento 1.x style!) – you can map Magento 2 product attributes to any custom CSV column in your file! Fully flexible and powerful way to import custom data structures to Magento!
- Support for XML & TXT file formats;
- Export jobs with mapping functionality;
- Run import / export jobs from admin;
- Extended debugging functionality;
- Order export with invoices, credit memos, and other docs;
- Magento 1 preset for import jobs;
- Hardcoded / default values during mapping;
- File validation;
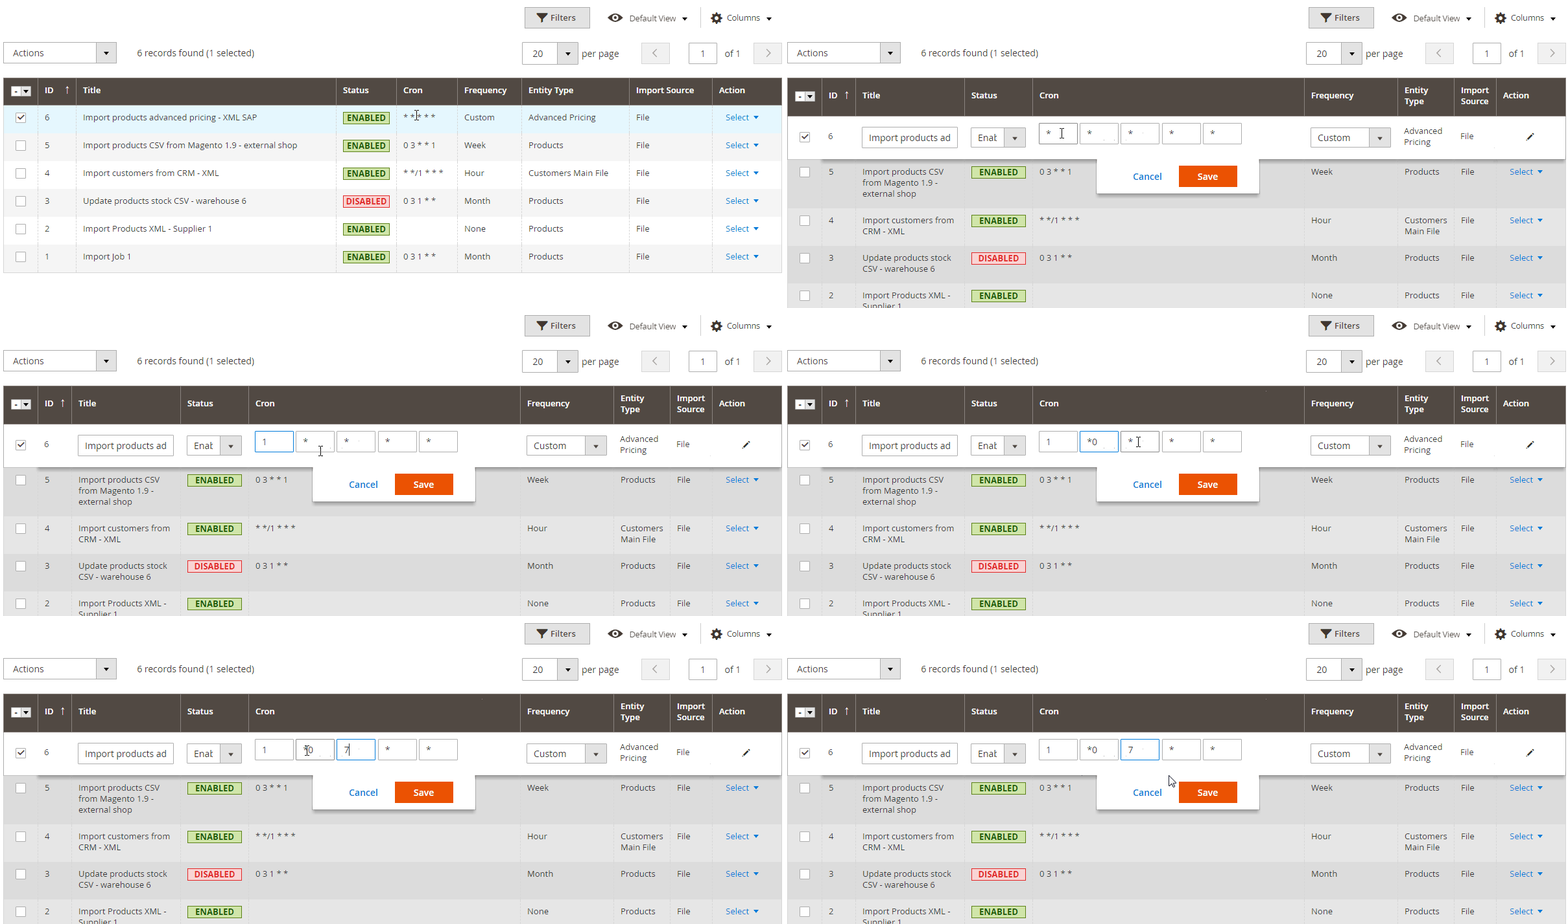
- Inline Edit Mode for cron in a grid;
- Attributes based export filtering;
- Sample files in the extension pack and manual;
- Direct CSV upload;
- Unzip / untar archives automatically;
- History with logs.
Improved Import Export Magento 2 Roadmap – vote for the most exciting features and we will implement them first. Leave your suggestions in the comments and we will add them to the poll.
We provide professional installation services for our Magento 2 extensions – get your extension installed and configured right after the purchase!
-
Installation
- Standard Magento 2 import
- Extension Configuration
- Import and Export Job grids
-
Add new Import Job
- Running the Job
- Job history
-
Add new Export Job
- Run jobs via CLI
-
Use cases and specific features
- Upcoming features
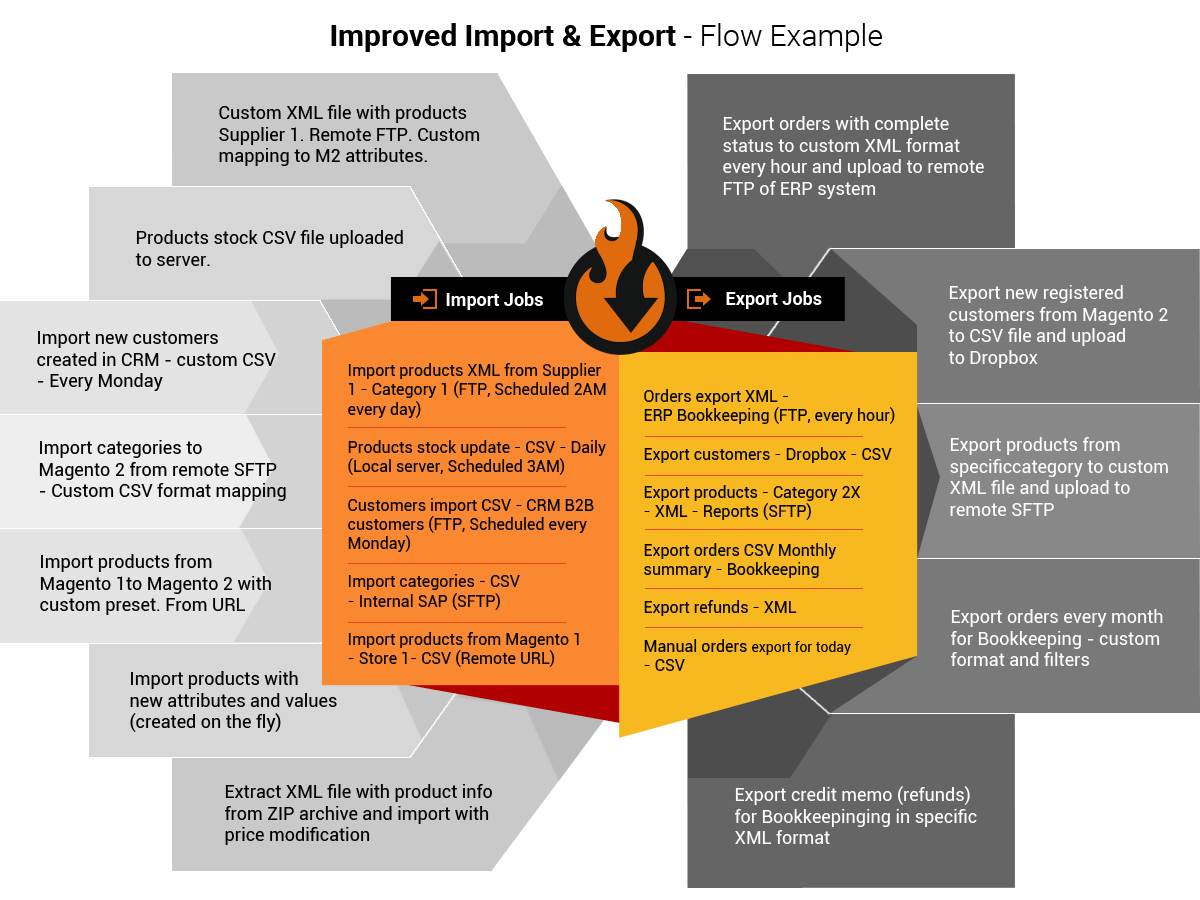
Before we begin, check a brief illustration of the extension features:
1. Backup your web directory and Magento 2 store database;
2. Download Improved Import installation package;
3. Copy files to /app/code/Firebear/ImportExport/ folder (create it if not exist!)
4. Navigate to your store root folder in the SSH console of your server:
cd path_to_the_store_root_folder
run:
|
1 |
php -f bin/magento module:enable Firebear_ImportExport
|
Only if you want to use Dropbox features :
|
1 |
composer require dropbox/dropbox-sdk
|
then:
|
1 |
php -f bin/magento setup:upgrade
|
and:
|
1 |
php -f bin/magento setup:static-content:deploy
|
5. Flush store cache; log out from the backend and log in again.
|
1 |
php -f bin/magento cache:clean<a name=“Dropbox”></a>
|
-
Create Dropbox account
.
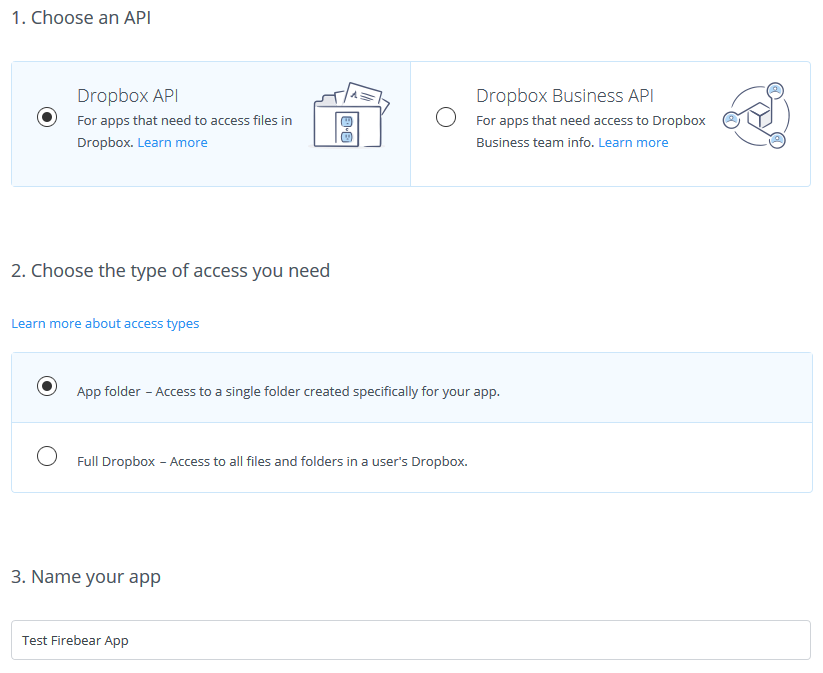
- Navigate to My apps screen and click ‘Create app’ button.
- Choose ‘Dropbox API’, select the most convenient ‘Type of access’, name your app, and click ‘Create app’ button.
-
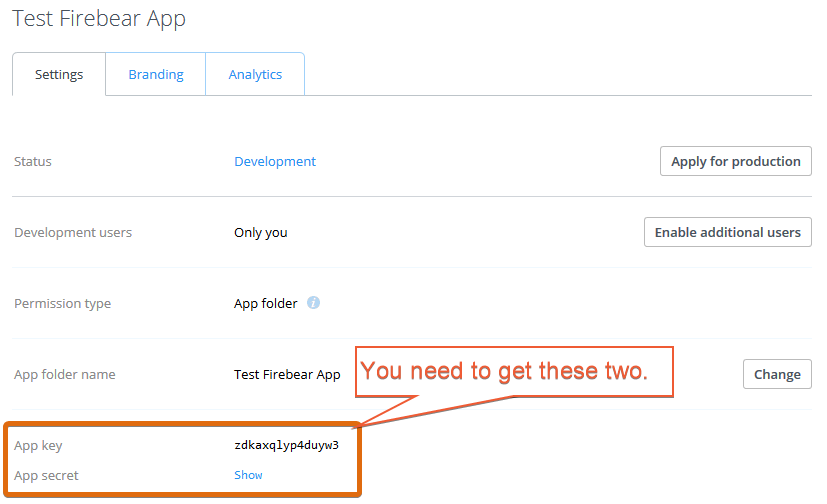
At the app screen find App key, and App secret. You will need to submit these into the appropriate fields when creating an Import Job.
- That’s it, now you have all necessary credentials to import files from your Dropbox account.
Before going any further with Improved Import, make sure you have read manuals and understand what to do with the default Magento 2 import procedure!
Once installed the extension introduces its configuration section to System > Configuration > Firebear Studio > Import/Export.
The configuration section is represented with a single setting Create attribute values on the fly. The setting controls if the product attributes can be created directly from the import table.
To create new attributes one should use custom column structure that will be covered later in this guide in the Product attribute values on the fly import section.
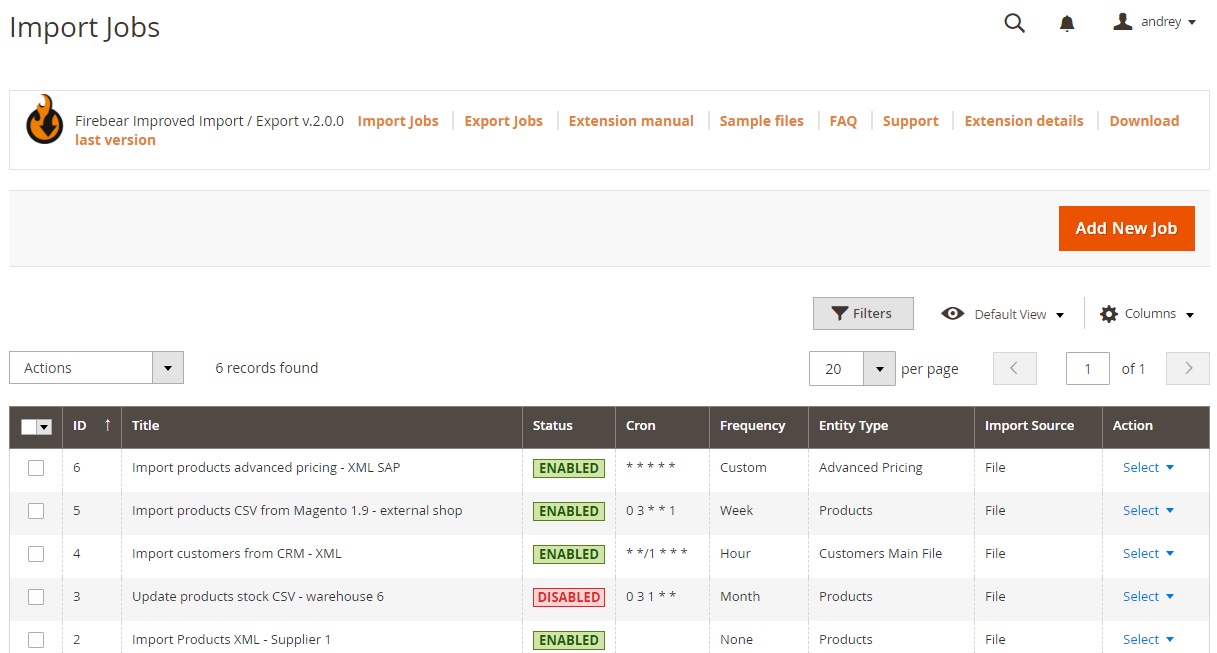
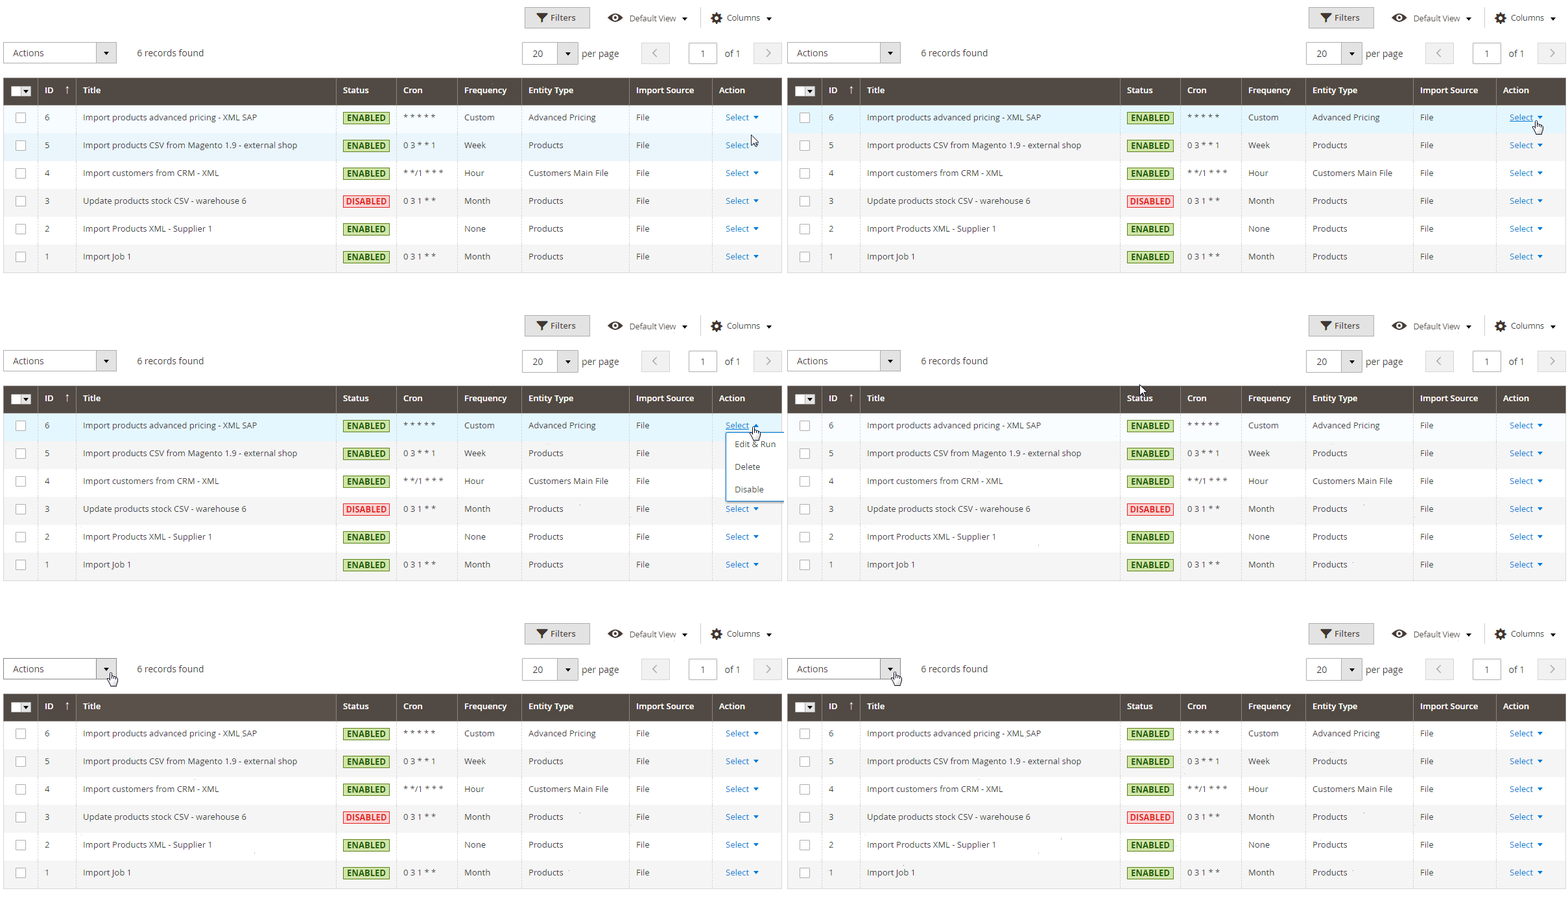
Once done with the settings, the store owner can proceed to the Import and Export Job grids that can be found under System > Improved Import/Export > Import Jobs and Export Jobs.
Import and Export Job grids have the same look and functionality and for convenience purposes we will cover both grids at the same time.
The grid displays the following information about each job:
- ID – unique ID of the job;
- Title – title of the job for internal identification purposes;
- Status – current status of the job, whether it is enabled or disabled;
- Cron – cron schedule, how often the job is launched automatically;
- Frequency – one of the predefined frequency values, if selected, how often the job is launched automatically;
- Entity Type – entity that the job imports to the store (products, advanced pricing, etc.);
- Import Source – source file with the table from which the values should be imported, can be: file, ftp, sftp, url, Google sheet.
All these columns can be adjusted using the ‘Columns’ button at the top of the screen.
Particular jobs can be found with the ‘Filters’ button.
And ideal grid view can be saved and loaded with the ‘Default View’ button.
In the ‘Action’ column, you can edit and delete jobs as well as change their statuses.
Alternatively, you can apply these actions to multiple jobs simultaneously.
Note, that it is also possible to edit the job right from the grid. You only need to click on the job.
This is it for the job grids. Now, let’s add a new import job to see how it’s done.
To add new import Job click ‘Add New Job’ button at the top of the job grid.
The New Job screen consists of six configuration sections, let’s have a break down of each section to get a complete understanding what option does what.
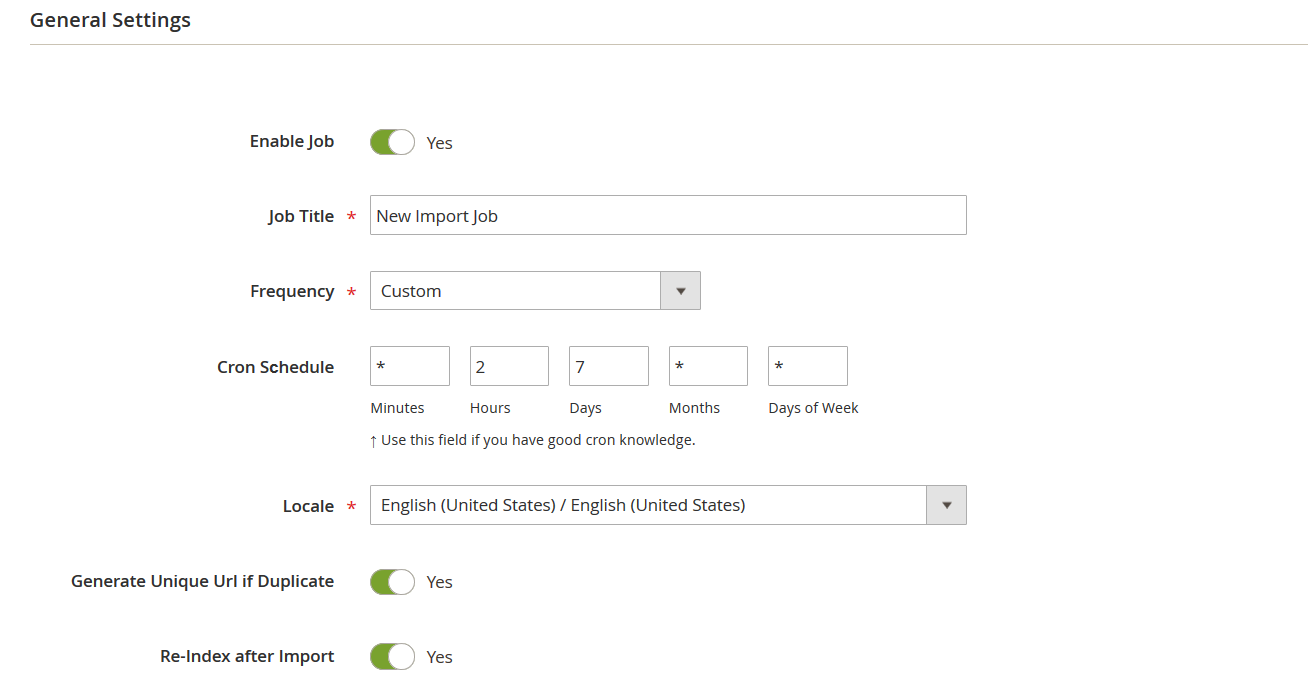
This set of settings defines the name of the job, schedule and general job behavior.
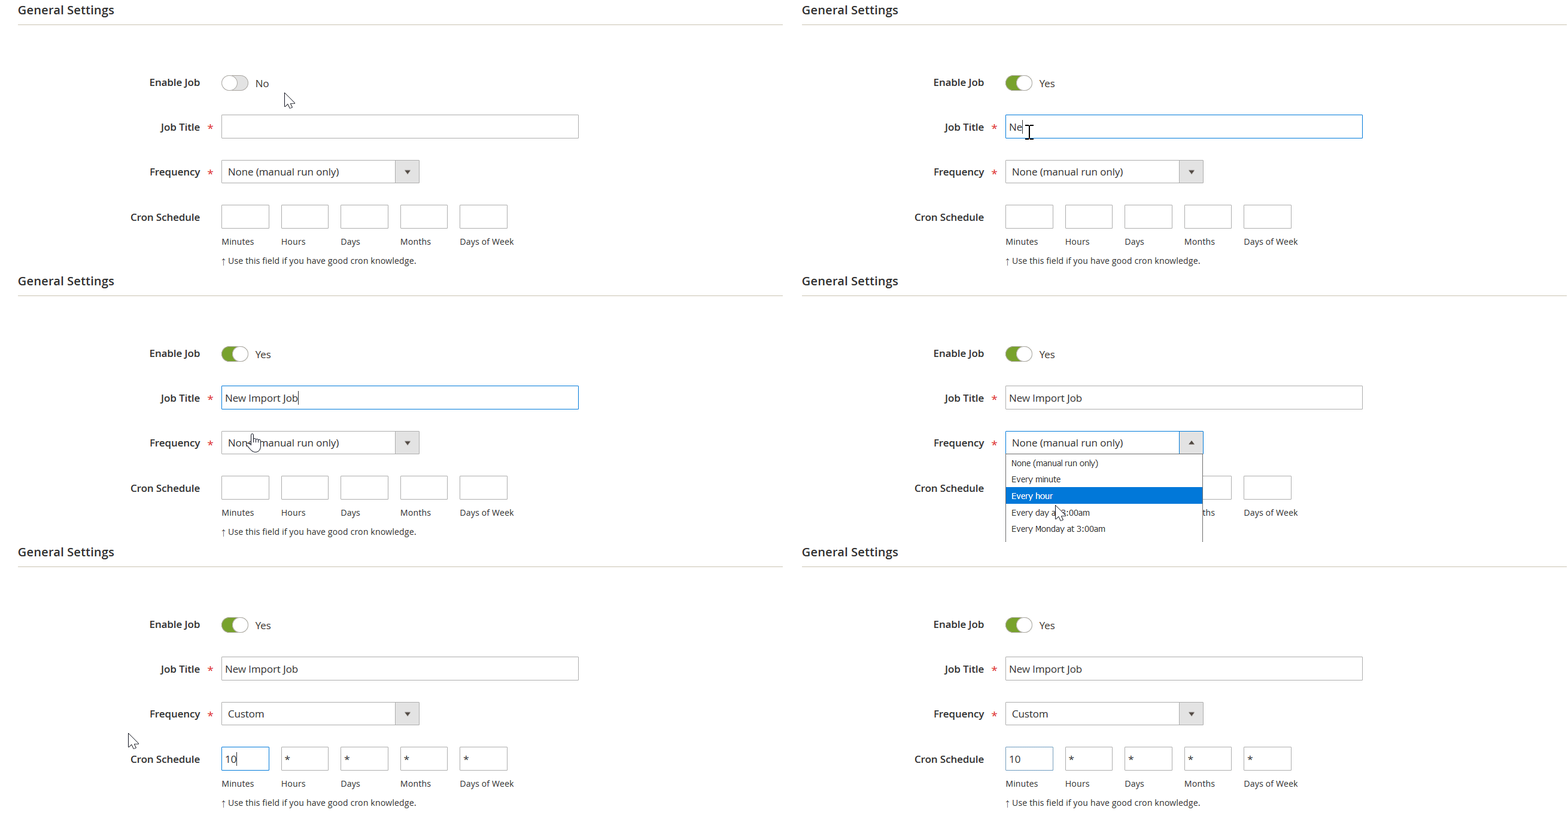
- Enable Job setting controls whether the job enabled or disabled. Depending on the selected option, the job status is changed from ‘Enabled’ to ‘Disabled’ and vice versa.
- In the Job Title we recommend you to use an expressive title that describes the new job. It will help you find the job in the grid or understand what jobs are enabled/disabled.
- Now, it is necessary to configure the Frequency of the import job. You can select one of the predefined values or stick to the ‘Custom’ Frequency, in this case proceed to the next item.
-
Cron Schedule allows you to take full advantage of the cron daemon. If you are not sure how to use it, feel free to take advantage of the following table and links to fully master it:
- https://en.wikipedia.org/wiki/Cron
- http://crontab-generator.org/
- http://www.cronmaker.com/
- http://stackoverflow.com/questions/18919151/crontab-day-of-the-week-syntax
- http://devdocs.magento.com/guides/v2.0/config-guide/cli/config-cli-subcommands-cron.html
- https://firebearstudio.com/blog/magento-2-cron-configuration.html
- Next, in the Locale set the locale of the store you will be importing your products to.
- If you think that some of the imported products may have the same URLs as existing ones, switch Generate Unique Url if Duplicate on.
- Some of the stores, may be indexed for performance optimization, in such cases enable Re-index after Import setting.
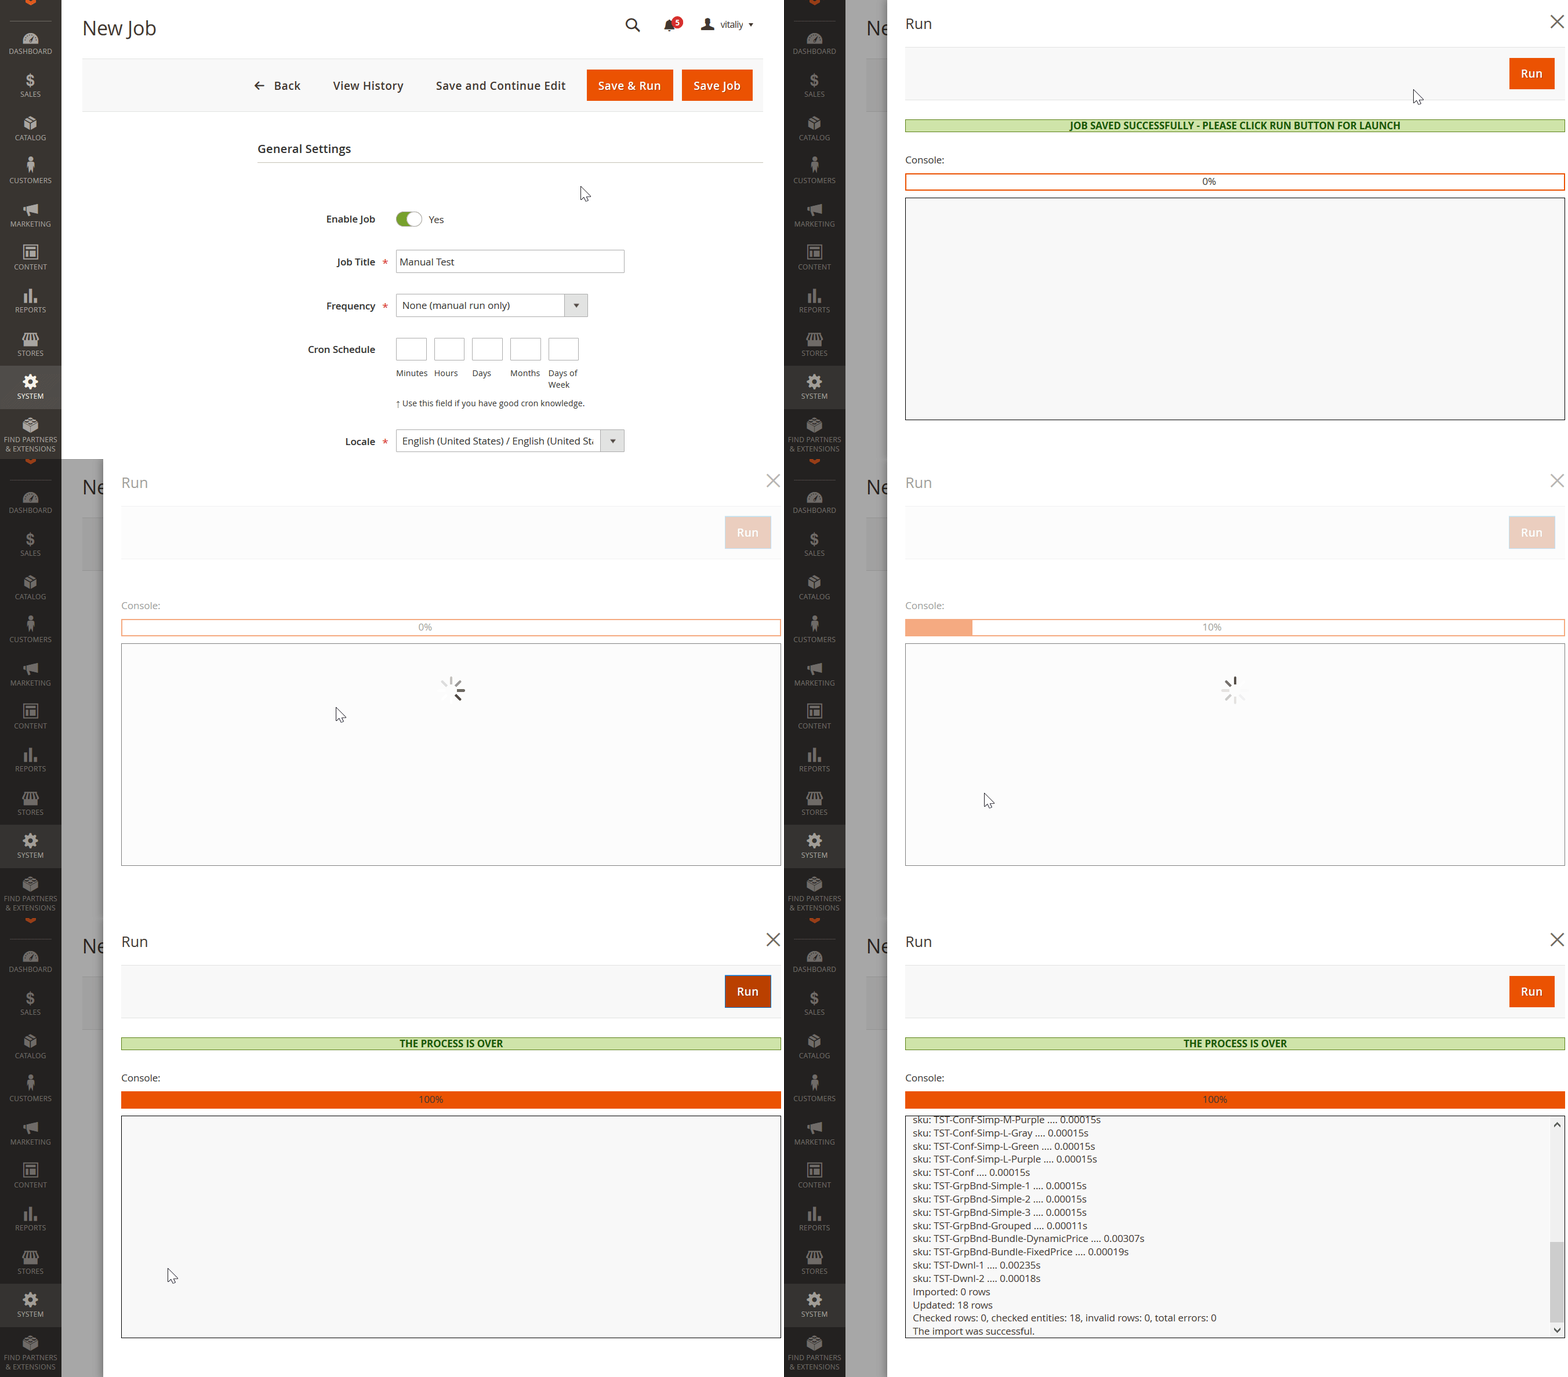
The first section of the import job configuration page is now complete. You know how to change job statuses and create cron schedules. The following gif illustrates the aforementioned processes:
Make sure you have got everything correct before saving the job.
Now, it is time to proceed to the second section of the New Job screen – Import Settings. Here, you can select the entity that will be imported. Currently, the extension allows you to import the following entities:
- Products;
- Categories;
- Customers and Addresses (single file);
- Customers Main File;
- Customer Addresses;
- Advanced Pricing.
Let’s select ‘Products’ to illustrate other sections.
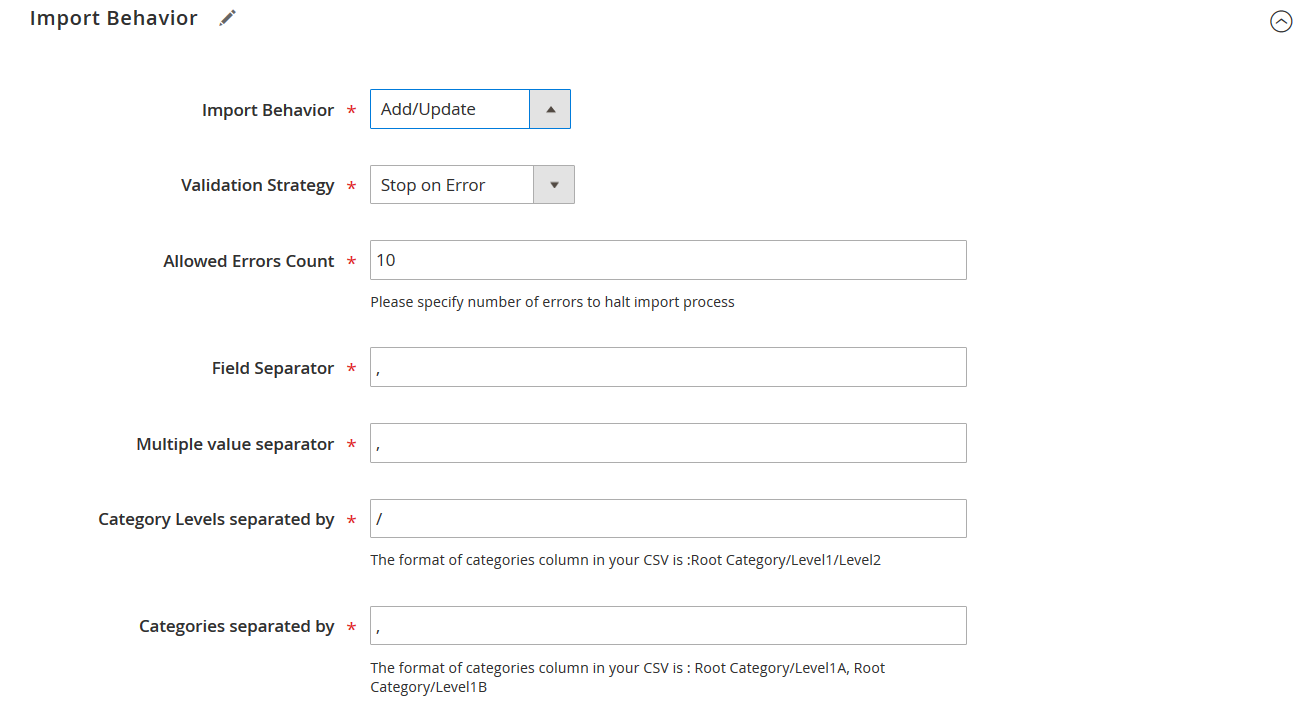
In this section, first you are to specify the Import Behavior. There are four default values:
- Add/Update;
- Only update;
- Replace;
- Delete.
Each value does what it reads. Choose the one that suits your needs.
Next, configure Validation Strategy. You can ‘Stop on Error’ or ‘Skip error entries’ during import process. And specify allowed error quantity, maybe a couple will do.
Then, you are suggested to choose various separators in case the file you are importing differs in formatting from the native Magento 2 .CSV file. The separator values are the following:
- Field Separator;
- Multiple value separator;
- Category Levels separated by;
- Categories separated by.
Default values of the Import Job separator fields correspond to the Magento 2 CSV file requirements, so, if you are using such CSV you shouldn’t change anything.
If you are using new import table of which separators you are not sure of, you can open it with any editor (like MS Excel) and find what separators are used.
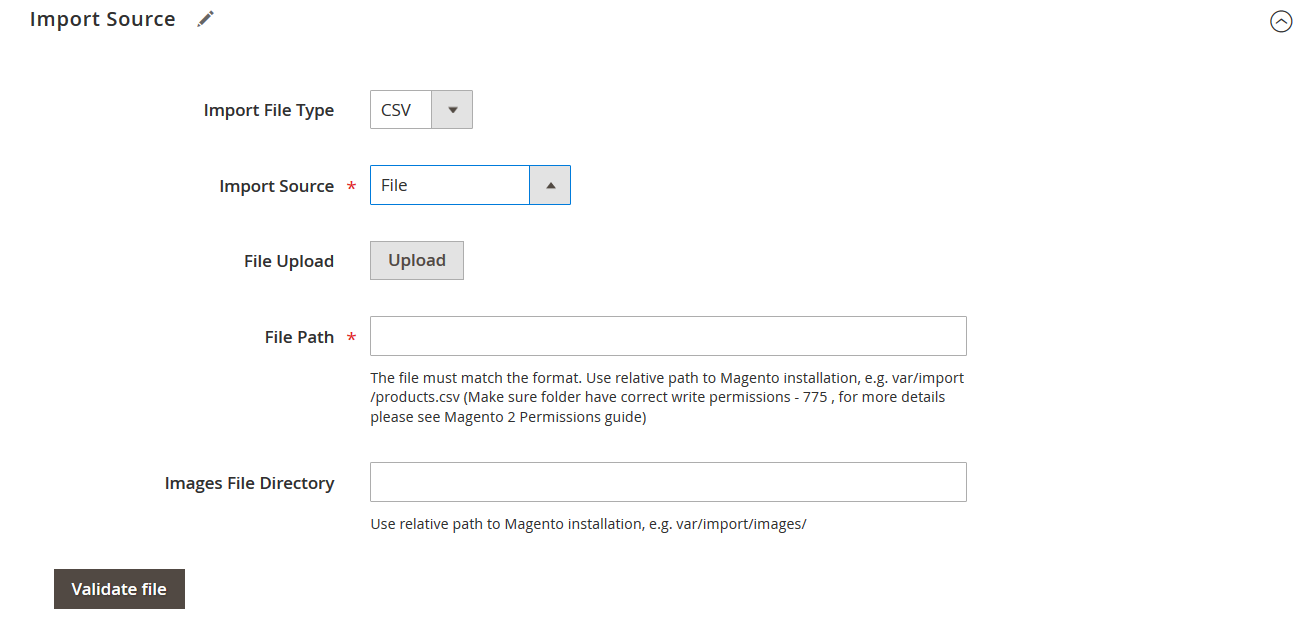
Import File Type section illustrates lots of useful improvements in comparison with the default import procedure. You can select one of three file types (the default import allows just CSV): CSV, XML, and TXT. Note that you can use XML files of the following format: Magento 2 Import Export Sample XML Files
. Alternatively, you can upload any other format, but it is necessary to use mapping. You can always find up-to-date sample import/export files in all formats at Firebear Github Import Export Sample Files for Magento 2.
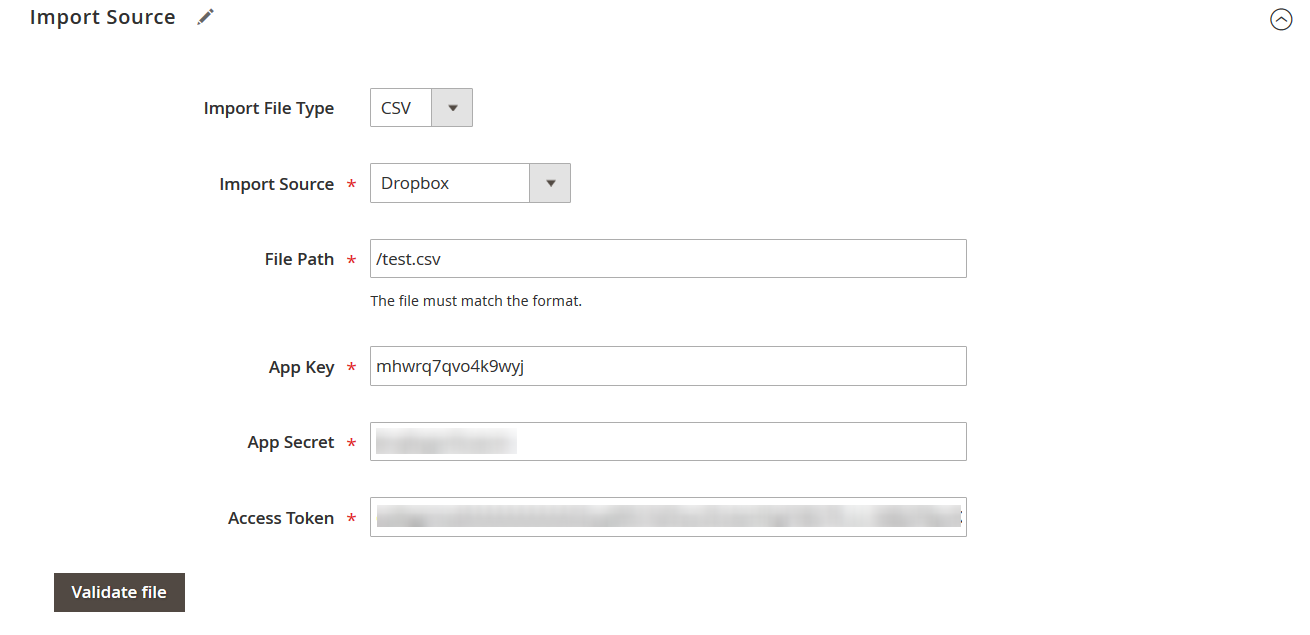
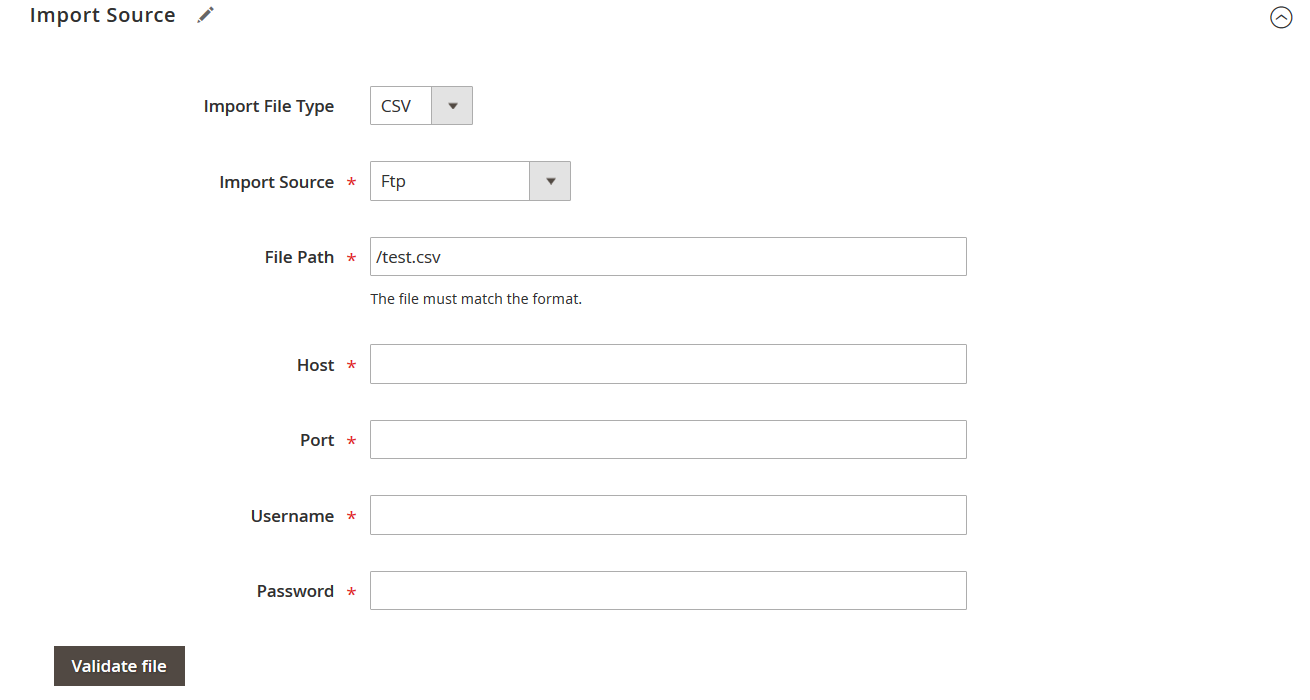
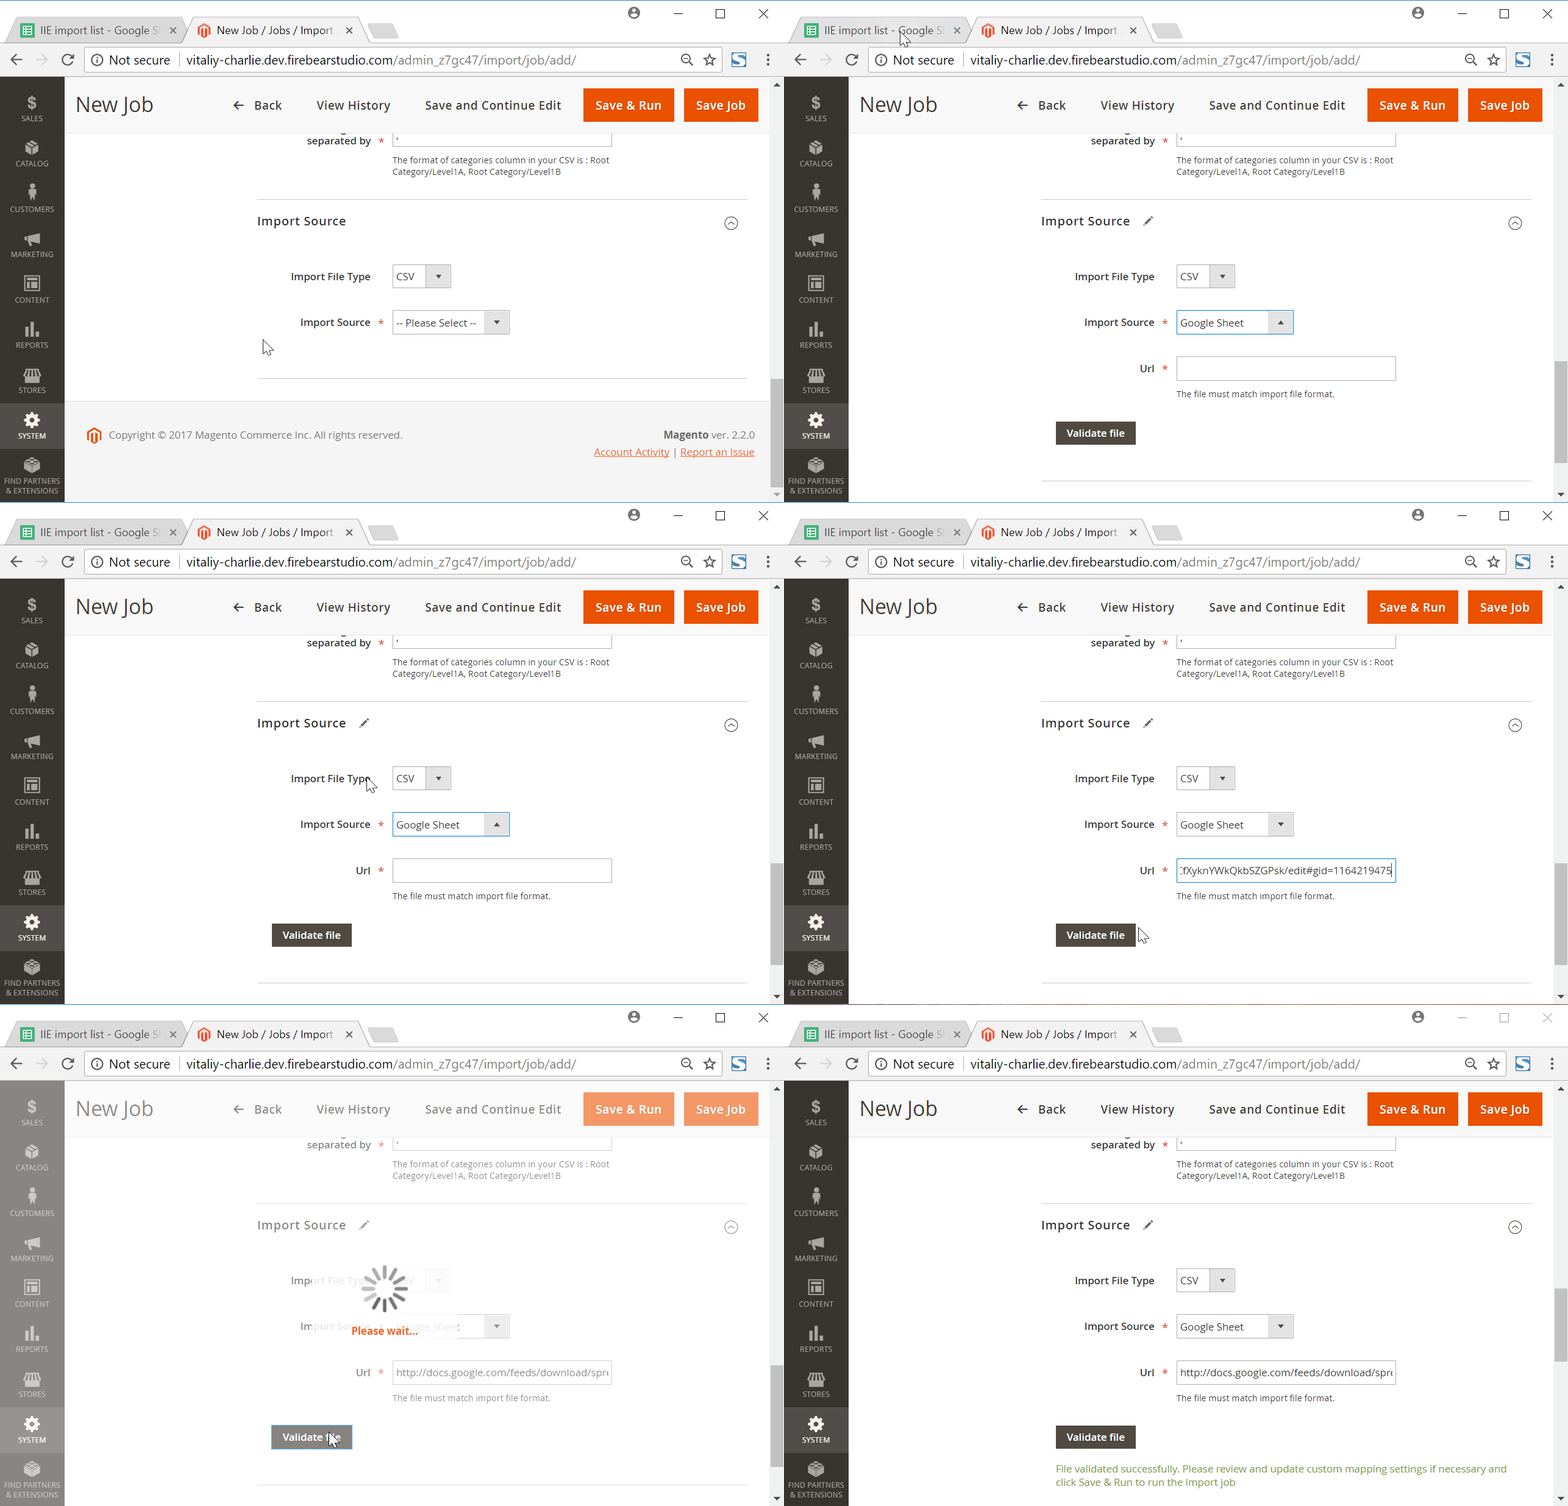
Next, choose your import source. It may be File, FTP, SFTP, URL, Dropbox, or Google Sheets.
Yes, the Google Sheets, at last! 2.1.1 version of the extension introduced Full Support of Google Sheets. You can now, work with your colleagues on the same document, paste it and run the import jobs. Just like this.
By the way, we have composed a Master Import table in Google Sheets to provide you with a comprehensive reference to the Magento 2 product import. Make sure to take full advantage of it.
In case of ‘File’, you can use direct file upload or specify its path. In addition, you can specify the path to the directory with product images, however this is optional and you can upload images manually.
Dropbox upload requires the following parameters to be specified: File Path, App Key, App Secret, and Access Token.
For ‘FTP’ and ‘SFTP’, specify File Path, Host, Port, Username, and Password.
As for Google Sheets and URL upload, it is only necessary to paste the file URL in the appropriate field.
Note that for each upload type, the Improved Import / Export Magento 2 extension provides file validation (a big grey button below to the left).
This was as for the basic import job configuration. Now, you can click ‘Save & Run’ button to test the newly created job. If the uploaded file has a structure that differs from the default import file, then you will need to apply mapping. If it satisfies the Magento 2 requirements, you can start the import process right now.
If the import file has a custom structure that doesn’t fit the Magento 2 requirements, you can apply mapping. If not sure, you can check the sample import files here: Import Export Sample Files for Magento 2.
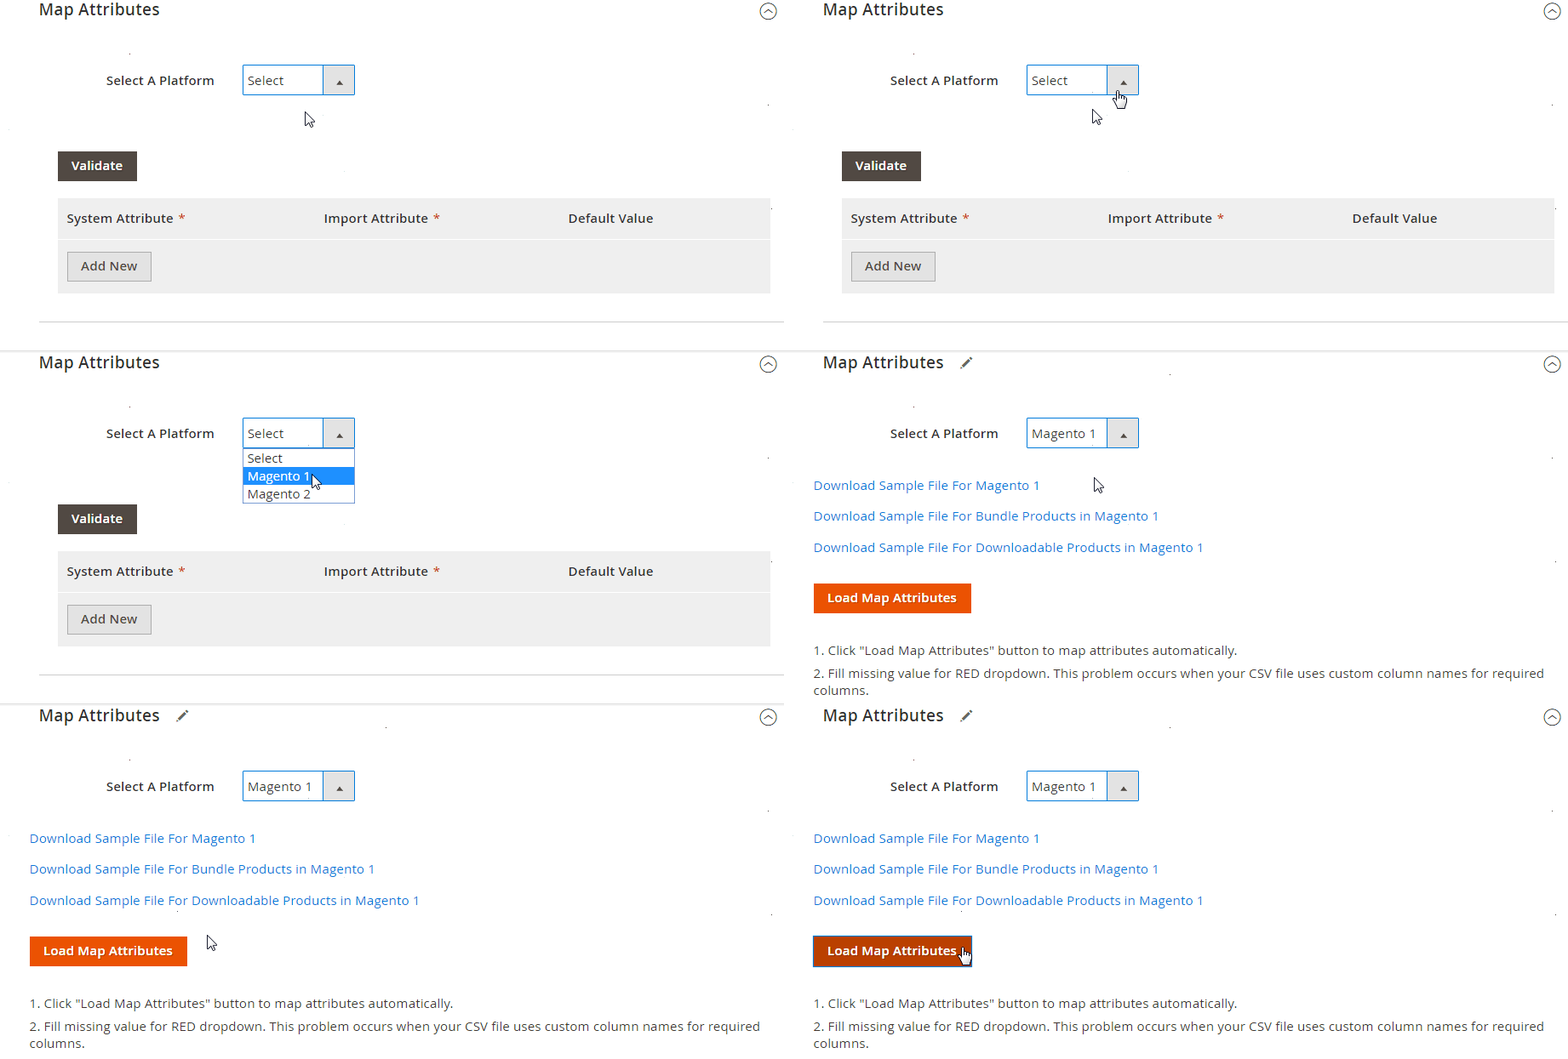
The ‘Map Attributes’ section provides the ability to apply presets. There is a ‘Select A Platform’ field, in which you can select a platform to import a CSV file from. For example if you are migrating your Magento 1 store, you can take advantage of Magento 1 preset. Let’s select it.
The extension will provide links to sample files, so you can view the structure of each one.
Now, click the ‘Load Map Attributes’ button to automatically map attributes. The module will compare product attributes from your store (System Attribute) and attributes from the import file (Import Attribute), applying a mapping preset.
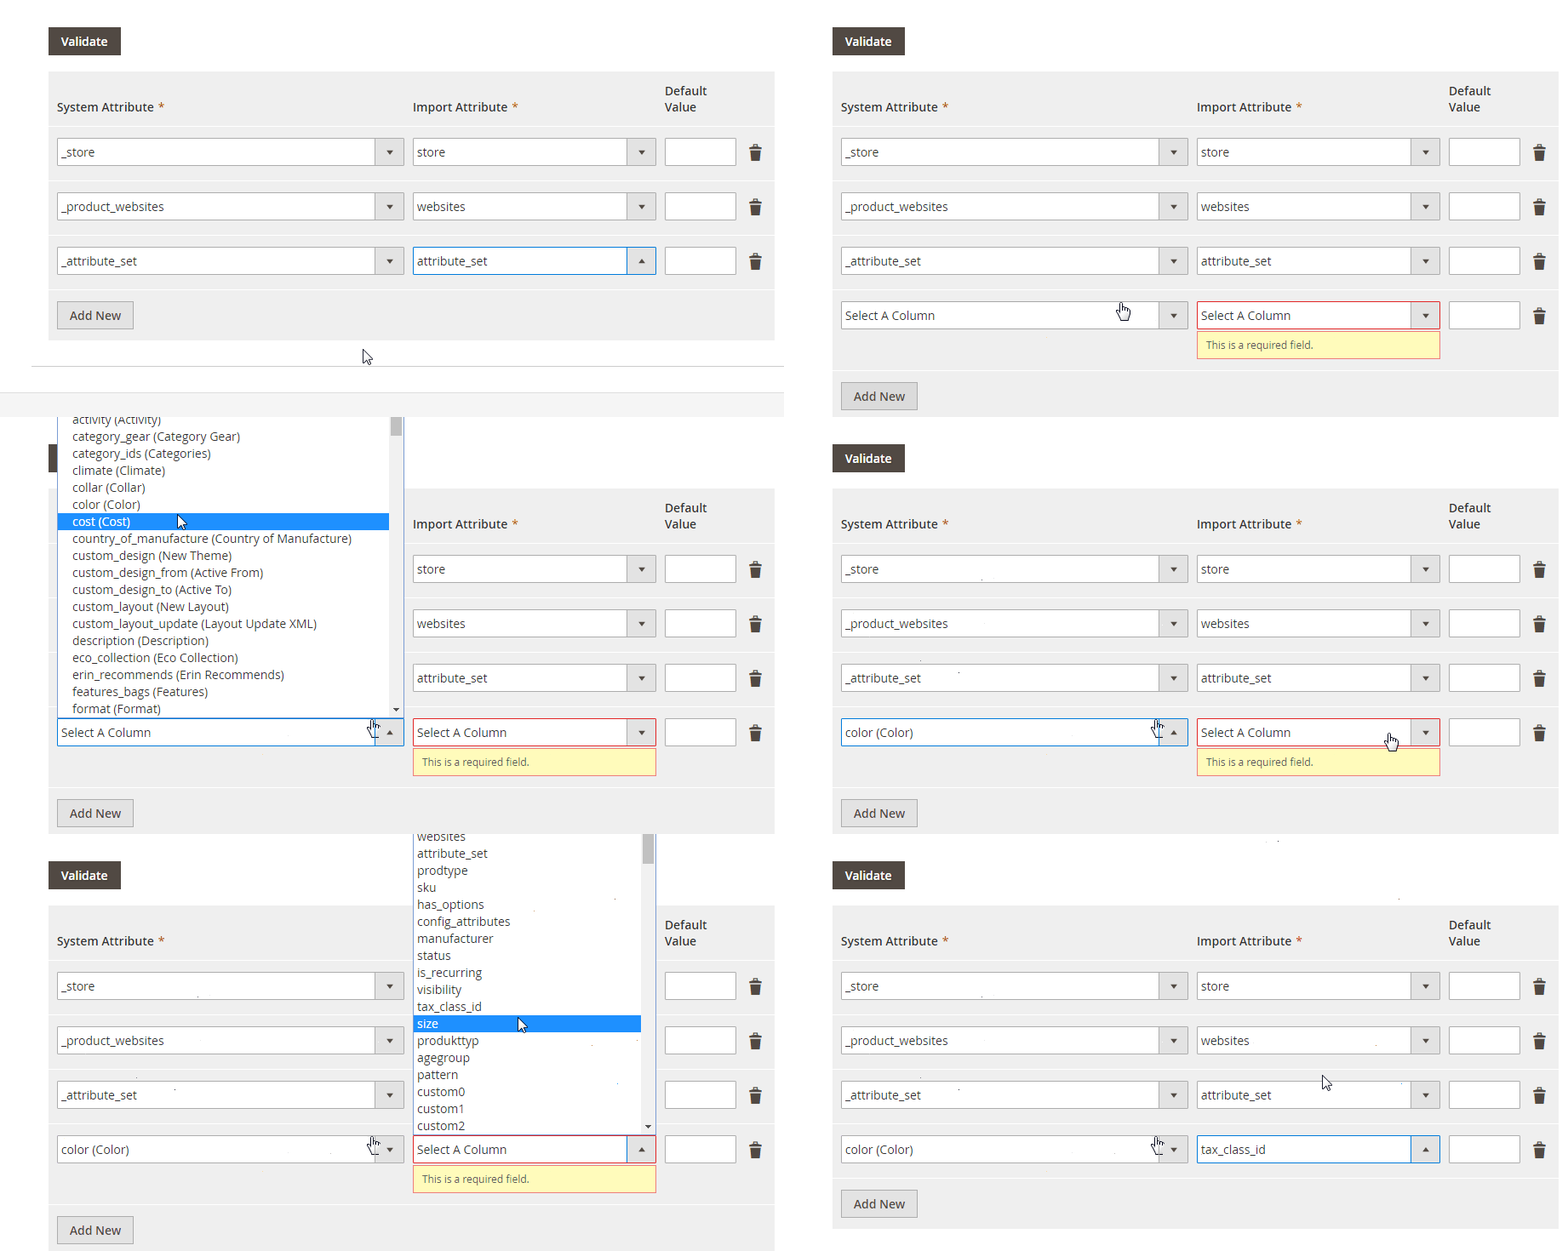
Once the preset is applied, the extension will automatically perform mapping for fields that don’t satisfy system requirements:
At the same time, you can still do everything manually: select a default Magento 2 attribute in ‘System Attribute’ and specify an appropriate import attribute. Besides, you can type a default (hard coded) value for each attribute. It will be added to each imported item in the appropriate attribute column.
To delete a mapping item, click on a black bin icon. When mapping configuration is prepared, to validate mapping – hit the appropriate button in the section.
Now, you can save and run the new Import job or just save it.
That’s it for Map Attributes section.
Improved Import and Export extension version 2.1.1 has added several fast and convenient ways of importing Configurable Products to your Magento 2 store.
To import a configurable product with a bunch of assigned simple products now you only need a single attribute. Let’s break it down.
In this section, we will only describe what each setting is responsible for and give general impression. If you are looking for in-depth guide on how to import configurable products using Improved Import and Export extension refer to the chapter ‘How to import configurable products’ of this manual.
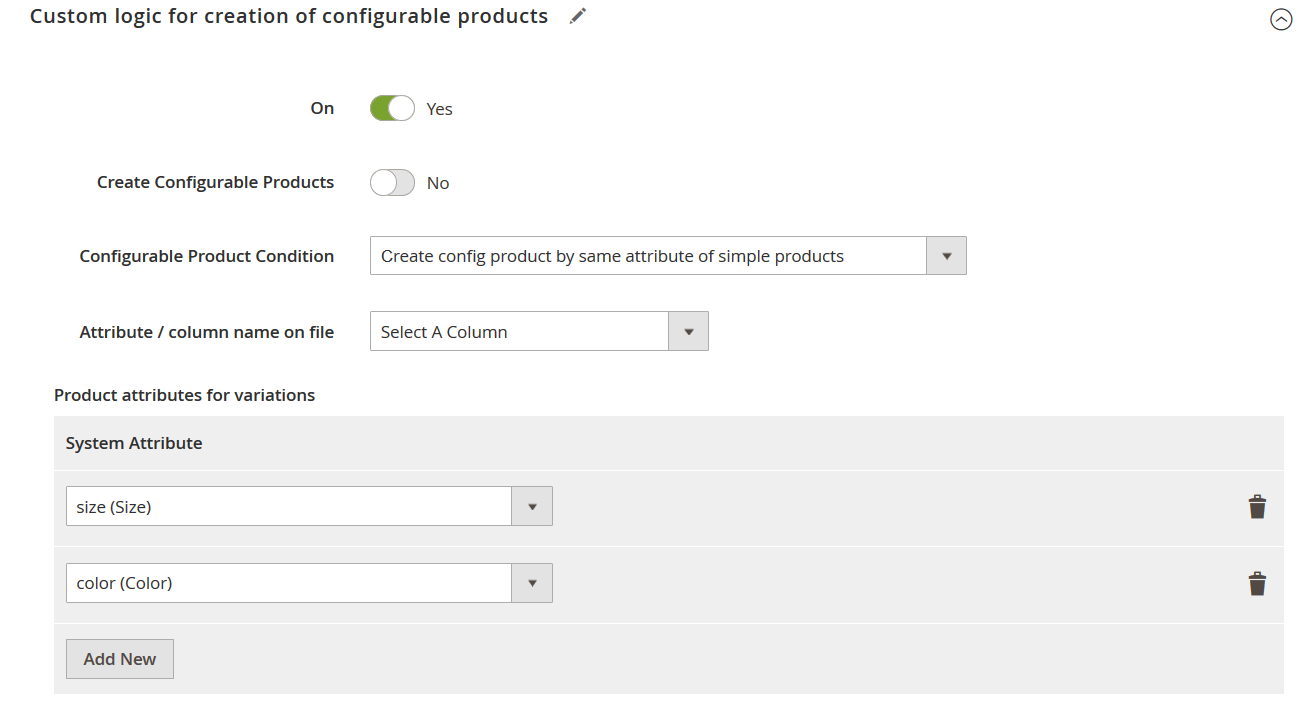
The new section for configurable product import comes with the following settings:
- On – defines whether the custom logic for creating configurable attributes is enabled;
-
Create Configurables Products – defines whether NEW configurable product should be created at your Magento 2 store if simple products have a reference to it, however the import file lacks this very product and it cannot be found at your store.
For example:
We are importing nine simple products that are referenced to configurable product with SKU:123. However, in the table there is no configurable product with SKU:123, and there is no such product in your Magento catalog. In this case a configurable product with SKU:123 will be created automatically, providing Create Configurable Products is enabled. Note: newly created configurable product will have the name same as SKU, and no price applied. -
Configurable Product Condition – defines on what conditions the configurable product should be created. There are five condition types:
-
Create config product by the same attribute of simple products – allows assigning simple products to a configurable product using dedicated column where the SKU (or any other recurring value) of the configurable product is specified.
How is it done.
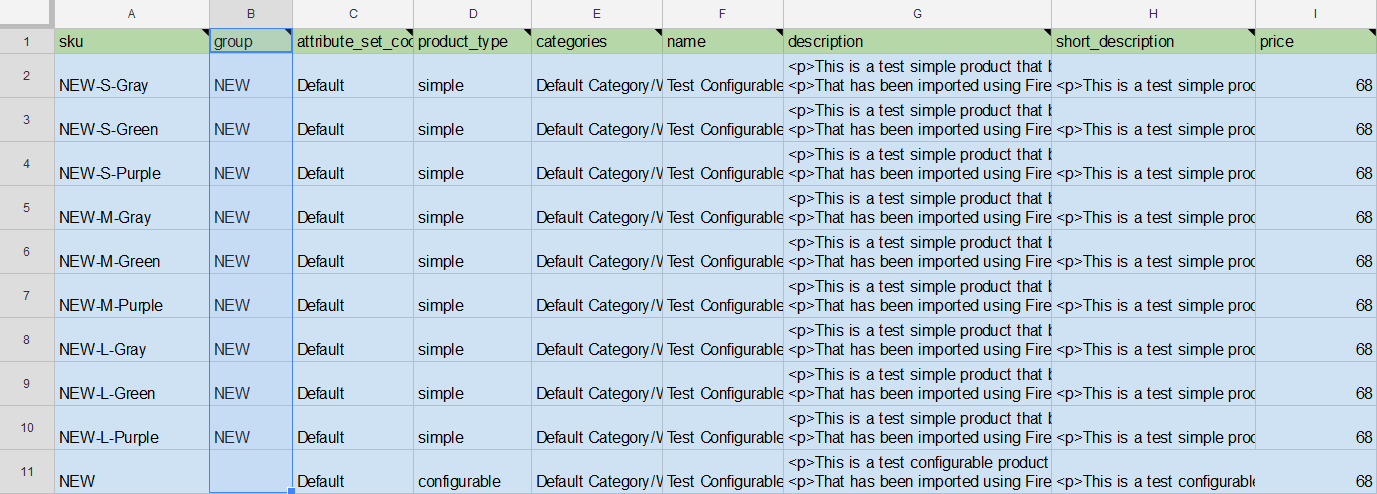
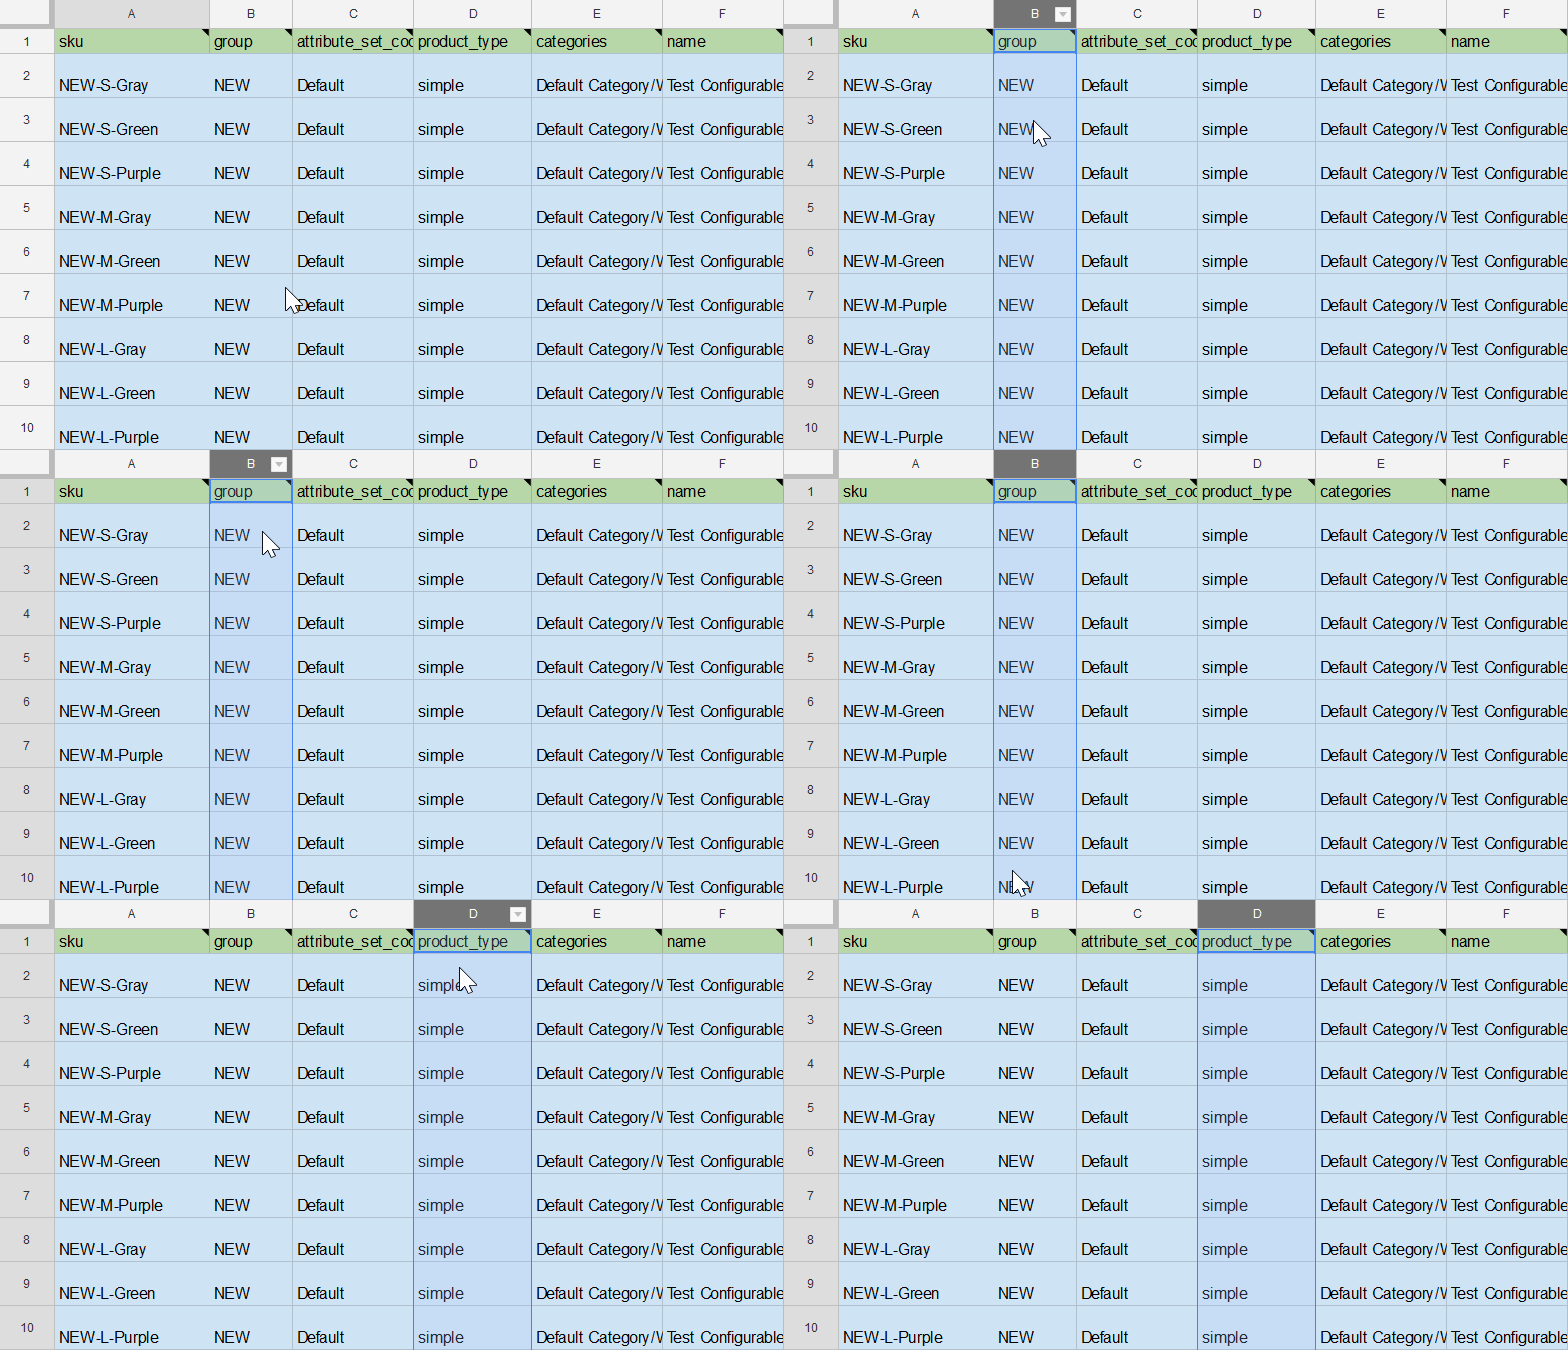
In the import table, where you list all simple products that should be assigned to the configurable, you need to create a new column with a unique name. In the Master Table we use column ‘group’.
In this column, next to the simple products, you need to specify the SKU of the configurable product you want this simple assigned to.
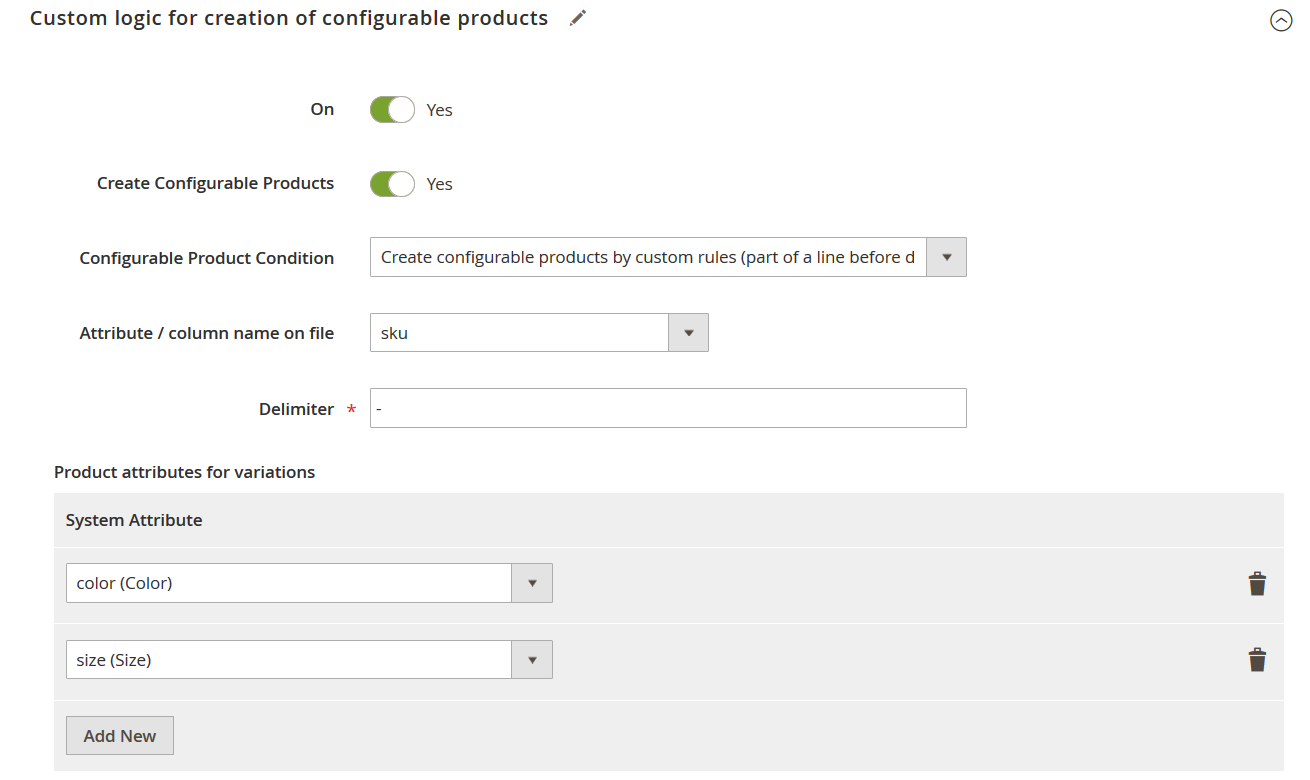
- Create configurable products by custom rules (part of a line before delimiter) –allows assigning simple products using SKU (or any dedicated column), where the extension reads part of the value before delimiter (which is specified separately).
- Create configurable products by custom rules (part of a line after delimiter) – allows assigning simple products using SKU (or any dedicated column), where the extension reads part of the value after delimiter (which is specified separately).
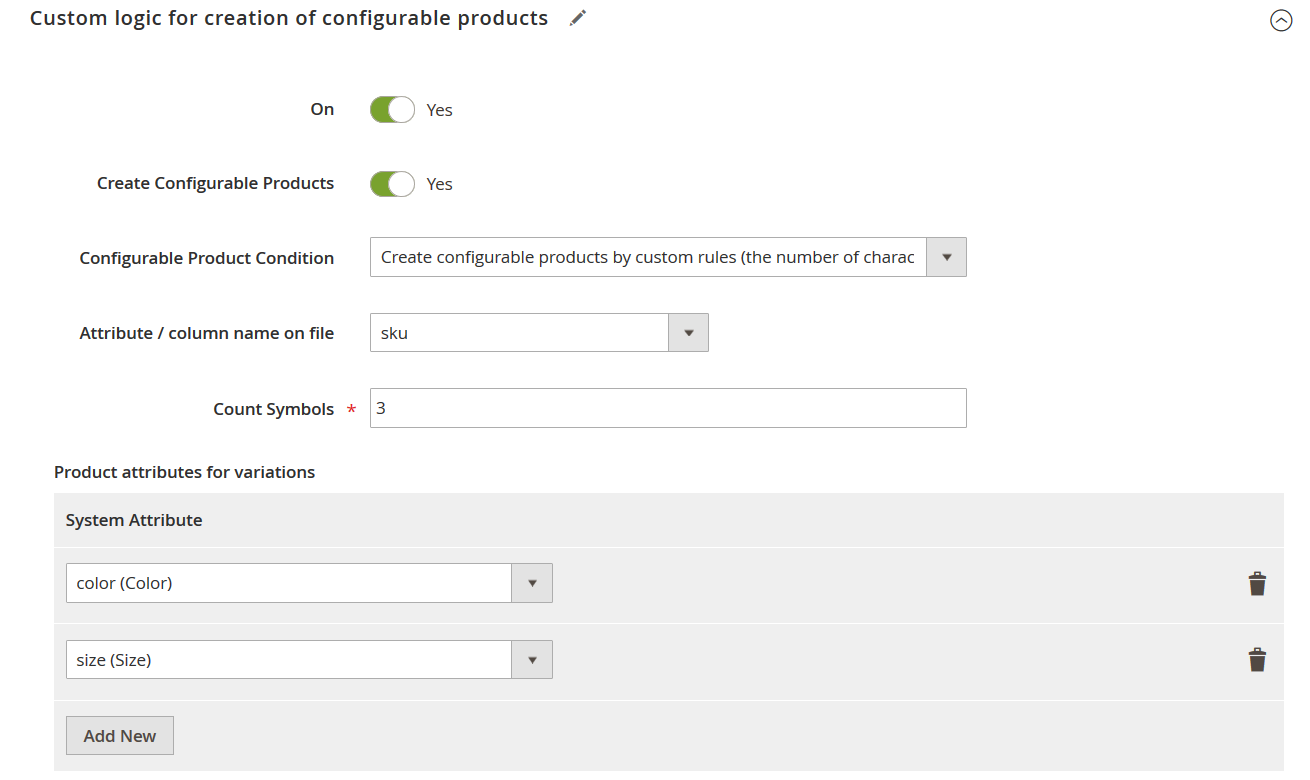
- Create configurable products by custom rules (the number of characters from the beginning of the line) – allows assigning simple products using SKU (or any dedicated column), where the extension reads first N number of characters from the beginning of the line).
- Create configurable products by custom rules (the number of characters from the ending of the line) – allows assigning simple products using SKU (or any dedicated column), where the extension reads first N number of characters from the beginning of the line).
-
Create config product by the same attribute of simple products – allows assigning simple products to a configurable product using dedicated column where the SKU (or any other recurring value) of the configurable product is specified.
- Attribute / column name on file – allows setting up the column, which defines Configurable Product Condition.
- Delimiter – allows specifying a delimiter value, which defines Configurable Product Condition.
- Count Symbols – allows specifying a number of symbols the extension should read considering Configurable Product Condition.
Next comes the Product attributes for variations table, where the store owner selects the product attributes, available in the import table, that the extension should also consider when assigning simple products to a configurable one.
For example:
If several simple products have same attributes: size and color; and same Configurable Product Condition values, then a configurable product will be created. If some of the attributes differ, then some of the simple products with different attributes, will not be assigned to the configurable one.
Now that we have covered all the Import Job settings it is high time to run the job.
To run the job from the Magento 2 admin, previously, this was possible only via CLI, hit ‘Save & Run’ button.
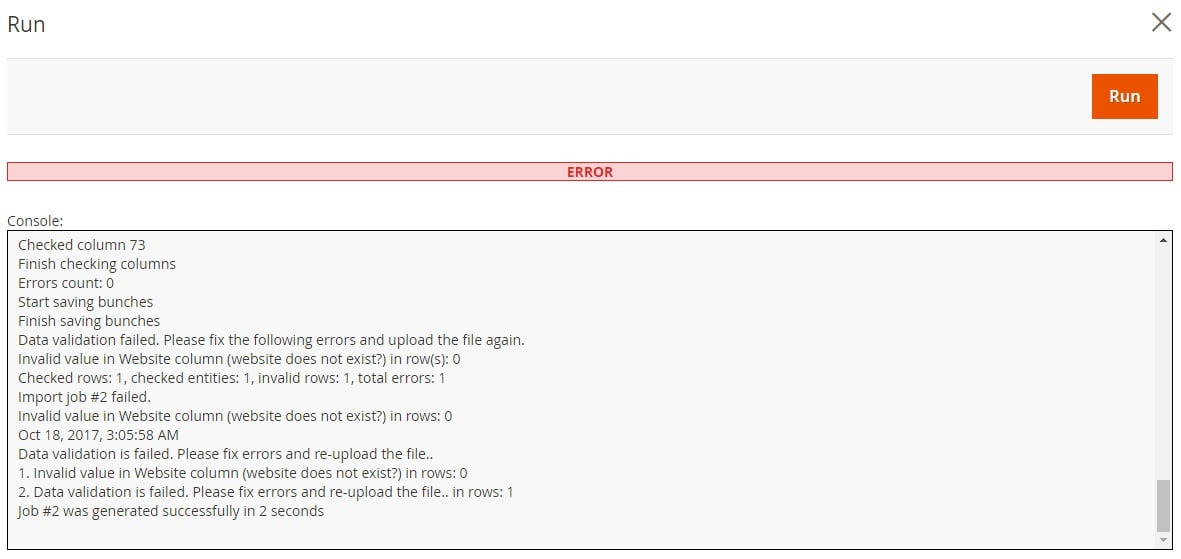
When the import is complete, the system will inform you whether the process went successfully or not. The detailed history log is also available on the appropriate page. In case of unsuccessful import, you will also see a detailed log with errors that are to be fixed:
Another important aspect of the Improved Import and Export Magento 2 extension is a job history which is available for both import and export jobs. You can find it on each job screen. Open the job and click the ‘View History’ link.
A new screen will be displayed. A grid with all runs is available there. You can download a log of each run, as well as view its type and start/finish time.
To create new Export Job hit the big orange ‘Add New Job’ button – you will be transferred to a new screen, which is divided into 4 sections: General Settings, Export Settings, Export Behavior, and Export Source. Let’s describe each one.
Here, you can enable/disable the job. Depending on the selected option, the job status is changed from ‘Enabled’ to ‘Disabled’ or vice versa.
Next, type a job title. We recommend you to use an expressive title that describes your new job. This will help you find the job in the grid or understand what jobs are enabled/disabled.
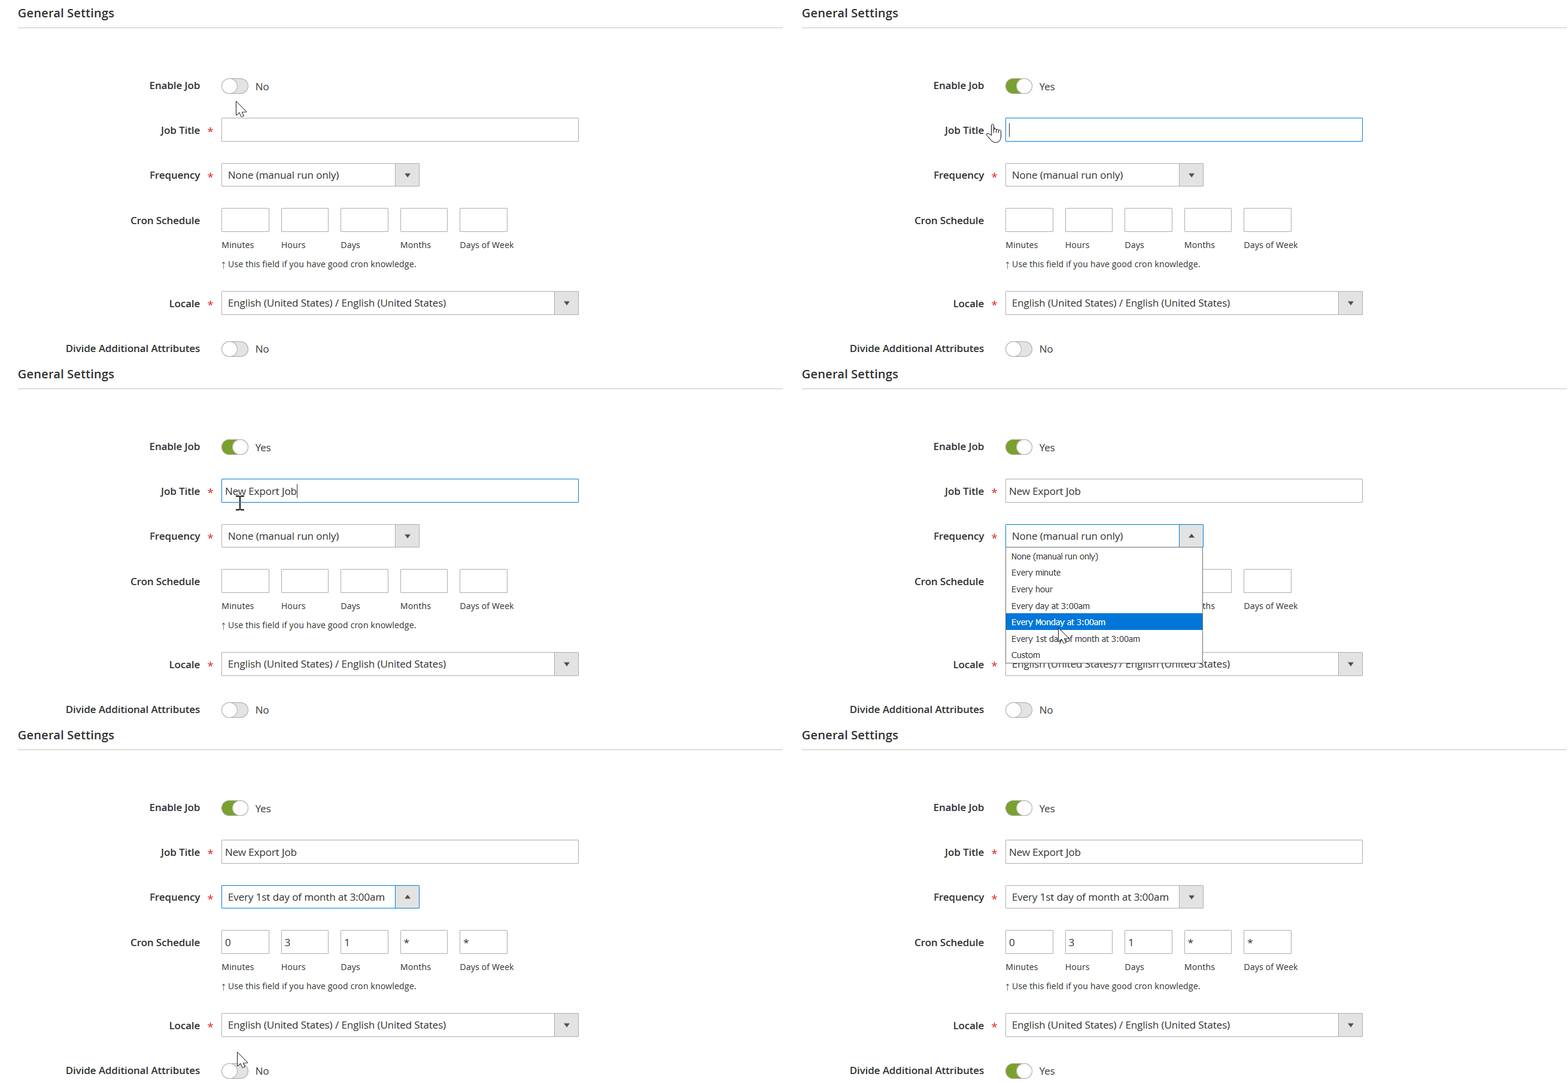
Now, it is necessary to configure the frequency of your export job. Although, you can always create a custom schedule (select the ‘Custom’ option in the ‘Frequency’ field), it is recommended to use the ‘Cron Schedule’ field (the field where you create a custom schedule) only if you understand cron well and have some previous experience in configuring this setting.
Alternatively, it is possible to select one of the predefined schedules:
- None (manual run only)
- Every minute;
- Every hour;
- Every day at 3:00am;
- Every Monday at 3:00am;
- Every 1st day of month at 3:00am;
- Custom.
In the end you are suggested to specify whether the additional_attributes column, where Magento 2 likes to put custom attributes should be split by attribute using Divide Additional Attributes setting.
The first section of the export job configuration page is now complete. You know how to change job statuses and create cron schedules. The following gif illustrates the aforementioned processes:
Now, it is necessary to proceed to the second section of the configuration page – Export Settings. Here, you can select an entity that will be exported. Currently, the extension allows you to export the following entities:
- Advanced Pricing;
- Products;
- Customers Main File;
- Customer Addresses;
- Order.
As you can see, the first 4 entity types are available in the default export procedure. The Improved Import / Export Magento 2 extension adds a new one – Order. Thus, you can easily export all orders automatically according to the predefined schedule. Let’s describe how to configure other export job sections on the example of the ‘Order’ entity type. Select ‘Order’ in ‘Entity’.
This section allows selecting a file format. You can export orders and related data via the standard CSV format or choose XML or even TXT. Note that you can use XML files of the following format: Magento 2 Import Export Sample XML Files
. You can always find up-to-date sample import/export files in all formats at Firebear Github Import Export Sample Files for Magento 2.
Next, specify field separator, multiple value separator, and field enclosure. Characters you specify there depend on system requirements of the platform you are going to export your order data to.
Next, choose entities that will be included into a CSV file you are going to export. As we have selected ‘Order’ we have the following entities:
- Order;
- Items of Order;
- Addresses;
- Payments;
- Shipments;
- Item of Shipment;
- Invoices;
- Item of Invoice;
- Credit Memos;
- Items of Credit Memo.
- Note that some items may not be compatible.
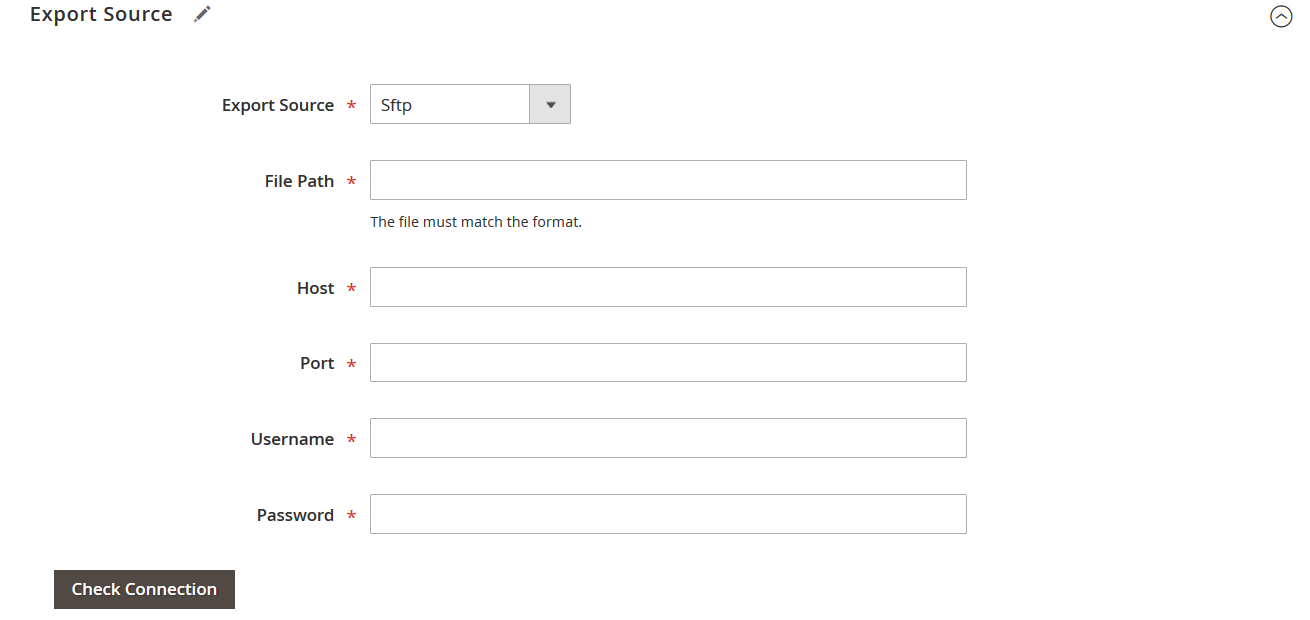
While selecting an export source, the extension offers 3 variants: File, FTP, and SFTP.
Choose the first one and specify a file path – your export source configuration is complete.
In case of FTP or SFTP, it is also necessary to specify Host, Port, Username, and Password. You can always check whether the provided parameters are correct by clicking the ‘Check Connection’ button.
This was a basic export job configuration. Now, you can click ‘Save & Run’ to test the new job. If exported file has a structure that differs from the default export file, then apply mapping. If it satisfies the requirements of your external system, start export right now. Below, we describe this process in a more detailed manner.
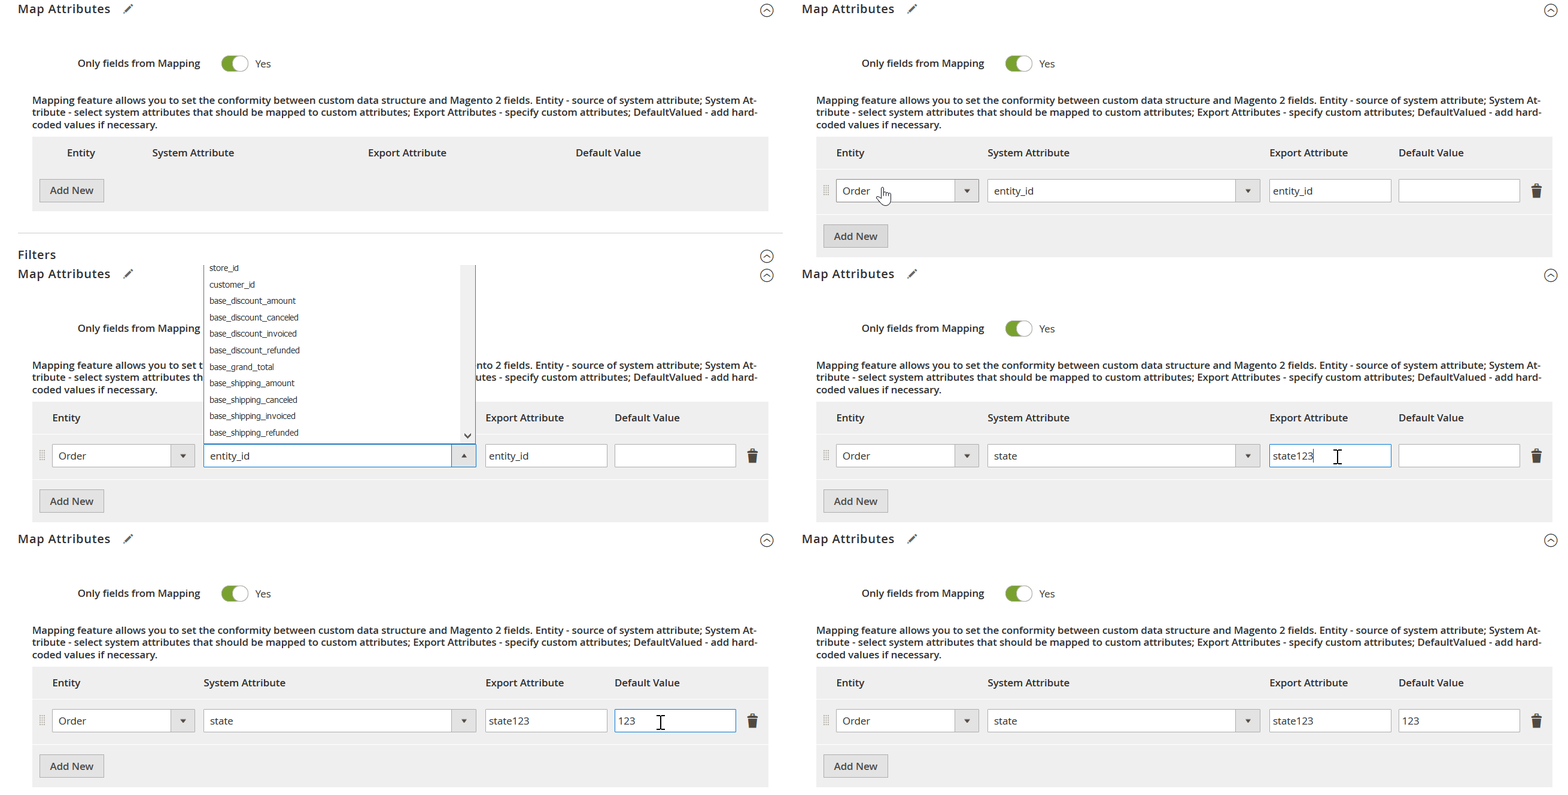
In this section, you can export fields specified in mapping only or all entity-related attributes. Turn the appropriate feature on to get a file with selected options only.
To do mapping, follow this step by step guide:
1) Hit the ‘Add New’ button;
2) Select an entity enabled in the ‘Export Behavior’ section (‘Entity’ column);
3) Select a system attribute that should have a custom name in the export file (‘System Attribute’ column);
4) Specify a custom name for the attribute selected in the previous step (‘Export Attribute’);
5) If necessary, specify a hardcoded or default value for the attribute (‘Default Value’ column), which will be provided to all items in the attribute column;
6) Repeat the previous steps to map more attributes.
Note that you can delete each attribute mapping by clicking the black bin icon and move rows by clicking on the left dotted area and applying drag&drop to the row.
Now when you know how to apply mapping and use hardcoded (default) values, we’d like to describe how filters work. Follow these steps to master the feature:
1) Click the ‘Add Filter’ button;
2) Select an entity enabled in the ‘Export Behaviour’ section (‘Entity’ column);
3) Select a system attribute that will be used as a basis of a new filter (‘Field’ column);
4) Specify parameters that will be applied for filtering (‘Filter’ column).
5) Repeat the previous steps to create more filters.
Note that parameters applied for filtering vary, depending on the attribute chosen (field).
It is possible to delete each filter by clicking the black bin icon. To move rows, click on the left dotted area and drag&drop the row.
Now, you can save and run the new job as well as only save it. The appropriate orange buttons are available on the top of the screen.
The process of running Export Jobs is similar to that of Import Jobs described previously.
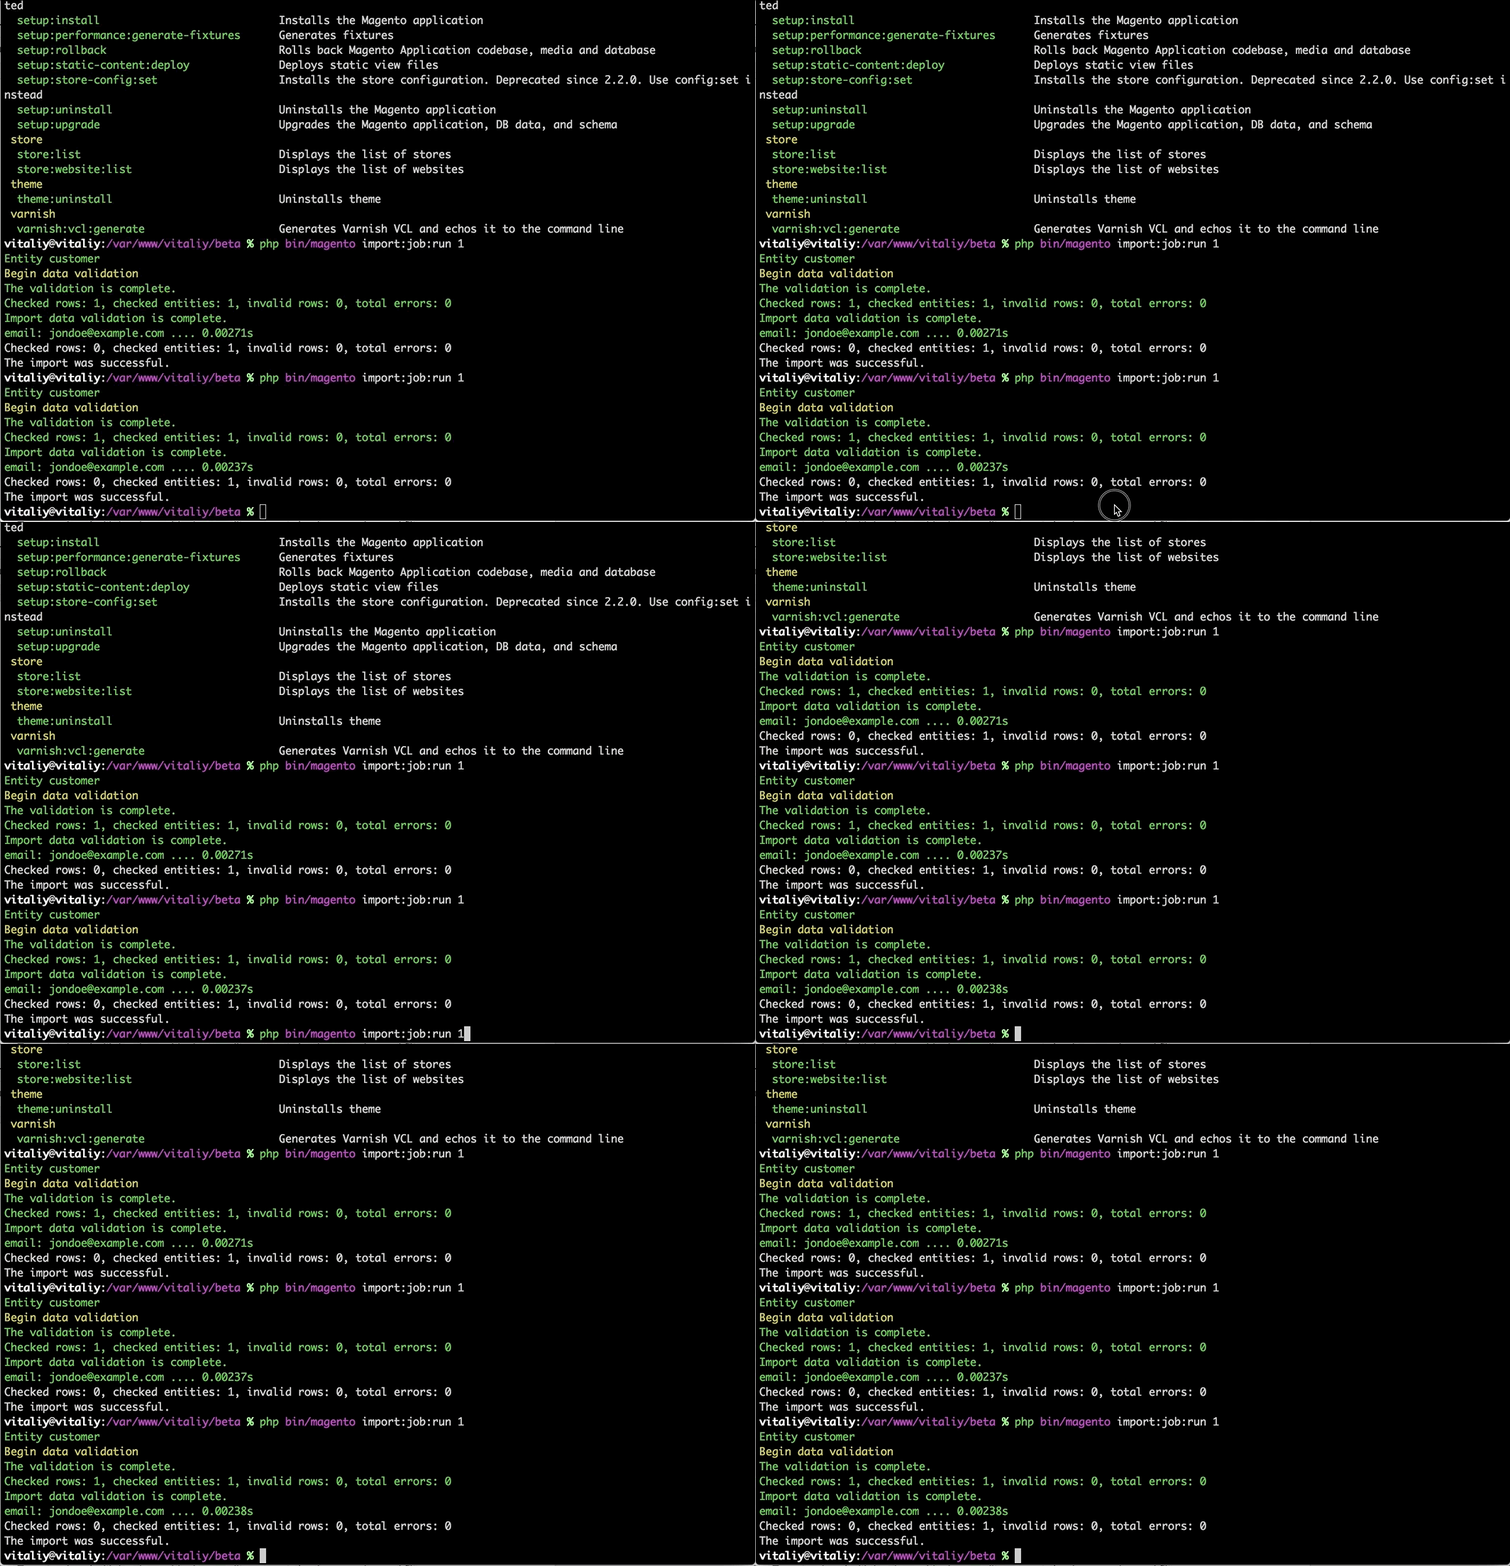
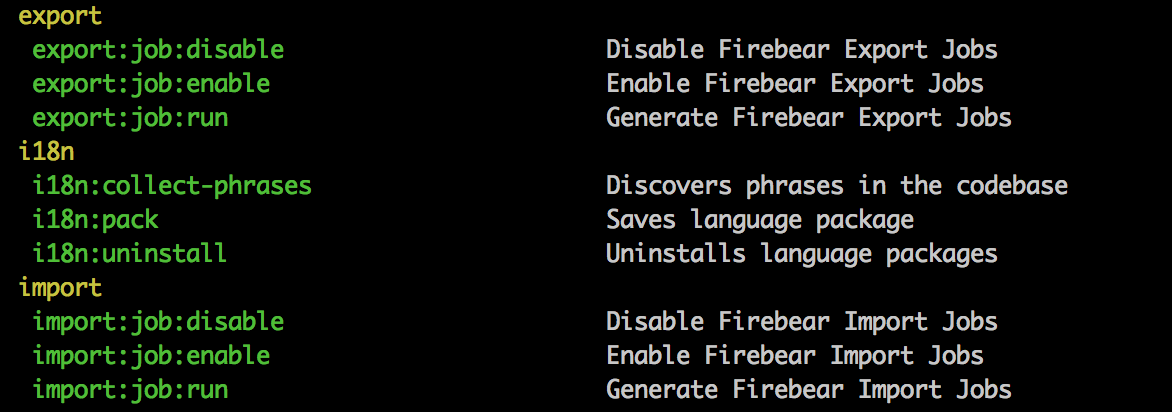
Import cron jobs can be enabled, disabled, or started from the Magento 2 CLI interface. In the Magento 2 root folder, run the following command:
|
1
2
3
4
5
|
php -f bin/magento import:job:COMMAND JOB_ID
import:job:disable Disable Firebear Import Jobs
import:job:enable Enable Firebear Import Jobs
import:job:run Generate Firebear Import Jobs
|
You will see the following information in the terminal:
This is how everything works:
To control export jobs via CLI, use the following commands:
|
1
2
3
4
5
|
php -f bin/magento export:job:COMMAND JOB_ID
export:job:disable Disable Firebear Export Jobs
export:job:enable Enable Firebear Export Jobs
export:job:run Start Firebear Export Jobs
|
You will see the following information in the terminal:
Both import and export commands:
Improved Import and Export extension support Google Sheets, meaning you can now work in cooperation with your colleagues on a single Google Sheet, then paste its link to the Import Job and hit Run button. Pretty simple, huh?
Moreover, with the new release Firebear Studio introduce Master Import Table, where we have gathered all product types and attributes available, to get you into import process in a quick and easy way. You can read more about the Master Table here.
Categories can be imported with different behavior – Add / Edit , Delete, and Replace which allows flexible category manipulations.
To import data from the Google Sheet File hit ‘Save and Run’ button.
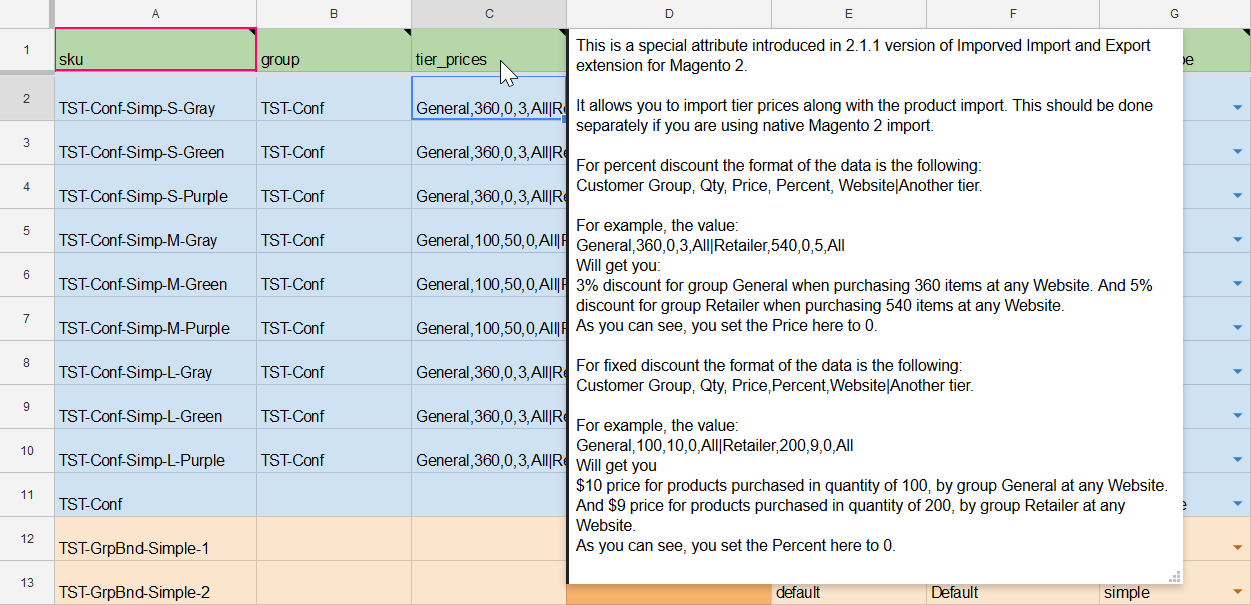
With 2.1.1 release Tier Prices can be imported along with the products in the same file. This is now possible with tier_prices column. Note, how ‘priceS’ are plural, in comparison with native Magento 2 tier_price column. In other words, if you are using native Magento 2 import, you need two separate files to import tier prices and products.
The tier_prices column is product specific and allows specifying multiple tier prices for each product. As you know, tier prices can be:
- A percent discount of the original product price;
- A flat price value.
For percent discount one should use the following data format in the column:
Customer Group,Qty,Price,Percent,Website|next_tier
For example, the value:
|
1 |
General,360,0,3,All|Retailer,540,0,5,All
|
Will get you:
3% discount for group General when purchasing 360 items at any Website. And 5% discount for group Retailer when purchasing 540 items at any Website.
As you can see, you set the Price here to 0.
For fixed discountone should use the following data format in the column:
Customer Group,Qty,Price,Percent,Website|next_tier
For example, the value:
|
1 |
General,100,10,0,All|Retailer,200,9,0,All
|
Will get you
$10 price for products purchased in quantity of 100, by group General at any Website. And $9 price for products purchased in quantity of 200, by group Retailer at any Website.
As you can see, you set the Percent here to 0.
Categories can be imported with different behavior, which allows for flexible category manipulations:
- Add/Edit;
- Delete;
- Replace.
The process behind the category import and simple and has not peculiarities, you can in the process described in the ‘Add new Import Job’ chapter of this manual.
To import categories to Magento 2 you need a file with the following structure: Download sample CSV files for categories import to Magento 2.
Category import offers different opportunities, so you can set a category position and location:
- Import by name and full path to category (Default Category/Women/Dresses);
- Import by category name & path to category;
- Import by parent category id (parent_id).
CSV file columns:
- name – Category name;
- parent_id – existing parent category id;
- url_key – URL keys of category;
- description – category description;
- is_active – category Enabled / Disabled;
- include_in_menu – include category to main menu on frontend;
- is_anchor – Is Anchor – required for displaying layered navigation on category;
- custom_layout_update – custom XML layout update for category.
The idea behind the import of product attributes to Magento 2 on the fly during the product import is pretty simple – instead of having only attribute name on a column with attributes, we place there all data required to create an attribute.
For instance, attribute set, frontend labels, scopes, etc. You can find a structure sample and a sample CSV file below. Please follow the example carefully and import a CSV file with products first. If it works correctly, you can create a custom attribute column and add new attributes. This will reduce possible issues, debug time, and maintenance time.
The general format of an attribute creation column can be described as follows:
attribute|attribute_property_name:attribute_property_value|…
To separate values use pipe “|” symbol. Note, that the new attribute column should ALWAYS start with ‘attribute’, it allows the extension to understand that this is a new attribute.
Let’s say, we want to create an attribute for the product size. Let’s list the values of the attribute, and put a required import values after the hyphen in italics next to them:
- attribute
- Attribute code will be ‘size’ – attribute_code:size
- Catalog Input Type for Store Owner will be ‘dropdown’ – frontend_input:select
- Values Required will be set to ‘No’ – is_required:0
- Scope will be set to ‘Global’ – is_global:1
- Default Value of the attribute will be size ‘XS’ – default_value_text:XS text
- Unique Value will be set to ‘No’ – is_unique:0
- Add to Column Options will be set to ‘Yes’ – is_used_in_grid:1
- Use in Filter Options will be set to ‘Yes’ – is_filterable_in_grid:1
- Use in Search will be set to ‘Yes’ – is_searchable:1
- Search Weight will be set to ‘3’ – search_weight:3
- Visible in Advanced Search will be set to ‘No’ – is_visible_in_advanced_search:0
- Comparable on Storefront will be set to ‘No’ – is_comparable:0
- Use in Layered Navigation will be set to ‘Yes’ – is_filterable:1
- Use in Search Results Layered Navigation will be set to ‘Yes’ – is_filterable_in_search:1
- Attribute position in layered navigation will be set to “2” – position:2
- Use for Promo Rule Conditions will be set to ‘No’ – is_used_for_promo_rules:0
- Allow HTML Tags on Storefront will be set to ‘Yes’ – is_html_allowed_on_front:1
- Visible on Catalog Pages on Storefront will be set to ‘Yes’ – is_visible_on_front:1
- Used in Product Listing will be set to ‘No’ – used_in_product_listing:0
- Used for Sorting in Product Listing will be set to ‘Yes’ – used_for_sort_by:1
- Default label will be ‘Size’ – frontend_label_0:Size
- Default label for store ID:1 will be ‘Size’ – frontend_label_1:Size
- Will belong to ‘Default’ attribute set – attribute_set:Default
Now we have specified all necessary values for the new attribute. We only need to copy and paste attribute values after the hyphen, and separate them with a pipe delimiter. So the column with the new attribute will be named like this:
|
1 |
attribute|attribute_code:size|frontend_input:select|is_required:0|is_global:1|default_value_text:XS text|is_unique:0|is_used_in_grid:1|is_filterable_in_grid:1|is_searchable:1|search_weight:3|is_visible_in_advanced_search:0|is_comparable:0|is_filterable:1|is_filterable_in_search:1|position:2|is_used_for_promo_rules:0|is_html_allowed_on_front:1|is_visible_on_front:1|used_in_product_listing:0|used_for_sort_by:1|frontend_label_0:Size|frontend_label_1:Size|attribute_set:Default
|
In the table below, you will find each property required for attribute creation in Magento 2 as well as appropriate possible values. As you can see, only attribute set and frontend label are required for creating a new attribute in Magento 2 during the import process. Another quite important attribute property is attribute code which actually defines the type of your attribute (text field, dropdown etc). If it is not specified, the attribute will be created with type XXX
Download CSV file sample for import product attributes on the fly
| Code | Description | Default value | Required | type | Values |
| attribute_set | Attribute Sets Comma separated attribute sets names |
Yes | text | For example: Default,Accessories | |
| frontend_label_0 | Default label | Yes | text | ||
| frontend_label_[n] | Default label for specified store Where [n] is the store id |
text | |||
| frontend_input | Catalog Input Type for Store Owner | select | text: Text Field textarea: Text Area date: Date boolean: Yes/No multiselect: Multiple Select select: Dropdown price: Price media_image: Media Image swatch_visual: Visual Swatch swatch_text: Text Swatch weee: Fixed Product Tax |
||
| attribute_code | Attribute Code This is used internally. Make sure you don’t use spaces or more than 30 symbols. |
text | |||
| is_required | Values Required | 0 | yes/no | 1, 0 | |
| is_global | Scope Declare attribute value saving scope |
0 | select | 0: Store View 1: Global 2: Website |
|
| default_value_text | Default Value Used for text attributes |
text | |||
| default_value_textarea | Default Value Used for textarea attributes |
text | |||
| default_value_date | Default Value Used for date attributes |
text | Format: mm/dd/YYYY (04/19/2016) | ||
| default_value_yesno | Default Value Used for yes/no attributes |
yes/no | 1,0 | ||
| is_unique | Unique Value Not shared with other products |
0 | yes/no | 1,0 | |
| frontend_class | Input Validation for Store Owner | select | validate-number validate-digits validate-email validate-url validate-alpha validate-alphanum |
||
| is_used_in_grid | Add to Column Options | 1 | yes/no | 1,0 | |
| is_filterable_in_grid | Use in Filter Options | 1 | yes/no | 1,0 | |
| is_searchable | Use in Search | 0 | yes/no | 1,0 | |
| search_weight | Search Weight | integer | |||
| is_visible_in_advanced_search | Visible in Advanced Search | 0 | yes/no | 1,0 | |
| is_comparable | Comparable on Storefront | 0 | yes/no | 1,0 | |
| is_filterable | Use in Layered Navigation | 0 | yes/no | 1,0 | |
| is_filterable_in_search | Use in Search Results Layered Navigation | 0 | yes/no | 1,0 | |
| position | Attribute position in layered navigation | integer | |||
| is_used_for_promo_rules | Use for Promo Rule Conditions | 0 | yes/no | 1,0 | |
| is_html_allowed_on_front | Allow HTML Tags on Storefront | 1 | yes/no | 1,0 | |
| is_visible_on_front | Visible on Catalog Pages on Storefront | 0 | yes/no | 1,0 | |
| used_in_product_listing | Used in Product Listing | 0 | yes/no | 1,0 | |
| used_for_sort_by | Used for Sorting in Product Listing | 0 | yes/no | 1,0 |
All the examples in this chapter are written in reference to the Master Import Table we have composed for your convenience. Before proceeding to creating configurable products during the import process, please, read carefully about the Master Table and its use.
Improved Import and Export extension offers five scenarios for Configurable Product import. These scenarios can be selected in the Configurable Product Condition field of the Import Job settings. For more information on the scenarios read Custom logic for creation of configurable products chapter of this manual.
This is the first scenario. It allows creating configurable products using the dedicated column for simple products, where the required configurable product SKU is specified.
As per the GIF image above you can see, that we have nine simple products rows 2-10. The service ‘group’ column for these products contains NEW – which is an SKU of the configurable product, these simples belong to.
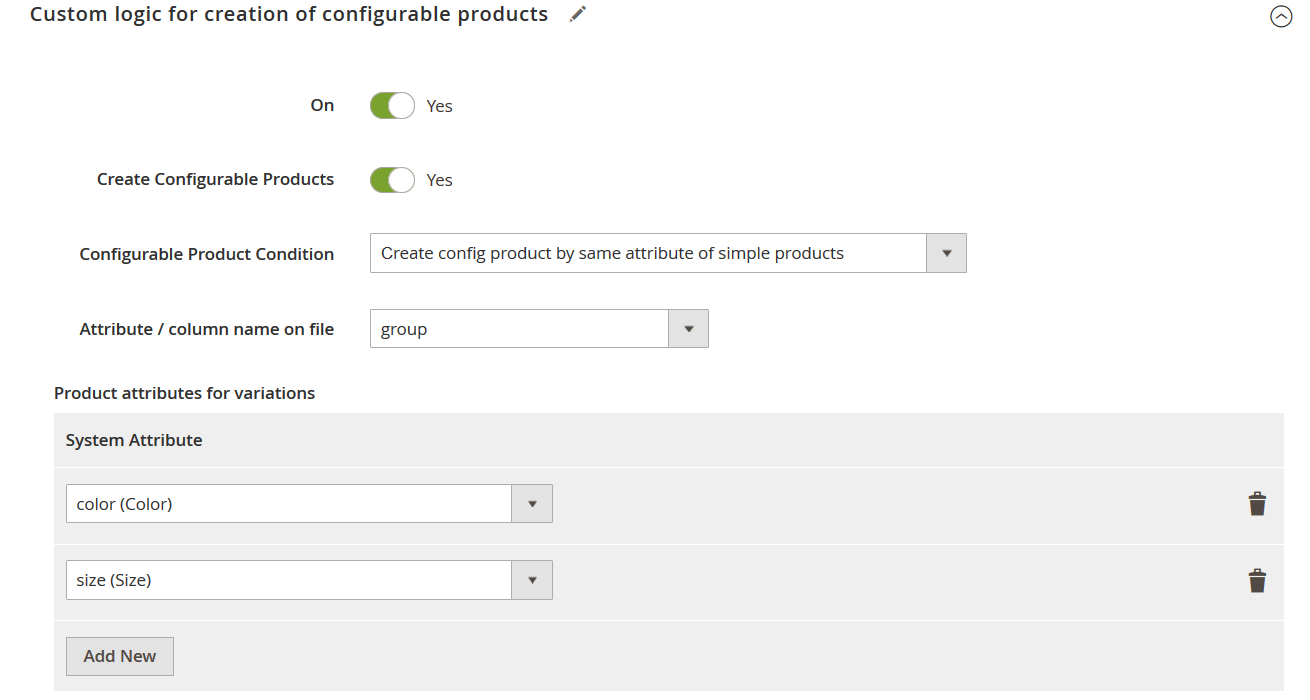
Let’s configure an Import job, to import these simple products, and assign them to the newly created configurable product. We will omit the general and other settings and focus solely on Custom logic for creation of configurable products.
Here we have:
- Enabled custom custom logic for creating configurable products;
- Decided that we want to create new Configurable Products. These products never existed at Magento 2 store, and in the Import Table, however have referenced simple products. You can disable this option, if you have a configurable product with the reference attribute in your import table, or at your product catalog;
- Configurable Product Condition is set as per the chapter you are currently reading;
- In the Attribute / column name on file we have specified ‘group’ as per table GIF above. As we use this column to tie simples to configurables. You can create any other column and name it the way you want. Just make sure, to put it into the Attribute / column name of file field, when importing the products.
- In the Product attributes for variations table we have specified attributes ‘color’ and ‘size’ as our simple products have these attributes for swatches. When creating configurable products on your own, – specify the attributes of your simple products.
Now, we can run the job to import these nine simple products. When the import job is processed a new configurable product with these nine simple products assigned to it will be created in your product catalog.
This is the second and third scenarios, that differ only in that of whether extension should start scan from the beginning or the end of the cell. It allows creating configurable products using the dedicated column for simple products, where the extension should look for similarities in the submitted value before the set delimiter.
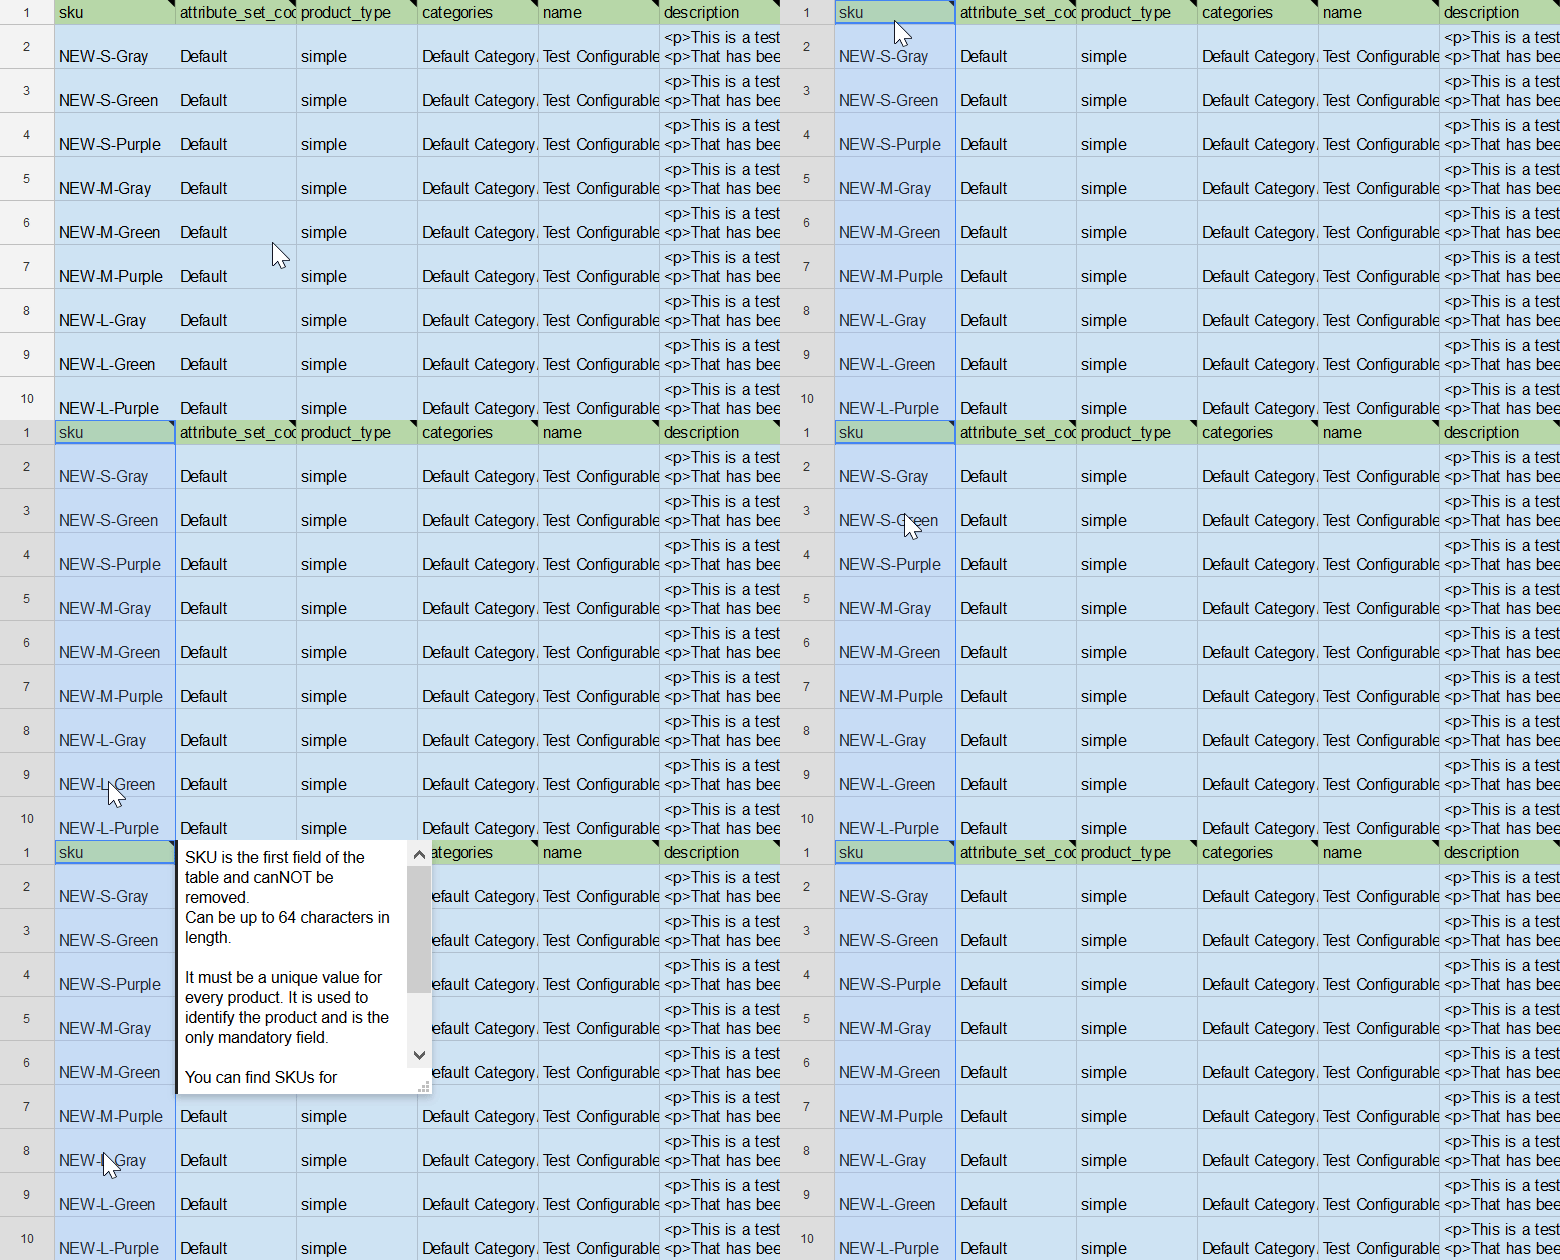
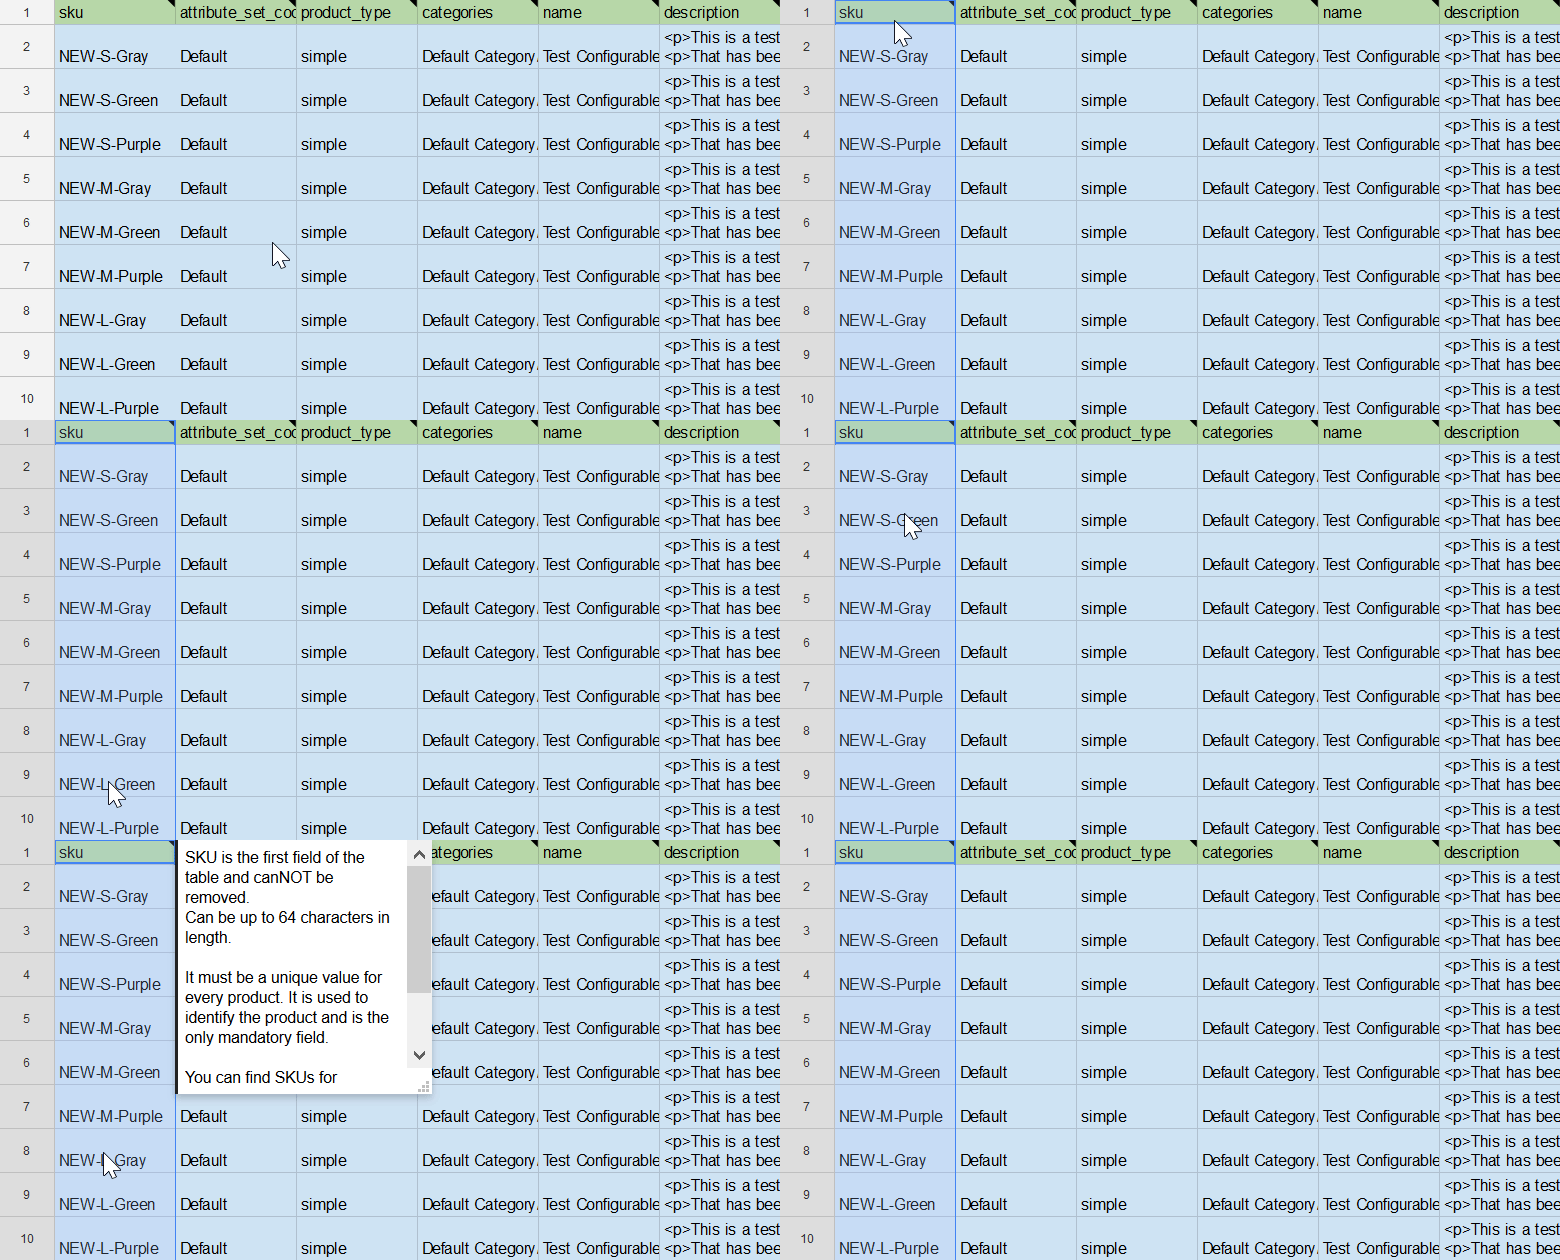
As per the GIF image above you can see, that we have nine simple products rows 2-10. The ‘sku’ column for these products contains similar product SKU, which start with NEW and then list product size and color, after a hyphen. In this case the hyphen is a delimiter, that separates one part, from another.
Let’s configure an Import job, to import these simple products, and assign them to the newly created configurable product. We will omit the general and other settings and focus solely on Custom logic for creation of configurable products.
Here we have:
- Enabled custom custom logic for creating configurable products;
- Decided that we want to create new Configurable Products. These products never existed at Magento 2 store, and in the Import Table, however have referenced simple products. You can disable this option, if you have a configurable product with the reference attribute in your import table, or at your product catalog;
- Configurable Product Condition is set as per the chapter you are currently reading;
-
In the Attribute / column name on file we have specified ‘sku’ as per table GIF above. As we use this column to tie simples to configurables. In this column all listed simple products have the same SKU format – NEW-size-color, where ‘NEW’ is a common value, that will tie these products to configurable.
You can use any other product attribute column. For example description, which you start or end with the name of a configurable product, these simples belong to, for example description that reads:
This is a Shirt: size X, color Y.
I this case, you can specify colon as a delimiter, and the extension will combine such products by the phrase “This is a Shirt”. - In the Delimiter field we enter ‘-’ a hyphen. As it is the hyphen that separates common SKU value NEW from the rest of the SKU.
- In the Product attributes for variations table we have specified attributes ‘color’ and ‘size’ as our simple products have these attributes for swatches. When creating configurable products on your own, – specify the attributes of your simple products.
Now, we can run the job to import these nine simple products. When the import job is processed a new configurable product with these nine simple products assigned to it will be created in your product catalog.
Create configurable products by custom rules (the number of characters from the beginning of the line)
This is the fourth and fifth scenarios, that differ only in that of whether extension should start scan from the beginning or the end of the cell. It allows creating configurable products using the dedicated column for simple products, where the extension should look for similarities in the submitted value before the set delimiter.
As per the GIF image above you can see, that we have nine simple products rows 2-10. The ‘sku’ column for these products contains similar product SKU, which start with NEW and then list product size and color, after a hyphen. In this case only first three characters are similar in all nine products.
Let’s configure an Import job, to import these simple products, and assign them to the newly created configurable product. We will omit the general and other settings and focus solely on Custom logic for creation of configurable products.
Here we have:
- Enabled custom custom logic for creating configurable products;
- Decided that we want to create new Configurable Products. These products never existed at Magento 2 store, and in the Import Table, however have referenced simple products. You can disable this option, if you have a configurable product with the reference attribute in your import table, or at your product catalog;
- Configurable Product Condition is set as per the chapter you are currently reading;
-
In the Attribute / column name on file we have specified ‘sku’ as per table GIF above. As we use this column to tie simples to configurables. In this column all listed simple products have the same SKU format – NEW-size-color, where ‘NEW’ is first three characters, that will tie these products to configurable.
You can use any other product attribute column. For example description, which you start or end with the name of a configurable product, these simples belong to, for example description that reads:
This is a Shirt size X, color Y.
I this case, you can specify ‘15’ in the Count Symbols option, as first 15 characters will look the same for all nine simple products. - In the Count Symbols field we enter ‘3’ a hyphen. As it is only first three characters of the ‘sku’ column that are similar in all nine products.
- In the Product attributes for variations table we have specified attributes ‘color’ and ‘size’ as our simple products have these attributes for swatches. When creating configurable products on your own, – specify the attributes of your simple products.
Now, we can run the job to import these nine simple products. When the import job is processed a new configurable product with these nine simple products assigned to it will be created in your product catalog.
Files for downloadable products can be imported in two ways:
- Import files from remote URL for downloadable products – you should specify a full URL address of the file and make sure the the following directory exists and is writable: /pub/media/downloadable/links/files/
- To import local files, upload your files to the directory you’ve chosen on the import page (input – Images File Directory).
Download CSV file example for import downloadable product
You can download CSV file samples here:
Download CSV sample files for import to Magento 2
Since we always try to improve our Improved Import Export extension following community and merchant needs, here are upcoming features which will be introduced soon:
- Advanced XML usage;
- Support for JSON;
- Import / export for all Magento 2 entities: shipping data, coupons, discounts, CMS pages, etc;
- Order import;
- Excel support;
- Performance improvements;
- New import/export presets;
- API connection for SAP, ERP, PIM, and CRM systems;
- Renewed email reporting;
- Integration with IceCat;
- Import from SOAP / REST API;
- Mapping presets management;
- Multiple files and sources input for one job.
After purchasing the extension, you will receive free upgrades during one year and get a 50% discount for the second year upgrades! Purchase the extension right now to use current features and get free updates with advanced functionality!
For further information and consultation or to request individual features use our contact form!
