This is an example Android application that consumes the Geoloqi Android SDK. It's a good starting point for anyone interested in developing with the Geoloqi location APIs.
For more information, visit: developers.geoloqi.com
This app can be compiled and run in the standard fashion using Eclipse or the command-line Android tools and ant. However, there are a couple of quick tasks to complete before running the app.
If you have not already installed the Android SDK do so now! It's also a good idea to make sure you're running the latest version.
Note: This documentation assumes the reader is familiar with the Android SDK at a basic level and knows how to build a simple Android project.
If you find yourself struggling with the concepts outlined below, you might benefit from looking over the Android Developer Docs.
After checking out the sample code, you'll need to create a Constants.java
file that contains both your Geoloqi API Key and Secret. These are needed
to authenticate your requests with the server. A ConstantsTemplate.java file
has been provided for you in src/com/geoloqi/android/sample/ that you
can rename and update with your key and secret.
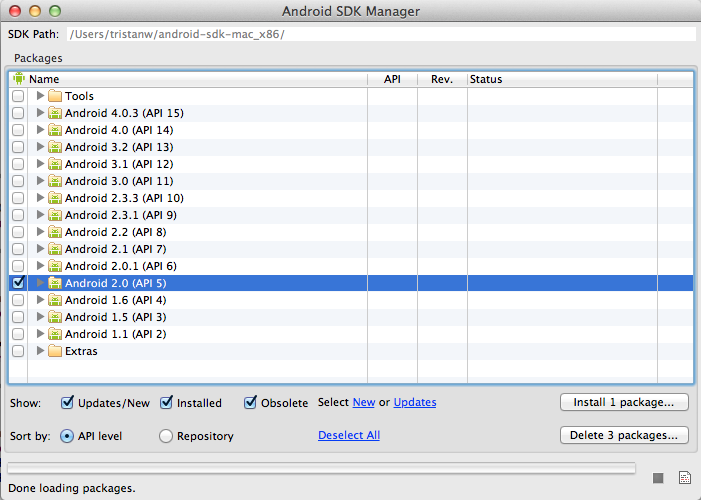
The sample app targets Android API level 5 (Android 2.0), but you can change the build target to any modern version. You'll need to use the Android SDK Manager to install the Android 2.0 platform or update the sample app to target a platform you've previously installed.
You can launch the SDK manager by running the android command from your
terminal. You can also launch the SDK manager from Eclipse (if you've installed
the Android plugin for Eclipse).
Note that you may have to check the Obsolete checkbox to find the Android 2.0 platform listing.
Once you've installed the platform sources you're almost ready to build the project. If you're using ant you can build the app immediately by executing the build command in the project directory.
# Build debug version
$ ant clean debug

# Install to device
$ adb install bin/GeoloqiSampleAndroidApp.apk
If you're using Eclipse, you'll need to also add the Geoloqi SDK library
.jar to your project's build path. The .jar is located in the libs/
directory in the project root. Simply right-click the .jar and select
Build Path -> Add to Build Path.
Note for Eclipse users: One common issue when importing a new Android project
occurs when Eclipse links your project against Java 1.5 instead of Java 1.6. If this
happens you'll see errors generated for all methods with @Override annotations.
You can fix this by updating your Eclipse/Project
preferences to ensure the Java compiler level is set to 1.6.
The Geoloqi Android SDK Javadoc is bundled with the sample application as
a jar file in the libs/ directory. To load the Javadoc into Eclipse simply:
- Expand the Referenced Libraries section of the project in the Eclipse Package Explorer.
- Right-click on the Geoloqi SDK library (if it isn't listed, check that you've added it to your Build Path).
- Select Properties.
- Select Javadoc Location.
- Check the Javadoc in archive radio button.
- Fill out the Archive path text area with the path to the geoloqi-docs.jar archive file.
If you have an existing project and would like to use the Geoloqi Android SDK
you can simply copy the .jar files from the sample applications libs/
directory to your project's libs/ directory.
Note: Don't forget to add the .jar files to your project's build path!
You'll need to update your project's AndroidManifest.xml to include certain
permissions and enable the tracking service.
    <uses-permission android:name="android.permission.INTERNET" />
    <uses-permission android:name="android.permission.WAKE_LOCK" />
    <uses-permission android:name="android.permission.ACCESS_NETWORK_STATE" />
    <uses-permission android:name="android.permission.ACCESS_WIFI_STATE" />
    <uses-permission android:name="android.permission.ACCESS_COARSE_LOCATION" />
    <uses-permission android:name="android.permission.ACCESS_FINE_LOCATION" />

    <!-- Note: This custom permission name should begin with your application's package name! -->
    <permission
        android:name="com.geoloqi.android.sample.permission.C2D_MESSAGE"
        android:protectionLevel="signature" />

    <!-- These permissions are required to enable the C2DM features of the SDK. -->
    <uses-permission android:name="com.geoloqi.android.sample.permission.C2D_MESSAGE" />
    <uses-permission android:name="com.google.android.c2dm.permission.RECEIVE" />
Optionally, you may also want to include the ACCESS_MOCK_LOCATION permission if you plan on doing any testing.
<uses-permission android:name="android.permission.ACCESS_MOCK_LOCATION" />To enable the tracker you'll need to declare the tracking service and (optionally) the C2DM receiver.
    <application>
        <service
            android:name="com.geoloqi.android.sdk.service.LQService"
            android:exported="false" />
        <receiver
            android:name="com.geoloqi.android.sdk.receiver.LQDeviceMessagingReceiver"
            android:permission="com.google.android.c2dm.permission.SEND">
            <intent-filter>
                <action android:name="com.google.android.c2dm.intent.RECEIVE" />
                <action android:name="com.google.android.c2dm.intent.REGISTRATION" />

                <!-- This should equal your application's package name! -->
                <category android:name="com.geoloqi.android.sample" />
            </intent-filter>
        </receiver>
</application>The easiest way to get started is to spin up the tracking service when the user takes some action (such as launching your app). You can start the Geoloqi tracker like starting any other Android Service.
    // Start the tracking service
    Intent intent = new Intent(this, LQService.class);
    intent.setAction(LQService.ACTION_DEFAULT);
    intent.putExtra(LQService.EXTRA_SDK_ID, "Your Geoloqi SDK ID!");
    intent.putExtra(LQService.EXTRA_SDK_SECRET, "Your Geoloqi SDK Secret!");
    startService(intent);
This code will start the background service, create an anonymous user account and start requesting location updates from the system. It's that easy!
Copyright 2011 by Geoloqi.com and contributors.
See LICENSE.


