Common practices and tools to be implemented when starting a new Xcode project such as versioning, CI, setting up environements, etc
-
To-Do
- Result.swift
- Sketch setup and script
- Firebase setup and script
- Fastlane example lanes
- Finish Crashlytics setup
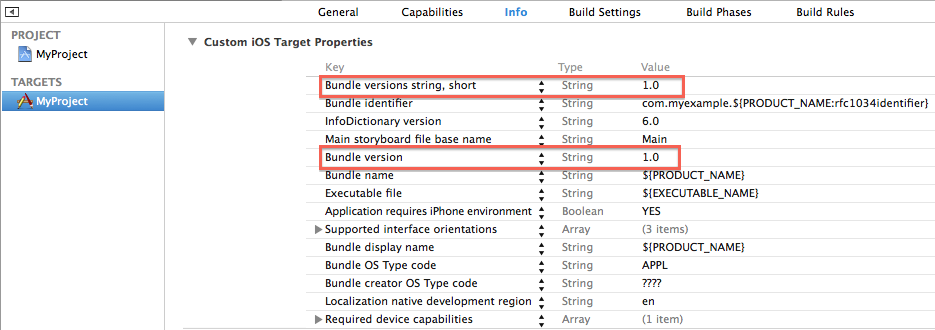
Setup build and version numbers so that they can be auto incremented using Fastlane
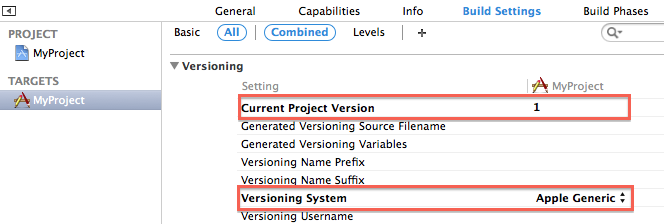
Initially you are going to want to set:
Bundle versions string, short: 1.0.0
Bundle verison: 1
When setting up a new Xcode project you are going to want have at least two different environements
Environement that will talk to your dev database / api with dummy data
So when you are making changes and your app has been shipped to the app store you are not messing with user data that is out in production
In order too have two environments you will need to create two different targets in your project. Under build settings select your target for your app and duplicate it

This will create a new target with named "appname copy" -> You should rename this to something like "appname-dev"
When you create this new target it will create another Info.plist for this specific target as well as give it a new BundleId

After you have setup your new target, you are most likely going to want to set a flag so that you can run certain code for specifics environment
To add a flag go to Build Settings and in the search bar type "other swift flags"
Here you are gonna want to add a flag to determine that this is the development target. See below

So now in your AppDelagate you can do something like this:
#if DEVELOPMENT
            let filePath = Bundle.main.path(forResource: "GoogleService-Info-DEV", ofType: "plist")!
            let options = FIROptions(contentsOfFile: filePath)
            FIRApp.configure(with: options!)
        #else
            let filePath = Bundle.main.path(forResource: "GoogleService-Info", ofType: "plist")!
            let options = FIROptions(contentsOfFile: filePath)
            FIRApp.configure(with: options!)
            Fabric.with([Crashlytics.self])
        #endif
Using Firebase as backend service and configuring it up for dev and prod environments
fastlane is an open source platform aimed at simplifying Android and iOS deployment.
fastlane lets you automate every aspect of your development and release workflow.
Make sure you have latest verison of Xcode command line tools installed:
xcode-select --install
Install fastlane using
sudo gem install -fastlane -NV
or
brew cask install fastlane
Navigate to project directory and run
fastlane init
CocoaPods are a very easy way to integreate different frameworks and packages into your project. There are tons and tons of cocoapods out there that will save development hours for many different aspects of your project like:
- Custom Alert Views
- Custom Login Pages
- Setting up backend services like Firebase or Crashlytics
- Much, much more!
In order to use cocoapods in your project cd in your project directory and run
pod init
This will create a podfile that looks like this:

cd into your project director and run
pod install
This will create a new .xcworkspace file in your directory which you should now use from now on instead of .xcproj
The most powerful, yet lightest weight crash reporting solution.
Spend less time finding and more time fixing crashes. Named the #1 performance SDK on both iOS and Android, Crashlytics provides deep and actionable insights, even the exact line of code your app crashed on.
While Crashlytics gives you powerful crash reporting, with one additional click you can enable real-time analytics that help you understand what's happening in your app. Fabric's analytics engine provides insights into your core goals, such as growth, retention, and engagement. Finally, analytics you don't need to analyze.
use_frameworks!
pod 'Fabric'
pod 'Crashlytics'
Run command
pod install
In the Project Navigator, click on your project and add a new run script build phase

"${PODS_ROOT}/Fabric/run" <your-key-here>
In the Project Navigator, right click on "Info.plist", and "Open as" → "Source Code"

  <key>Fabric</key>
  <dict>
    <key>APIKey</key>
    <string>  <your-key-here> </string>
    <key>Kits</key>
    <array>
      <dict>
        <key>KitInfo</key>
        <dict/>
        <key>KitName</key>
        <string>Crashlytics</string>
      </dict>
    </array>
</dict>import UIKit
import Fabric
import Crashlytics
@UIApplicationMain
class AppDelegate: UIResponder, UIApplicationDelegate {
func application(_ application: UIApplication, didFinishLaunchingWithOptions launchOptions: [UIApplicationLaunchOptionsKey: Any]?) -> Bool {
Fabric.with([Crashlytics.self])
return true
}
}See this tutorial for more help
Sketch is a design toolkit built to help you create your best work — from your earliest ideas, through to final artwork.
Layout the design of your app!

Sketch tool is an awesome command line tool that comes with Sketch.
To make the best use of it, we are going to use a python script that will automatically import your Sketch slices into your Xcode Project.
First go here to download slice.py
Next, add it to your project directory, and create any named Sketch file (I name mine Design.sketch) and add it to the directory as well

Now we need to add a new run script to your xcode project.
Select your project and select Build Phases
Hit the plus icon in the top left and select "New Run Script Phase"

Add the script
python "$PROJECT_DIR/slice.py" "$PROJECT_DIR/Design.sketch" "$PROJECT_DIR/Assets.xcassets"
Make sure the script is placed before "Copy Bundle Resources" as seen below

Now create your assets in your Design.sketch file. All images you want imported over have to be slices.

When you build your project all slices that have been saved in Design.sketch will automatically import over

If you having any issues head to the original article written by Ryan Gomba