This application allows you to set constraints on Windows processes. It uses a job object for this purpose.
Table of contents
- Installation
- Understanding procgov run modes
- Applying limits on processes
- Available process constraints
- Other options
- Contributions
- Links
You may download the latest version binaries from the release page or install it with Chocolatey or winget:
choco install procgov
# or
winget install procgovNot much to say here :) It's the default mode that is activated when you launch procgov from the command prompt to launch a new process or attach to a running one.
When using procgov you may observe that it sometimes launches a second instance of itself (unless you use the --nomonitor switch). This second instance is a job monitor and you may recognize it by the --monitor switch in the command line args. It will stay alive until the last process in the monitored jobs exits. There should be at maximum one instance of a job monitor per Windows session. Its role is to monitor jobs created with procgov. The monitor should exit right after the termination of the last process in the monitored jobs.
This feature is in a beta phase. Please use it with caution and report any experienced errors.
If you use the --install switch to persist application settings, procgov will save the settings in the registry and will create a Windows service named ProcessGovernor. By default it will use the SYSTEM account and the %ProgramFiles%\ProcessGovernor folder as the service base path. You may configure this settings by using the --service-path, --service-username, and --service-password command-line switches. If you run the install command for another application, procgov will add new data to the registry but will reuse the existing service. The service should pick up the updated configuration after short time.
The ProcessGovernor service monitors starting processes and applies limits predefined during installation.
To uninstall the service, use the --uninstall switch. The service will be removed when you remove the last saved configuration. If you want to remove all saved procgov data, along with the service, use the --uninstall-all switch.
You may set limits on a newly created process or on an already running one. To constraint a running process use the -p|--pid switch, eg.
procgov.exe --maxmem 40M --pid 1234To start a new process with the limits applied, just pass the process image path as a procgov argument, eg. procgov64 --maxmem 40M c:\temp\test.exe. If you need to pass any parameters to the target process, it's best to use -- to separate procgov parameters from the target process ones, for example:
procgov.exe -m 100M -- test.exe -arg1 -arg2=val2 arg3You may assign multiple processes to the same job object. When you use the -p parameter multiple times with different process IDs, procgov will apply the same limits for all the processes, for example:
procgov.exe --maxmem 100M -p 1234 -p 1235 -p 1236If any of the processes was already assigned to a procgov job object, others will be assigned to it as well.
It is also possible to update once set limits. However, there is one requirement: the processes can't be assigned to different procgov jobs (so they must be either in the same job or unassigned). To update the limits, simply run procgov providing new limits and the target process ID(s). Procgov will update only the specified limits. Let's have a look at an example to understand this behavior better:
We set a CPU limit on a process 1234
procgov.exe --nowait -c 2 -p 1234

Then we run procgov again with the new CPU limit - procgov will update the existing job object
procgov.exe --nowait -c 4 -p 1234With the --maxmem (-m) switch Process Governor allows you to set a limit on a memory committed by a process. On Windows committed memory is actually all private memory that the process uses. This way you may use Process Governor to test your .NET applications (including web applications) for memory leaks. If the process is leaking memory you faster get the OutOfMemoryException.
procgov.exe -m 100M -c 2 notepad.exe

procgov.exe -m 120M -p 1234
With the --maxws and --minws switches you may control the maximum and minimum working set sizes (physical memory usage) of the process. This option requires SeIncreaseBasePriorityPrivilege, so make sure your account has it (more info in the issue 69). If you want to limit the working set size, remember to always provide values greater than zero for both these parameters, for example:
procgov.exe --minws 1M --maxws 120M -p 1234The --maxjobmem option allows you to specify the maximum committed memory for all the processes that belong to a given job object. This might be handy when you enable job propagation to child processes or you use the same job object to control multiple processes, for example:
procgov.exe -r --maxjobmem 200M -- cmd.exe

procgov.exe -r --maxjobmem 1G -p 1234,1235,1236With the --cpu switch you may control on which cores your application will run. If you provide the CPU core number as a decimal value, your application will be allowed to use the specified number of cores.
If you provide the CPU core number as a hex value (with 0x prefix), this number will be treated as an affinity mask in the first processor group - where each bit represents a CPU core (starting from the least significant bit). Additionally, you may prepend the affinity mask with a processor group number prefixed with letter 'g' and/or a NUMA node number prefixed with a letter 'n'. You may also skip the affinity and use the NUMA node or processor group affinity. Valid example values: n1:g0:0xF, n1:g0, n1, g0.
The --cpu parameter may be defined multiple times and the final affinity mask will be a combination of the provided masks.
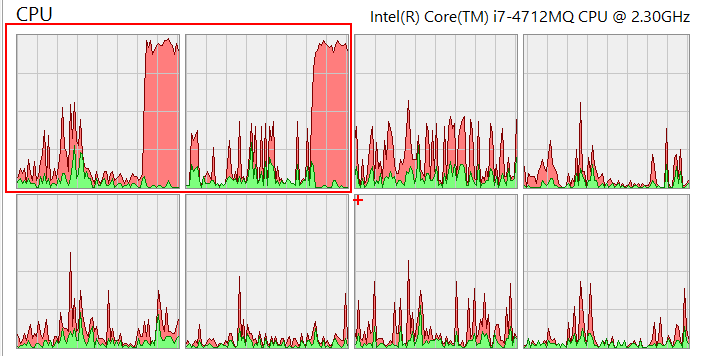
Let's have a look at two example usages on a CPU intensive application. In a first one we set the CPU core limit to two cores:
procgov.exe --cpu=2 TestLimit.exeA CPU usage graph on my machine looks as follows:
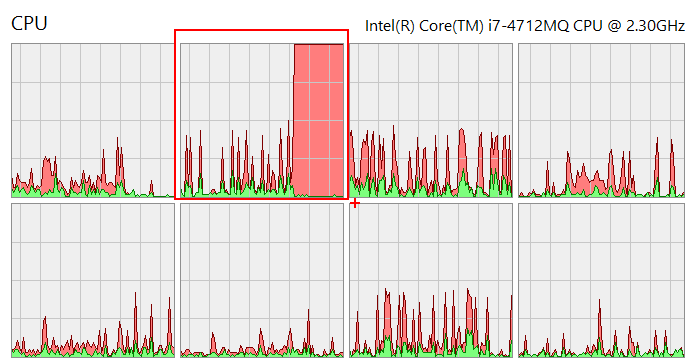
In a second we set the CPU affinity mask (with the hex notation):
procgov.exe --cpu=0x2 TestLimit.exeA CPU graph in this case looks as follows (notice only the second core is used):
Examples of more complex affinity settings:
# Use processor group 0 affinity from NUMA node 0 and 1 core from the group 1 in NUMA node 1
procgov.exe --cpu=n0:g0 --cpu=n1:g1:0x1 TestLimit.exe

# Use processor group 0 affinity and 1 core from the group 1
procgov.exe --cpu=g0 --cpu=g1:0x1 TestLimit.exe
If you are unsure what CPU configuration is present in the system, you may run procgov with no params and it will print it:
procgov.exe
#
# Use --help to print the available options.
#
# === SYSTEM INFORMATION ===
#
# NUMA Node 0:
#   Processor Group 0: 000000000000000F (CPUs: 0,1,2,3)
#   Processor Group 1: 0000000000000007 (CPUs: 4,5,6)
#
# NUMA Node 1:
#   Processor Group 2: 000000000000000F (CPUs: 7,8,9,10)
#   Processor Group 3: 0000000000000007 (CPUs: 11,12,13)
#
# Total Physical Memory (MB):          20 460
# Available Physical Memory (MB):      16 086
# Total Committed Memory (MB):         3 701
# Current Committed Memory Limit (MB): 21 740The --cpu-rate option allows you to set the maximum CPU rate for the process. If you also set the CPU affinity, the rate will apply only to the selected cores. For example, if you have eight logical CPU cores on your machine and you set the CPU rate to 100% and the CPU affinity to 0x7 (first four cores), the maximum CPU rate reported for this process by the monitoring tools will be 50% (we are running at full capacity but on a half of the CPU number).
With the --timeout option you may define the maximum time (clock time) the process can run before procgov terminates it. If the --recursive option is set and the timeout passes, progov will terminate also all the process children started from the beginning of the monitoring session.
The --process-utime and --job-utime options allow you to set a limit on the maximum user-mode execution time for a process (with the --recursive option also all its children) or a job. The latter case will make sense with the --recursive option as it will set a limit on the total user-mode execution time for the process and its children.
The --priority parameter sets the process priority class of monitored processes. Possible values include: Idle, BelowNormal, Normal, AboveNormal, High, RealTime. The highest three priorities require SeIncreaseBasePriorityPrivilege, so make sure your account has it (more info in the issue 69).
With the --env switch you may set process environment variables. This switch accepts a path to a text file with the variable values, for example:
COR_ENABLE_PROFILING=0x01
COR_PROFILER={32E2F4DA-1BEA-47ea-88F9-C5DAF691C94A}
The procgov command might look as follows:
procgov.exe --env c:\temp\env.txt -c 2 dotnet_app.exeYou may set the environment variables when starting a new process or accessing an existing one.
You can enable privileges in the target process with the --enable-privilege switch. You may specify multiple privileges by using this parameter multiple times, for example:
procgov.exe --enable-privilege=SeDebugPrivilege --enable-privilege=SeShutdownPrivilege notepadKeep in mind that in Windows, you can't add new privileges to the process token. You may only enable existing ones. You may check the available process privileges in Process Hacker or Process Explorer. Check the documentation for a given privilege to learn how to make it available for a given user (for example, you may need to update group policies).
You may use the --freeze and --thaw options to control execution of processes managed by procgov jobs. When launching a new process with the --freeze option, it will remain in a suspended state that occurs even earlier than when using the CREATE_SUSPENDED flag. This means that even if there are missing imports, the process won't fail - instead, the main image will be loaded into memory, allowing for any necessary fixes to be made.
Below you may find a list of people who contributed to this project. Thank you!
- @rowandh - an issue with the WS limit not being set
- @beevvy - an issue report and a fix for a bug with the environment variables
- @weidingerhp - an idea of environment variables for a process and CLR profiler setup
- 2013.11.21 - Set process memory limit with Process Governor
- 2016.10.21 - Releasing wtrace 1.0 and procgov 2.0
- 2019.01.31 - Limit the execution time of a process tree on Windows


