-
Notifications
You must be signed in to change notification settings - Fork 4
Web Caching Lab, mod_cache, Varnish, Amazon S3 and Amazon CloudFront CDN
Web Caching Lab, mod_cache, Varnish, Amazon S3 and Amazon CloudFront CDN.
Please install
-
Maven 3.0.x
-
YSlow Plugin installed on your favorite browser (chrome, firefox)
-
Google PageSpeed extension for Chrome or Firefox
-
Cygwin with OpenSSH if you are using Windows
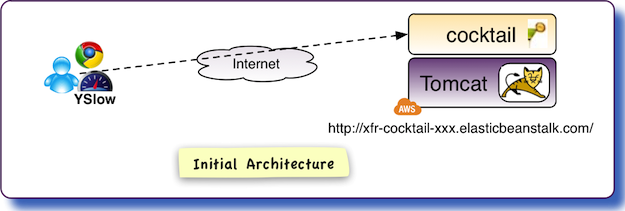
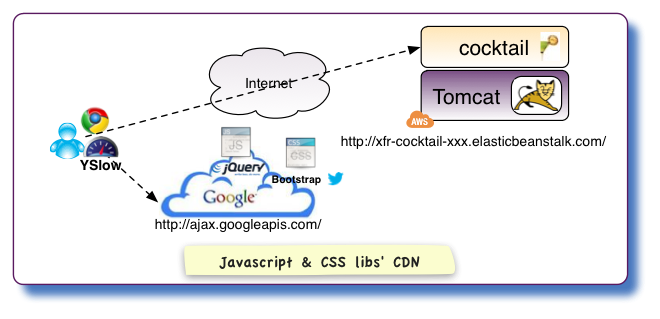
Famous CSS and JS libraries like JQuery or Twitter Bootstrap are available on large CDN like ajax.googleapis.com or cdnjs.
This will serve as an example for our projects files and resources.
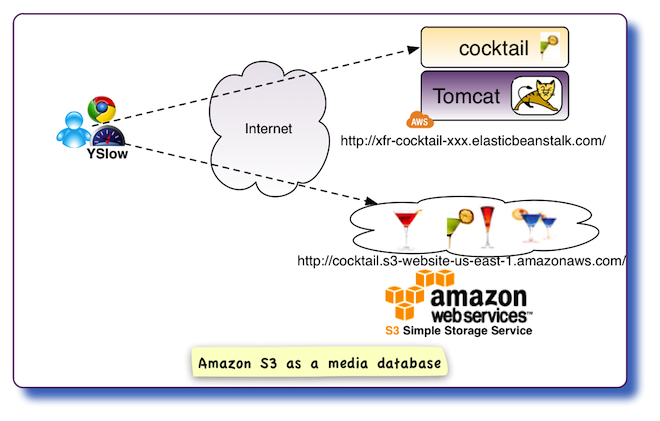
Amazon S3 is a great storage for media like user avatars, cocktails pictures, etc
It is much more efficient than database blob stores and offer a very efficient bandwith for internet users.
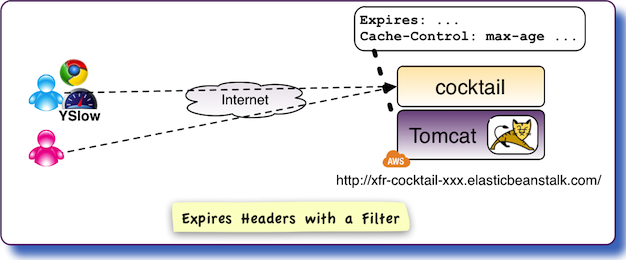
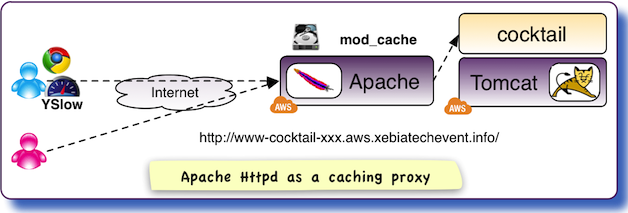
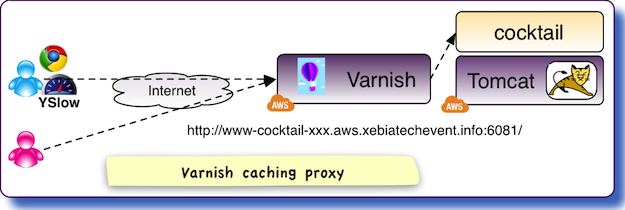
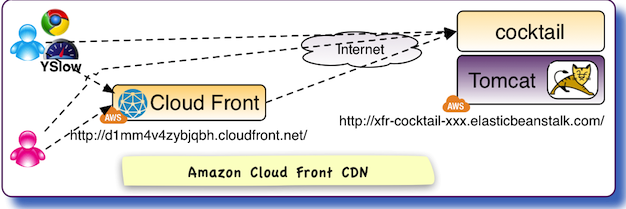
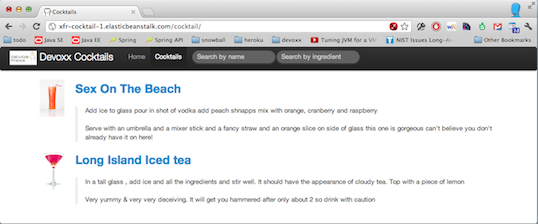
Connect to your application http://xfr-cocktail-1.elasticbeanstalk.com/cocktail/.

Get the Cocktail App on Github (download it or clone it) : https://github.com/xebia-france/workshop-web-caching-cocktail
Build the application with Maven
mvn package
Note: as the creation of a CDN distribution takes several minutes with Amazon CloudFront, we create it at the beginning of the lab and we will use it later.
-
Connect to Amazon AWS Console: https://xebia-france.signin.aws.amazon.com/console
-
Open
Services > CloudFront tab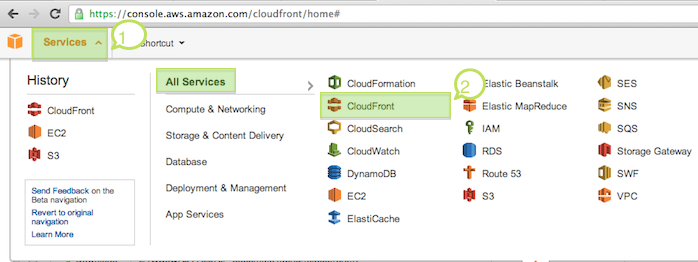
-
Click on
Create Distribution
-
Select
Downloaddelivery method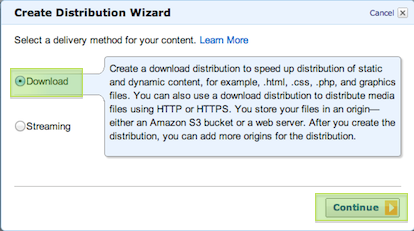
-
Enter
Origin Domain Name: xfr-cocktail-1.elasticbeanstalk.comandOrigin Protocol Policy: Match Viewer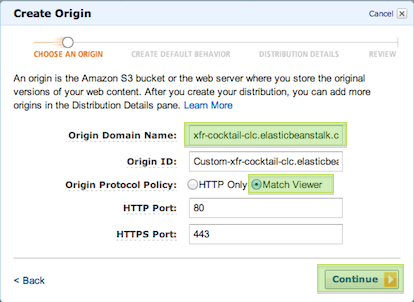
-
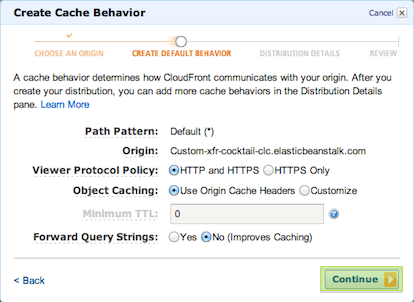
Keep default cache behaviors
-
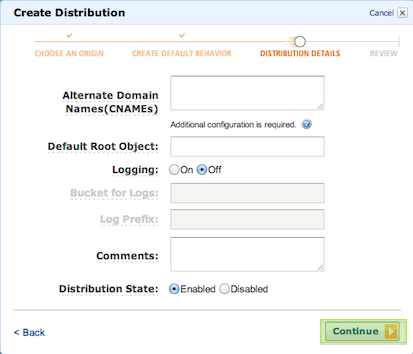
Keep default Distribution details
-
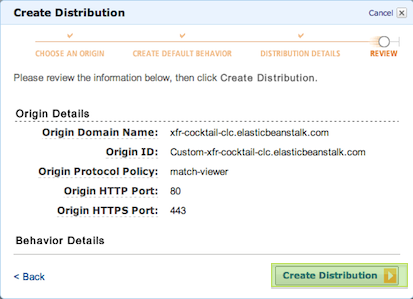
Review your configuration
-
Verify that your distribution is being created

Congratulations, you have created your CDN Distribution!
Note: Don't wait for the completion of this creation, go to the next exercice.
Analyse with YSlow the web page http://xfr-cocktail-1.elasticbeanstalk.com/cocktail/.
During this lab, we will focus on two YSlow recommandations:
-
Add Expires Headers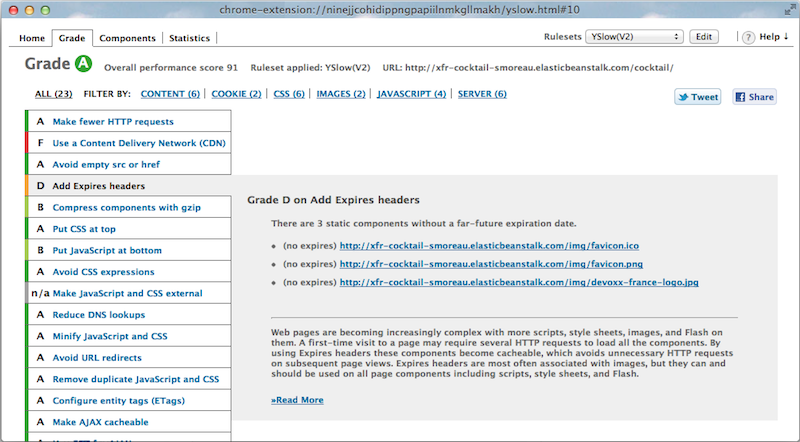
-
Use a Content Delivery Network (CDN)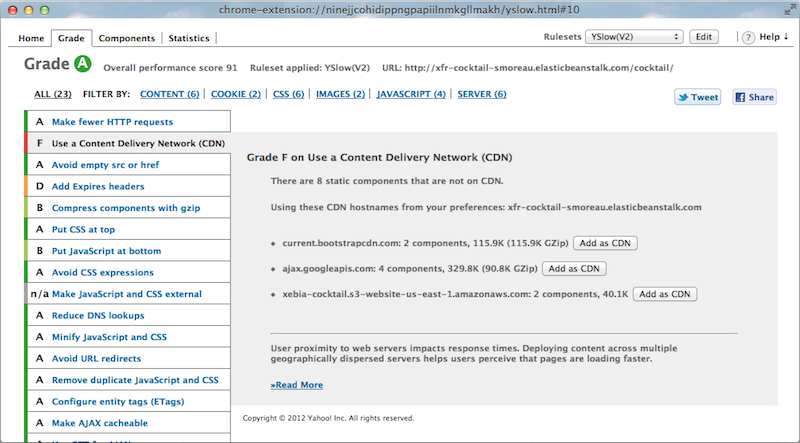
This step is purely informational, the next exercise is below.

Instead of shipping your own version of widely used JS and CSS frameworks and libs like JQuery or Twitter Bootstrap, you can reference versions deployed on CDNs. Benefits:
- Decreased Latency: CDN have Point of Presence (PoPs) near you visitors
- Better Caching: many web sites use these JS and CSS files, they may already be cached in the web browser of your visitors
- Decreased load on your data center: spare network bandwidth and server CPU.
HTML sample referencing Google CDN and Boostrap CDN (view.jsp)

Note that as per RFC 3986 (section 5.2), it is valid to omit the scheme of the URI.
If the scheme component is defined, indicating that the reference starts with a scheme name, then the reference is interpreted as an absolute URI and we are done. Otherwise, the reference URI's scheme is inherited from the base URI's scheme component.
This step is purely informational, the next exercise is below.

Storing files in Amazon S3 instead of a standard file system requires little changes to your code and many FTP clients also support Amazon S3 APIs.
Sample with Amazon SDK for Java:

See docs:
- W3C > RFC 2616 - Hypertext Transfer Protocol - HTTP/1.1 > 14 Header Field Definitions > Cache-Control
- YSlow > Best Practices for Speeding Up Your Web Site > Add an Expires or a Cache-Control Header
This step is purely informational, the next exercise is 'Adding Expires Headers With a Servlet Filter'.
You can define the caching policy according to the business logic. For example, an RSS feed could be cached for 5 minutes.
See CocktailManager.java.

-
Query the
/rssURL:curl -v http://xfr-cocktail-1.elasticbeanstalk.com/rss > /dev/null -
Look at the
Cache-ControlandExpiresheader in the response< HTTP/1.1 200 OK < Cache-Control: public, max-age=300 <===== CACHE-CONTROL MAX-AGE HEADER < Content-Language: en-US < Content-Type: application/rss+xml;charset=ISO-8859-1 < Date: Wed, 06 Jun 2012 18:40:16 GMT < Expires: Wed, 06 Jun 2012 18:45:16 GMT <===== EXPIRES HEADER < Server: Apache-Coyote/1.1 < transfer-encoding: chunked < Connection: keep-alive

Docs available at Google Code - Xebia France > ExpiresFilter.
-
Verify with YSlow and
curlthat expiration headers are missing: http://xfr-cocktail-1.elasticbeanstalk.com/cocktail/css/bootstrap.min.csscurl -v http://xfr-cocktail-1.elasticbeanstalk.com/css/bootstrap.min.css > /dev/null -
Modify
src/main/webapp/WEB-INF/web.xml(source) to add anExpiresFilter:<filter> <filter-name>ExpiresFilter</filter-name> <filter-class>fr.xebia.servlet.filter.ExpiresFilter</filter-class> <init-param> <param-name>ExpiresByType image</param-name> <param-value>access plus 1 year</param-value> </init-param> <init-param> <param-name>ExpiresByType text/css</param-name> <param-value>access plus 1 year</param-value> </init-param> <init-param> <param-name>ExpiresByType application/javascript</param-name> <param-value>access plus 1 year</param-value> </init-param> </filter> ... <filter-mapping> <filter-name>ExpiresFilter</filter-name> <url-pattern>/*</url-pattern> <dispatcher>REQUEST</dispatcher> </filter-mapping> -
Repackage your application
mvn package -
Deploy the new version named of your application on your Amazon Elastic Beanstalk environment
xfr-cocktail-1withVersion Label: 1.1.0-team-1-
Connect to https://console.aws.amazon.com/elasticbeanstalk/home?region=eu-west-1
-
Select your environment
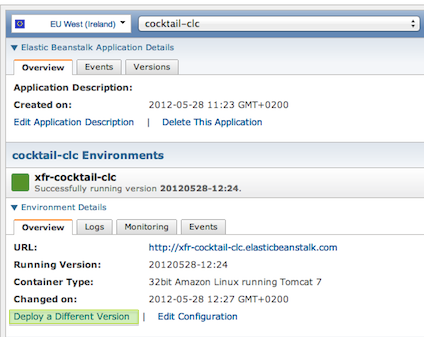
xfr-cocktail-1and click onDeploy a Different Version:
- Select
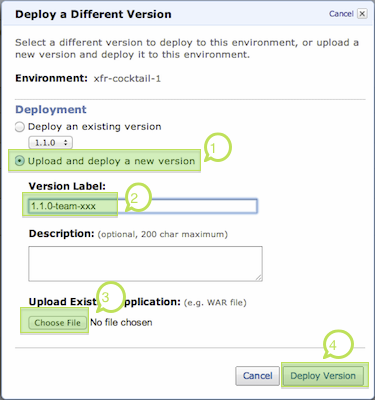
Upload and deploy a new versionand enterVersion Label: 1.1.0-team-1
-
Click on
Deploy Versionand wait for the deployment -
Verify with YSlow that your expiration headers appeared: http://xfr-cocktail-1.elasticbeanstalk.com/cocktail/
-
Cheat sheet: deploy version 1.1.0 if you have a problem deploying your own patched version.
Congratulations!!! You fixed the first YSlow recommandation to add Expires Headers and you deployed a WAR on Amazon Beanstalk!
This step is purely informational, the next exercise is 'Add a Caching Proxy with Apache mod_cache in front of the Tomcat Server'.
Apache > HTTP Server > Documentation > Version 2.2 > Modules > mod_expires
Sample of of httpd.conf
ExpiresByType image "access plus 1 year"
ExpiresByType text/css "access plus 1 year"
ExpiresByType text/javascript "access plus 1 year"

Apache > HTTP Server > Documentation > Version 2.2 > Modules > mod_proxy
-
Download the
web-caching-workshop.pemSSH private keycd mkdir .aws cd .aws wget http://xfr-workshop-caching.s3-website-eu-west-1.amazonaws.com/web-caching-workshop.pem chmod 400 web-caching-workshop.pem echo "Certificate 'web-caching-workshop.pem' installed under `pwd`" -
Connect to your proxy server
www-cocktail-1.aws.xebiatechevent.infossh -i web-caching-workshop.pem [email protected] -
Configure Apache
mod_proxy-
Create a
conf.d/cocktail.confconfiguration fragment to configuremod_proxysudo vi /etc/httpd/conf.d/cocktail.conf -
Add a
ProxyPassdirective in cocktail.conf# connect Apache to Tomcat ProxyPass / http://xfr-cocktail-1.elasticbeanstalk.com/
-
-
Restart Apache
sudo service httpd restart -
Verify opening in your browser http://www-cocktail-1.aws.xebiatechevent.info/cocktail/
WARNING: a production ready mod_proxy configuration is more complex.
See Apache > HTTP Server > Documentation > Version 2.2 > Modules > mod_cache
-
Verify
curlthatAgeheaders is missing (Ageheader can be used with Apache 2.2 to check thatmod_cacheis active, more details below): http://xfr-cocktail-1.elasticbeanstalk.com/cocktail/curl -v http://www-cocktail-1.aws.xebiatechevent.info/css/bootstrap.min.css > /dev/null -
Connect to your proxy server
www-cocktail-1.aws.xebiatechevent.infossh -i web-caching-workshop.pem [email protected] -
Enabled mod_disk_cache in
httpd.conf-
Edit
httpd.confsudo vi /etc/httpd/conf/httpd.conf -
Unncoment
 <IfModule mod_disk_cache.c>
     CacheEnable disk /
     CacheRoot "/var/cache/mod_proxy"
 </IfModule>
-
-
Restart Apache
sudo service httpd restart -
Verify that the Httpd Server successfully restarted opening in your browser http://www-cocktail-1.aws.xebiatechevent.info/cocktail/
WARNING: a production ready mod_disk_cache configuration is more complex, you must schedule a disk cleaner using htcacheclean.
Apache Httpd 2.2 does not add a X-Cache-Detail header to the HTTP response in order to ease debugging of page caching.
This X-Cache-Detail header has been introduced in Apache Httpd 2.4 with the CacheDetailHeader directive.
As of Apache 2.2, you can check that a resource has been served by mod_cache rather than by Tomcat checking the existence of the Age header.
Query twice the URL to load the resource in the caching resource.
curl -v http://www-cocktail-1.aws.xebiatechevent.info/css/bootstrap.min.css > /dev/null
curl -v http://www-cocktail-1.aws.xebiatechevent.info/css/bootstrap.min.css > /dev/null
< HTTP/1.1 200 OK
< Date: Mon, 28 May 2012 13:57:24 GMT
< Server: Apache-Coyote/1.1                        <==== RESPONSE GENERATED BY TOMCAT
< Cache-Control: max-age=86400
< Content-Type: text/css
< Expires: Tue, 29 May 2012 13:57:24 GMT
< Last-Modified: Sun, 01 Apr 2012 14:07:28 GMT
< Content-Length: 81150
< Connection: close
< HTTP/1.1 200 OK
< Date: Mon, 28 May 2012 13:43:18 GMT
< Server: Apache/2.2.22 (Amazon)                   <==== RESPONSE GENERATED BY APACHE HTTPD
< Last-Modified: Sun, 01 Apr 2012 14:07:28 GMT
< Cache-Control: max-age=86400
< Expires: Tue, 29 May 2012 13:08:40 GMT
< Age: 222									       <==== 'Age': DURATION IN CACHE IN SECS
< Content-Length: 81150
< Connection: close
< Content-Type: text/css
W3C > RFC 2616 - Hypertext Transfer Protocol - HTTP/1.1 > 14 Header Field Definitions > Age
The Age response-header field conveys the sender's estimate of the amount of time since the response (or its revalidation) was generated at the origin server. A cached response is "fresh" if its age does not exceed its freshness lifetime.

ssh -i web-caching-workshop.pem [email protected]
-
Edit
default.vcland setup your backend server:sudo vi /etc/varnish/default.vcl -
Update
backend default:backend default { .host = "xfr-cocktail-1.elasticbeanstalk.com"; .port = "80"; } -
Restart Varnish:
sudo service varnish restart -
Verify that the Varnish Cache successfully restarted opening in your browser http://www-cocktail-1.aws.xebiatechevent.info:6081/cocktail/
By default Varnish does not inform us about its execution, let's set up some configuration to keep informed about cache usage per request thanks to HTTP headers:
-
X-Cache:HITwhen resource was found in cache orMISSif not in cache -
X-Cacheable
-
Edit
default.vclsudo vi /etc/varnish/default.vcl -
Add
vcl_fetchandvcl_deliverroutines indefault.vcl(afterbackend defaultdirective):sub vcl_fetch { # Varnish determined the object was not cacheable if (beresp.ttl == 0s) { set beresp.http.X-Cacheable = "NO:Not Cacheable"; # You are respecting the Cache-Control=private header from the backend } elsif (beresp.http.Cache-Control ~ "private") { set beresp.http.X-Cacheable = "NO:Cache-Control=private"; return(hit_for_pass); # You are extending the lifetime of the object artificially } else { set beresp.http.X-Cacheable = "YES"; } # .... return(deliver); } sub vcl_deliver { if (obj.hits > 0) { set resp.http.X-Cache = "HIT"; } else { set resp.http.X-Cache = "MISS"; } } -
Restart Varnish:
sudo service varnish restart -
Verify the existence of the
X-Cache: HITheader. Query the ressource twice to load it in Varnish.curl -v http://www-cocktail-1.aws.xebiatechevent.info:6081/css/bootstrap.min.css > /dev/null curl -v http://www-cocktail-1.aws.xebiatechevent.info:6081/css/bootstrap.min.css > /dev/null
Now you should see the X-Cache header indicating wether the cache hit or miss, X-Cacheable will display wether the resource was cacheable or not and why.
< HTTP/1.1 200 OK
< Cache-Control: max-age=31536000
< Content-Type: text/css
< Expires: Mon, 03 Jun 2013 23:13:44 GMT
< Last-Modified: Sun, 01 Apr 2012 14:07:28 GMT
< Server: Apache-Coyote/1.1
< X-Cacheable: YES                                <==== CACHEABLE BY VARNISH
< Content-Length: 81150
< Date: Sun, 03 Jun 2012 23:13:44 GMT
< X-Varnish: 758000267
< Age: 0
< Via: 1.1 varnish
< Connection: keep-alive
< X-Cache: MISS                                    <==== VARNISH MISS
< HTTP/1.1 200 OK
< Cache-Control: max-age=31536000
< Content-Type: text/css
< Expires: Mon, 03 Jun 2013 23:13:44 GMT
< Last-Modified: Sun, 01 Apr 2012 14:07:28 GMT
< Server: Apache-Coyote/1.1                       <==== VARNISH DOESN'T MODIFY THE SERVER HEADER
< X-Cacheable: YES                                <==== CACHEABLE BY VARNISH
< Content-Length: 81150
< Date: Sun, 03 Jun 2012 23:14:10 GMT
< X-Varnish: 758000268 758000267
< Age: 27
< Via: 1.1 varnish
< Connection: keep-alive
< X-Cache: HIT                                    <==== VARNISH HIT
By default Varnish consider requests with Cookie and response with Set-Cookie not cacheable and just pass the request as a simple reverse proxy to the backend. A solution is to force Varnish to cache resources even though there is one or more Cookie header present in request.
Add vcl_recv routine in /etc/varnish/default.vcl:
sub vcl_recv {
    if (req.restarts == 0) {
        if (req.http.x-forwarded-for) {
            set req.http.X-Forwarded-For =
                req.http.X-Forwarded-For + ", " + client.ip;
        } else {
            set req.http.X-Forwarded-For = client.ip;
        }
    }
    if (req.request != "GET" &&
      req.request != "HEAD" &&
      req.request != "PUT" &&
      req.request != "POST" &&
      req.request != "TRACE" &&
      req.request != "OPTIONS" &&
      req.request != "DELETE") {
        /* Non-RFC2616 or CONNECT which is weird. */
        return (pipe);
    }
    if (req.request != "GET" && req.request != "HEAD") {
        /* We only deal with GET and HEAD by default */
        return (pass);
    }
    if (req.http.Authorization) {
        /* Not cacheable by default */
        return (pass);
    }
     /* Now let's use the cache */
    return (lookup);
}
Restart Varnish:
sudo service varnish restart
And check access:
curl -v http://www-cocktail-1.aws.xebiatechevent.info:6081/css/bootstrap.min.css > /dev/null
With this setup, Varnish will cache resources even if a session Cookie is present in the request.
Backend probes will monitor backend health which allows to use grace mode to keep delivering resources while backend server is down.
Update the backend default directive in default.vcl:
backend default {
    .host = "xfr-cocktail-1.elasticbeanstalk.com";
    .port = "80";
    .probe = {
        .url = "/";
        .timeout = 0.3 s;
        .window = 8;
        .threshold = 3;
        .initial = 3;
    }
}
Add req.grace timeout in vcl_recv and vcl_fetch routines /etc/varnish/default.vcl:
sub vcl_recv {
    # ....
    set req.grace = 120m;
    # ....
}
sub vcl_fetch {
    # ....
    set beresp.grace = 120m;
    # ....
}
Restart Varnish:
sudo service varnish restart
Now if the backend goes down, Varnish will keep resources and deliver them during grace timeout.
Please note that it is not possible to pause your Amazon Elastic Beanstalk environment, you can only restart or terminate it. Once this lab is completed, you are free to terminate it in order to test the Varnish grace mode.

-
Go to
CloudFront tab
-
Get the base URL of your distribution
The hostname of the distribution looks like
d1mm4v4zybjqbh.cloudfront.net
-
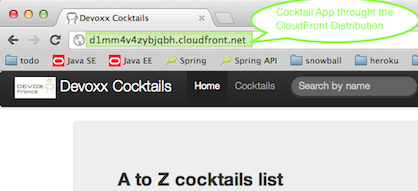
Open the cocktail app in your browser via the CloudFront distribution URL (something like http://d1mm4v4zybjqbh.cloudfront.net/)
Here is a technique to use switchable CDN URLs in your application. Other techniques exist.
Look at the use of ${cdnUrl} in view.jsp (source):
<link rel="shortcut icon" href="${cdnUrl}${pageContext.request.contextPath}/img/favicon.ico">
...
<link href="${cdnUrl}${pageContext.request.contextPath}/css/bootstrap.min.css" media="screen" rel="stylesheet" type="text/css" />
...
<script src="${cdnUrl}${pageContext.request.contextPath}/js/bootstrap.min.js" type="text/javascript"></script>
And the injection of cdn_url System Property as cdnUrl variable in JSP Expression Language in spring-mvc-servlet.xml (source)
<!-- source 'cdn_url' from the system-properties -->
<context:property-placeholder system-properties-mode="OVERRIDE" />

<!-- inject 'cdn_url' as "cdnUrl" in JSP EL variables -->
<bean class="org.springframework.web.context.support.ServletContextAttributeExporter">
    <property name="attributes">
        <map>
            <entry key="cdnUrl" value="${cdn_url:}/>
        </map>
    </property>
</bean>
-
Edit the configuration of your Amazon Beanstalk Tomcat Environment
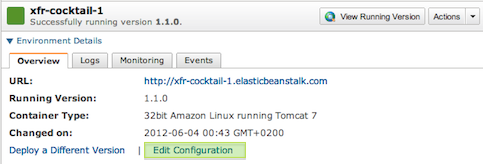
-
Add a
JVM Command Line Options: -Dcdn_url=http://...FIXME....cloudfront.netand click onApply Changes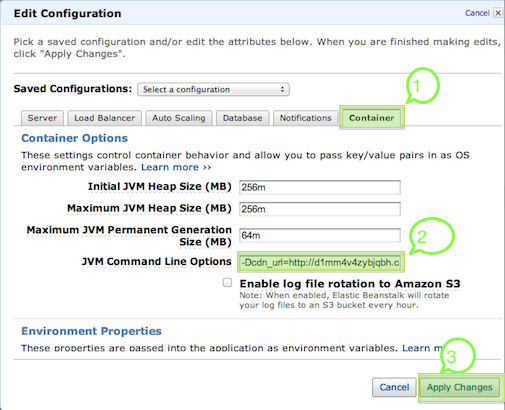
-
Once your application is restarted, reopen in your browser http://xfr-cocktail-1.elasticbeanstalk.com/
-
Verify in the HTML source code that the CloudFront CDN Distribution servers


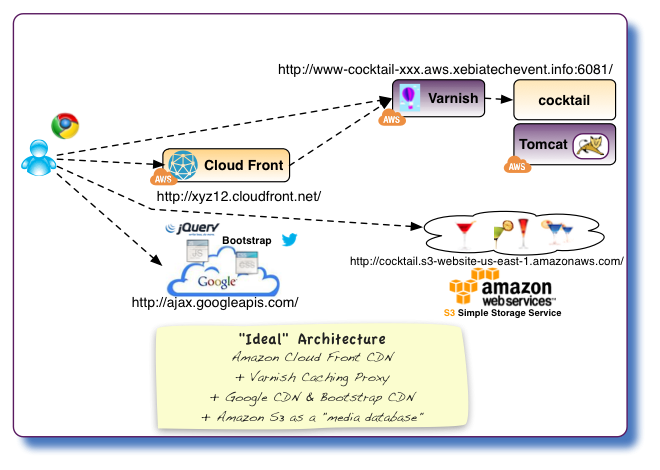
Note: our "ideal" architecture connects the CloudFront CDN to the Varnish layer even if the lab simplified this directly connecting the CloudFront CDN to the Tomcat Layer.
- Add expiration headers to a Java web application
- Use Bootstrap CDN and Google CDN
- Use a web server auch as Apache Httpd as a Caching Proxy
- Use a Caching Proxy such as Varnish Cache
- Use a Content Delivery Network such as Amazon CloudFront
- Integrate CDN based URLs in a web application
