-
Notifications
You must be signed in to change notification settings - Fork 0
Installation V2
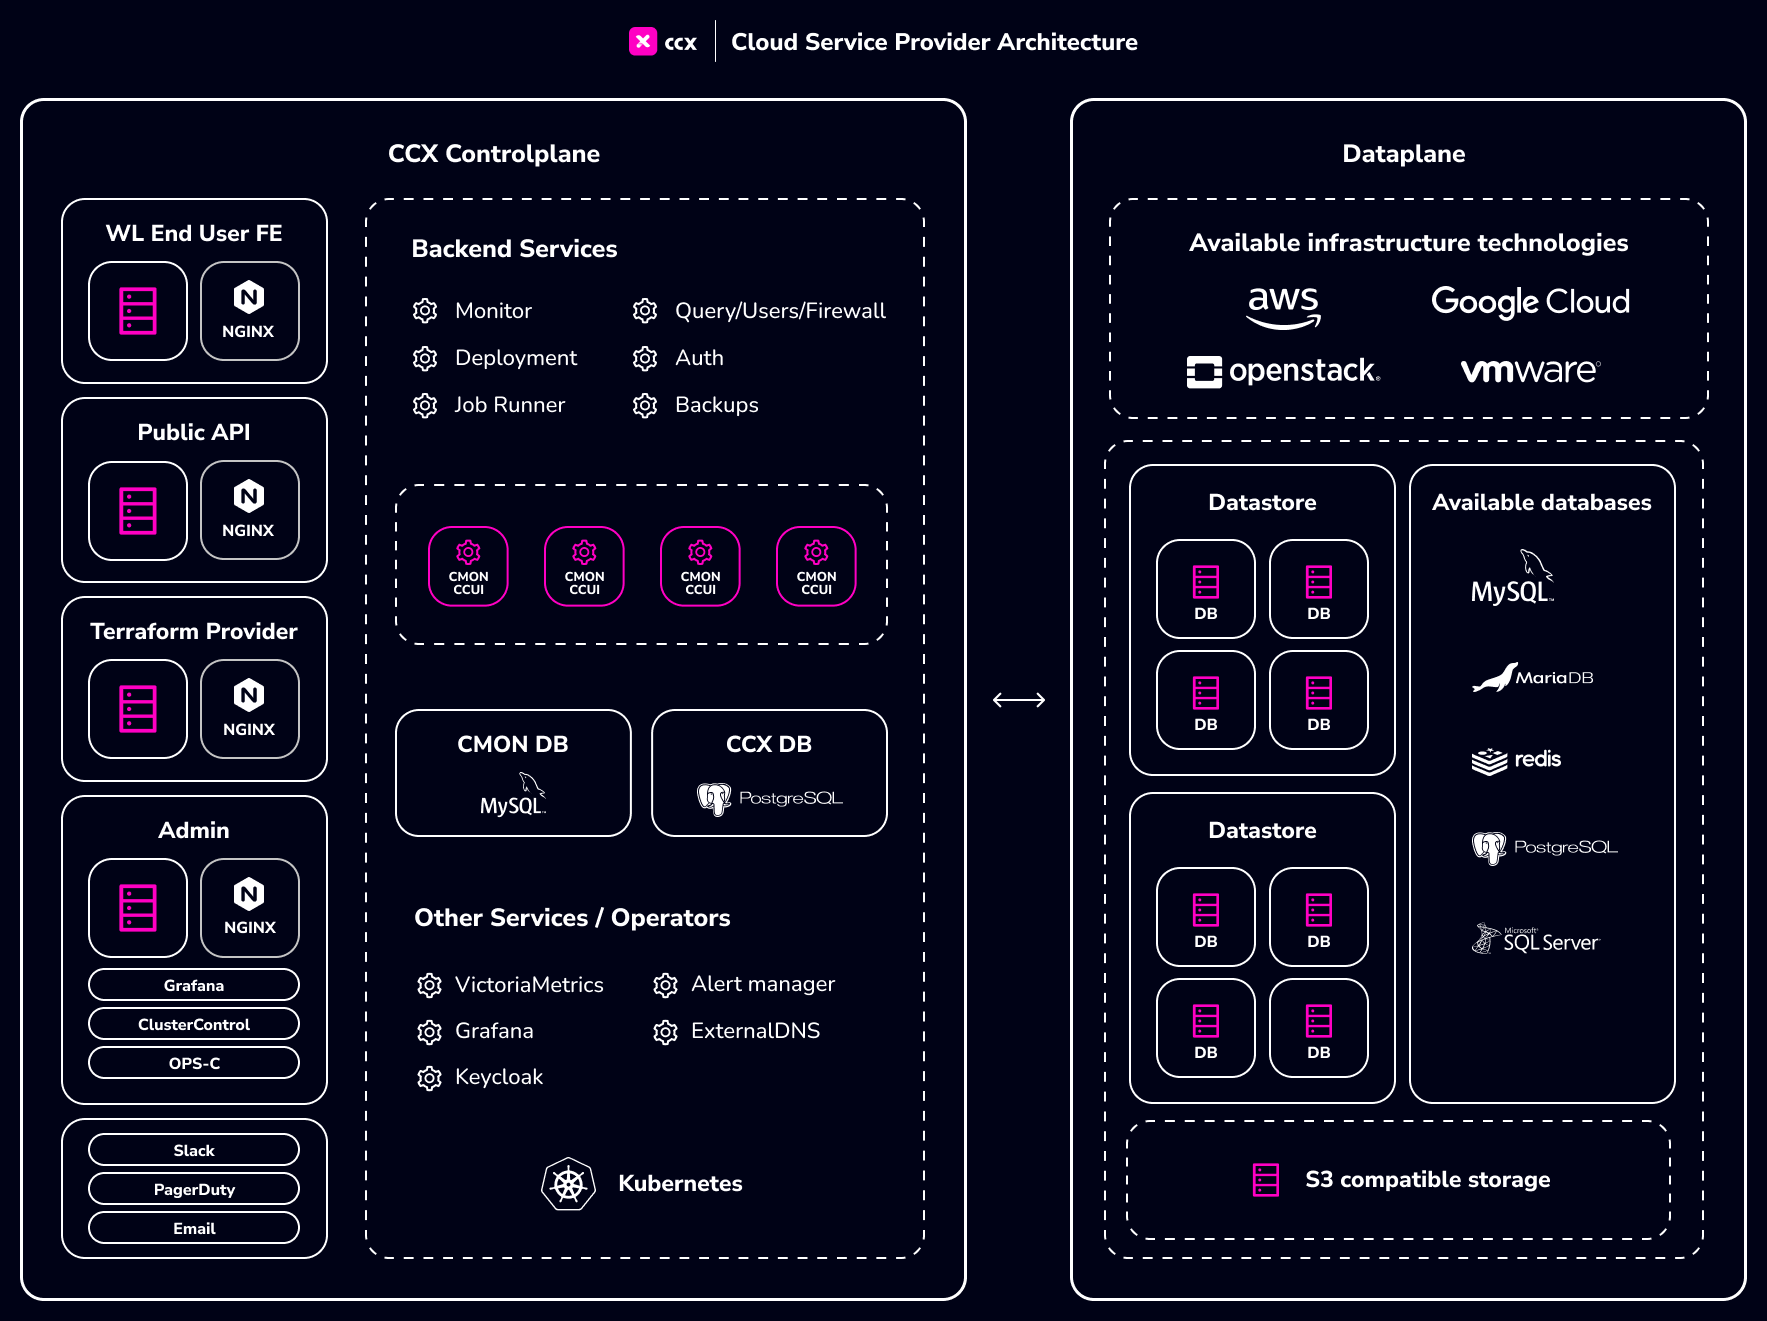
CCX is a comprehensive data management and storage solution that offers a range of features including flexible node configurations, scalable storage options, secure networking, and robust observability tools. It supports various deployment types to cater to different scalability and redundancy needs, alongside comprehensive management functions for users, databases, nodes, and firewalls. The CCX project provides a versatile platform for efficient data handling, security, and operational management, making it suitable for a wide array of applications and workloads.
A K8s Control plane responsible for the life-cycle of the datastores, backend databases and tools responsible for metadata such as users, datastores, and other resources.

The control plane requires the following resources:
- 3 worker nodes
- 4vCPU Per node
- 8GB of RAM Per Node
- 100 GB of Disk (for PVCs)
CCX requires Kubernetes Cluster Version to be >=1.22.
A namespace must be configured for the CCX K8s services to operate.
example: production
- nginx ingress controller
- nats
- external-dns (Please see - DynamicDNS and please check the supported DNS provider for external-dns here)
- MySQL Database, aka CMON DB, is used by the CMON container to store metadata about managed/monitored data stores
- PostgresSQL Database, aka CCX DB, is used to store CCX (Control Plane) metadata.
- Prometheus compatible monitoring server
This prequisite can be installed using ccxdeps. Dependencies required for CCX are created as child charts inside ccxdeps. By default only ingress-nginx controller and external-dns is not enabled in ccxdeps. you can enable by setting it to true by using below command.
  helm repo add s9s https://severalnines.github.io/helm-charts/
  helm repo update
  helm install ccxdeps s9s/ccxdeps --debug --set ingressController.enabled=true --set external-dns.enabled=true
CCX requires flavors built with Ubuntu 22.04 for the datastores. For a test/evaluation the following flavors are recommended:
- 2vCPU, 4GB RAM, 80GB Disk
- 4vCPU, 8GB RAM, 100GB Disk
Create a pool of floating IPs. Each VM requires a floating IP.
Disk space can either be ephemeral or block storage.
There are two methods to quick start CCX.
-
If you wish to quickly install CCX in dev environment, you can use provided
ccxdepshelm chart to install and configure dependencies. By default CCX will install with the cloud vendor AWS - only thing you need to provide is cloud secrets! If you want to customize your installation, please see thevalues.yamland follow the guide.This is recommendend only for development environment.
For a super quick start you can create a
awssecret from your existing aws credentials file~/.aws/credentials.kubectl create secret generic aws --from-literal=AWS_ACCESS_KEY_ID=$(awk '/aws_access_key_id/{print }' ~/.aws/credentials) --from-literal=AWS_SECRET_ACCESS_KEY=$(awk '/aws_secret_access_key/{print }' ~/.aws/credentials)Otherwise you can create secrets manually or by copying a
secrets-template.yamland putting your secrets in. For AWS cloud make sure to setupawssecret. For Openstack make sure to setupmycloud-openstacksecret replacingmycloudwith your cloud code. Apply secrets by running:kubectl apply -f secrets-template.yamlhelm repo add s9s https://severalnines.github.io/helm-charts/ helm repo update helm install ccxdeps s9s/ccxdeps --wait --debug
Note Make sure to install the prerequisites in
Prerequisite tool sets for CCX Installationfor ccxdeps.
Have a look at values.yaml and create your own values file to customize your CCX instance.
The very minimal values.yaml could be
sessionDomain: mycloud.com
ccxFQDN: ccx.mycloud.com
ccFQDN: cc.mycloud.com
cmon:
  license: ZHVwYQ== #YOUR CMON LICENSE SHOULD BE BASE64 ENCODED HERE
# this section is for configuring specifics of the CCX system
ccx:
  # list of k8s secrets containing cloud credentials
  cloudSecrets:
    - aws
For testing, you can also add entry in your /etc/hosts file for local resolution of ccx.local on your machine instead of public FQDN.
Note Get in touch with our s9s representative in case of issues or clarifications.
-
Clone the repo
helm-ccxand run the script./charts/ccx/scripts/ccx-yaml-gen.shYou will be prompted with user inputs. please choose the option or paste parameters carefully. This will install theccxdepswhich comes with prerequisite tool-sets for CCX Installation and generate CCXvalues.yamlfile for CCX installation. After the values.yaml file are generated. you can review your changes and run commands in Install CCX section.
Those are the two methods which you can do quickstart install for ccx.
To install ccx, run this command
helm repo add s9s https://severalnines.github.io/helm-charts/
helm repo update
helm install ccx s9s/ccx --wait --debug --values values.yaml
Note: Ensure to check all pods, jobs are running without any errors
Backups needs to be configured for:
-
CMON database (See mysql)
-
CCX database (See postgres)
Note Severalnines is not responsible for backups that is lost or incorrect configuration
To ensure data integrity and availability in your production environment, it is crucial to take regular snapshots of Persistent Volume Claims (PVCs) for CMON, DB's. Configure snapshot schedule at regular intervals, based on the criticality and update frequency of your data in your cloud environment
To know more about the monitoring setup, please read Observability.