-
Notifications
You must be signed in to change notification settings - Fork 8
2.1 Get Started Building
If you would like to get started with the minimal system hardware here is a list of components and tools required to get started.
-
(1) Raspberry Pi - ADA3055
-
(1) Pimoroni Automation HAT - PIM213
-
(1) Humidity sensor / Temperature sensor - DHT22 ADA385
-
(1) 10K Ohm Resistor - ADA2784
-
(1) Spool of 20-24 (AWG) copper wire - 22AWG - ADA290
-
(1) Soldering Iron/Pencil - ADA180
-
(1) Spool of solder 60/40 rosin core - ADA1886
-
(1) Multi-size wire stripper/cutter - ADA147

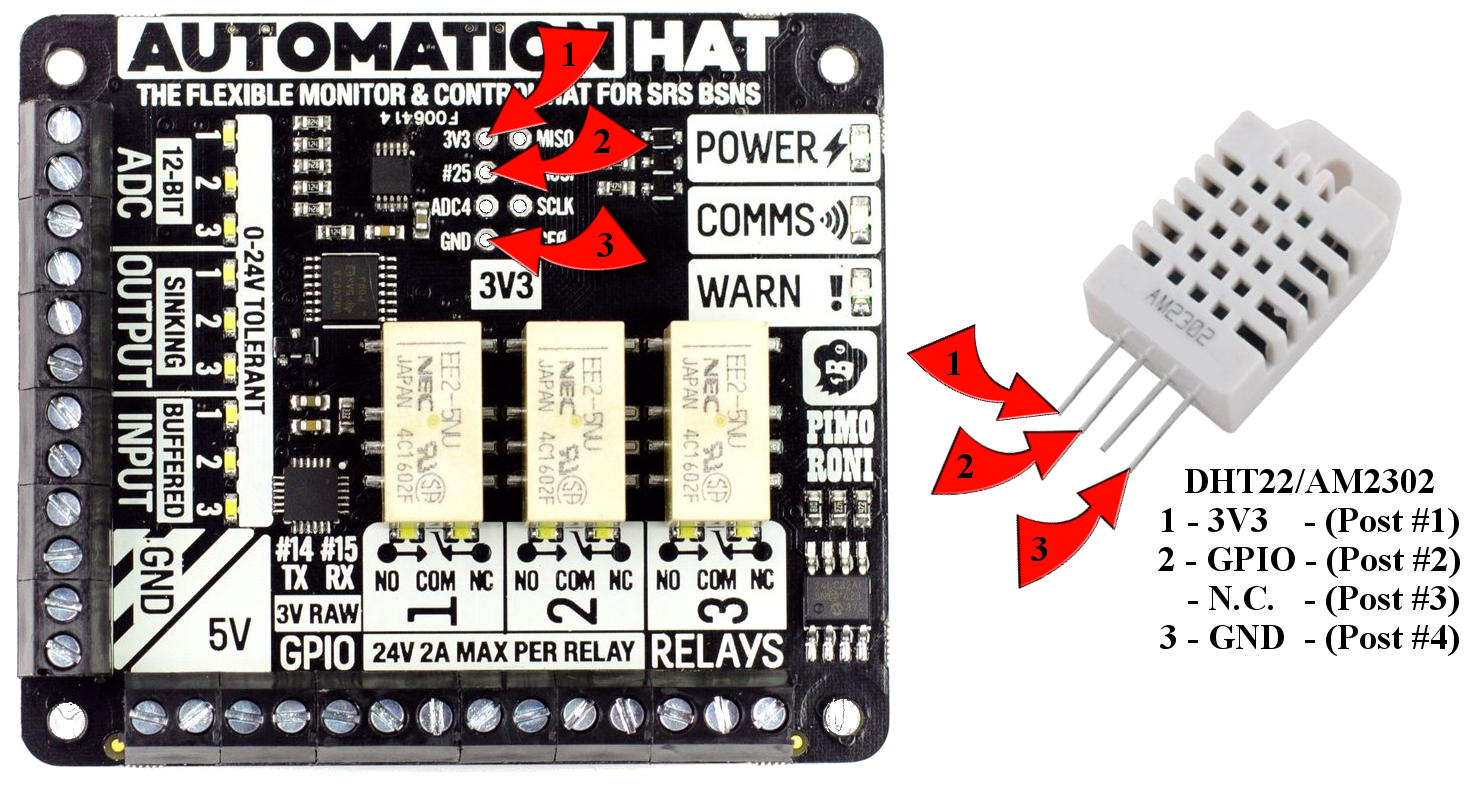
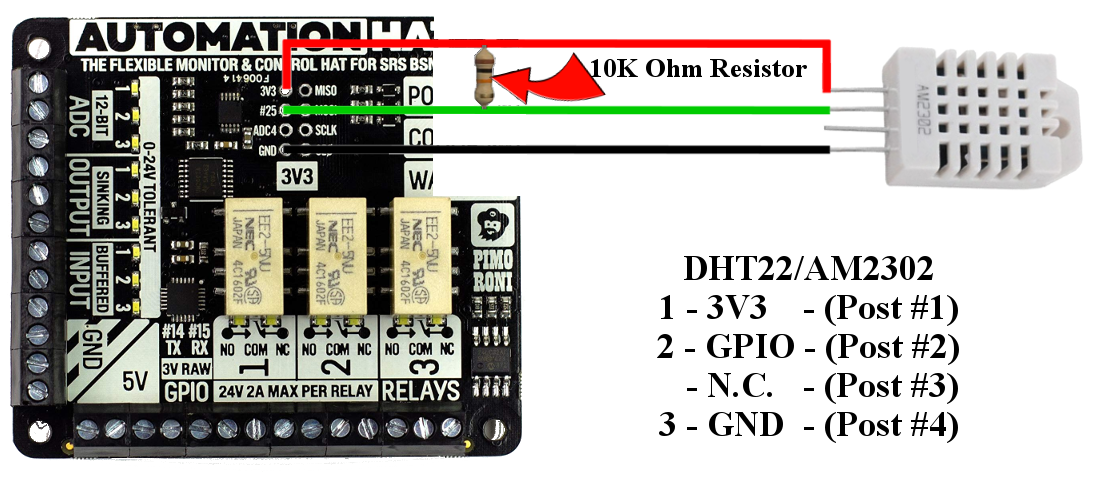
Using the wire strippers/cutter cut three short segments of wire from the spool. Next, using the wire stripper tool, remove a small amount of insulation from each end of the wires. Be sure to twist the wire ends to prevent fraying. Now locate and place a segment of wire into each of the three the empty GPIO mount holes on the Pimoroni Automation HAT circuit board. Rotate the board upside down while being careful not to allow of the wires to slip from their mounting hole. Using the soldering pencil and solder, carefully solder each wire end into place. Now we will solder each remaining wire end to its appropriate terminal post located on the DHT22 digital temperature/humidity sensor. The sensor will require the use of a 10K Ohm resistor installed between the 3 Volt wire and the #25 GPIO data wire. Decide on an installation location along both wires between the sensor and the automation hat. Cut the two wires and strip the insulation all four new wire ends a few millimeters back. Now solder in place the 10K Ohm resistor while reconnecting the wire ends.

2.) Install the Automation HAT onto your Pi by seating the GPIO pins into the female socket located on the underside of the Automation HAT circuit board.
3.) Load the GreenhousePi disk image onto the Pi's SD card. (Referring to a section of documentation yet to be produced.)
4.) Connect the Pi to your local network using a wired (network cable) connection. Boot the GreenhousePi.
6.) Using a web browser connect to your new automated greenhouse Pi's homepage. (E.g. http://192.168.1.118)
8.) Locate a broken solar pathway light and salvage the LDR (Light Dependant Resistor) from the product to connect to an ADC (Analog to Digital Converter).
9.) You are now ready to start planning the enclosure layout, future sensor deployment, and the rest of your automation systems design.
As soon as you have your automation HAT and DHT sensor installed you can configure the greenhouse.py script to begin reading values. To disable fake sensor readings edit the /home/pi/Greenhouse/greenhouse.py file and set the following value to False.
ENABLE_FAKE_SENSOR_VALUES = TrueProceed to next section: Section 3. Software Installation
Understand well as I may, my comprehension can only be an infinitesimal fraction of all I want to understand. - Ada Lovelace
Home 🌸
4. Remote Monitoring Alarm Email
5. Remote Monitoring Report Email
6. Remote Monitoring Radio Frequency Broadcast
7. Remote Monitoring Radio Frequency Reception
8. Remote Monitoring POTS (Plain Old Telephone Service) Landline
9. Ubuntu Desktop Alarm Notifications