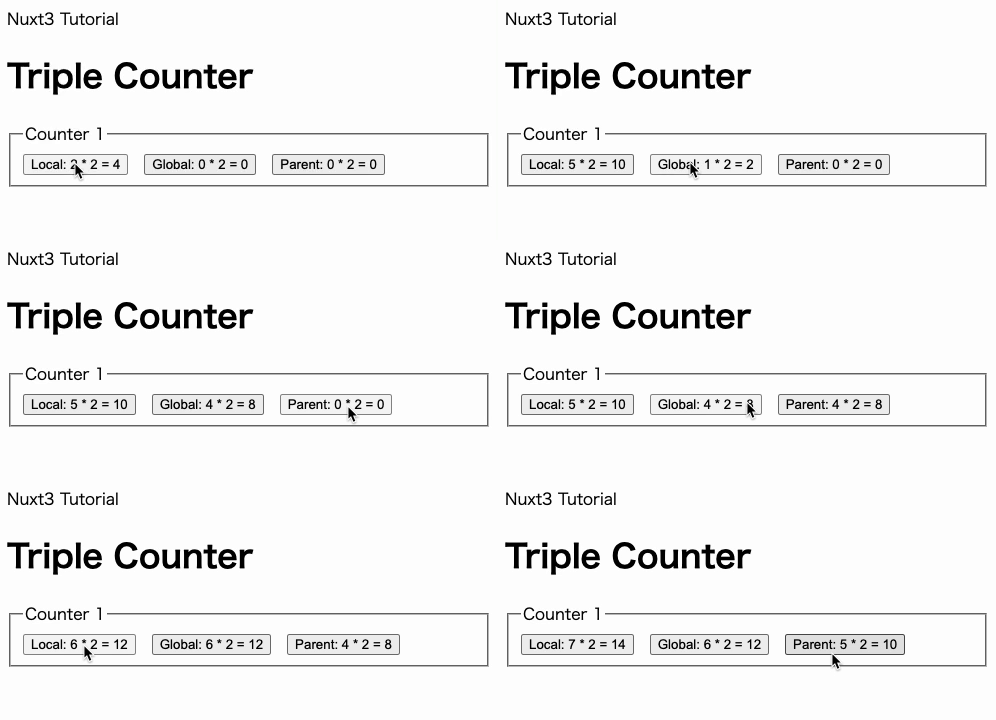
- コンポーネントのローカル変数を使った状態管理
- コンポーザブルを使ったグローバルな状態管理
- props/emits を使って上位コンポーネントの状態を使う状態管理
これらのコードを書くチュートリアルです。
それぞれ、リアクティビティを保った動作を短い記述で実現できます。
nuxt3のインストールから初めます。
mac の作業用ディレクトリで、空のプロジェクトを作ります
npx nuxi init triple-counter指示通りに進めます
cd triple-counter
npm installnpm run devhttp://localhost:3000/
triple-counter ディレクトリをエディタで開きます。
プロジェクトのルートディレクトリに pages という名前でディレクトリを作成
その中に、 index.vue を作成
<template>
  <div>
    <h1>Triple Counter</h1>
  </div>
</template>
プロジェクトルートの app.vue の内容を修正
<template>
  <div>
    <NuxtPage />
  </div>
</template>
NuxtWelcome となっていた箇所を、NuxtPage に変更します。
今回のプロジェクトではあまり活用しませんが、実際の商用プロジェクトでは必ず必要になる、レイアウトファイルを作成します。
プロジェクトのルートディレクトリに layouts という名前でディレクトリを作成
その中に、 default.vue を作成
<template>
  <div>
    <header>Nuxt3 Tutorial</header>
    <slot/>
  </div>
</template><template>
<div>
<NuxtLayout>
<NuxtPage />
</NuxtLayout>
</div>
</template>NuxtLayout タグを作り、NuxtPage をその中に入れる
プロジェクトのルートディレクトリに components という名前でディレクトリを作成
その中に、counter というディレクトリを作成
その中に、 CounterComponent.vue ファイルを作成
<script lang="ts" setup>
const localCounter = ref<number>(0)
const doubledLocalCounter = computed<number>(() => localCounter.value * 2)
</script>

<template>
  <fieldset>
    <legend>Counter</legend>
    <button @click.prevent="localCounter++">
      Local: {{ localCounter }} * 2 = {{ doubledLocalCounter }}
    </button>
  </fieldset>
</template>- 今回の script 内の変数の型は推論できる内容ですが、今回はあえて指定しています。
- script 内で値を参照する再は
.valueが必要で、 template タグ内では.valueは必要ありません。
作った CounterComponent を使用します。
<template>
  <div>
    <h1>Triple Counter</h1>
    <CounterComponent />
  </div>
</template>
CounterComponent は、インポートしなくても使えます。
ディレクトリ名とコンポーネント名の前方が一致している場合は省略、一致していない場合は結合されて、自動インポートが行えます。
プロジェクトのルートに composables ディレクトリを作成し、counter.ts を作成
export const useGlobalCounterComposable = () => {
  const globalCounterState = useState<number>('globalCounter', () => 0)

  const doubledCount = computed<number>(() => globalCounterState.value * 2)

  const increment = () => {
    globalCounterState.value++
  }

  return {
    count: globalCounterState,
    doubledCount,
    increment
  }
}- これも、型は推論できる内容ですが指定しています。 また、関数名もあえて冗長に書いています。
useCounterComposable を組み込みます。
<script lang="ts" setup>
const localCounter = ref<number>(0)
const doubledLocalCounter = computed<number>(() => localCounter.value * 2)

const globalCounter = useGlobalCounterComposable()
</script>

<template>
  <fieldset>
    <legend>Counter</legend>

    <button @click.prevent="localCounter++" class="me-1">
      Local: {{ localCounter }} * 2 = {{ doubledLocalCounter }}
    </button>

    <button @click.prevent="globalCounter.increment" class="me-1">
      Global: {{ globalCounter.count }} * 2 = {{ globalCounter.doubledCount }}
    </button>

  </fieldset>
</template>

<style scoped>
button.me-1 {
  margin-right: 1rem;
}
</style>composablesディレクトリ以下のuseXxxxxメソッドは、 import 無しで使えます
const props = defineProps<{
  counterId: string,
  propCount: number,
  propDoubledCount: number,
}>()
const emits = defineEmits(['emitIncrement'])props, emits を定義します。
<button @click.prevent="emits('emitIncrement')">
  Parent: {{ props.propCount }} * 2 = {{ props.propDoubledCount }}
</button>props, emits を使うようにする
動作にはあまり関係ありませんが、親から指定された変数を表示しています。
これより複数コンポーネントを表示する予定のためです。
<legend>Counter {{ counterId }}</legend><script lang="ts" setup>
// 親の状態を使う
const props = defineProps<{
counterId: number,
propCount: number,
propDoubledCount: number,
}>()
const emits = defineEmits(['emitIncrement'])
// ローカルカウンター
const localCounter = ref<number>(0)
const doubledLocalCounter = computed<number>(() => localCounter.value * 2)
// グローバルカウンター
const globalCounter = useGlobalCounterComposable()
</script>
<template>
<fieldset>
<legend>Counter {{ counterId }}</legend>
<!-- コンポーネント変数を使うカウンター -->
<button @click.prevent="localCounter++" class="me-1">
Local: {{ localCounter }} * 2 = {{ doubledLocalCounter }}
</button>
<!-- コンポジション内の状態を使うカウンター -->
<button @click.prevent="globalCounter.increment" class="me-1">
Global: {{ globalCounter.count }} * 2 = {{ globalCounter.doubledCount }}
</button>
<!-- 親の状態を使うカウンター -->
<button @click.prevent="emits('emitIncrement')">
Parent: {{ props.propCount }} * 2 = {{ props.propDoubledCount }}
</button>
</fieldset>
</template>
<style scoped>
button.me-1 {
margin-right: 1rem;
}
</style>script タグを作り、変数を定義します。値を CounterComponent に渡します。
<script lang="ts" setup>
const parentCount = ref<number>(0)
const parentDoubledCount = computed<number>(() => parentCount.value * 2)
</script>

<template>
  <div>
    <h1>Triple Counter</h1>
    <CounterComponent
      counter-id="1"
      :prop-count="parentCount"
      :prop-doubled-count="parentDoubledCount"
      @emit-increment="parentCount++"
    />
  </div>
</template>
少し長くて複雑になってしまいましたが、
- コンポーネント内の変数を使った状態管理
- コンポーザブルを使った状態管理
- 親コンポーネントからの値の受け渡しを使った状態管理
それぞれ違った方法で、状態管理ができています。
いずれにしても、変数を変更した瞬間に、2倍の値を求める自動計算が動き、リアクティブに HTML の再描画が行われます。
最後に、CounterComponent を複数表示してみます。
index.vue の <CounterComponent> を、ループで囲います。
<script lang="ts" setup>
const parentCount = ref<number>(0)
const parentDoubledCount = computed<number>(() => parentCount.value * 2)
</script>

<template>
  <div>
    <h1>Triple Counter</h1>
    <div v-for="i in 3" :key="i">
      <CounterComponent
        :counter-id="i"
        :prop-count="parentCount"
        :prop-doubled-count="parentDoubledCount"
        @emit-increment="parentCount++"
      />
    </div>
  </div>
</template>ローカルのカウンターは状態が分離され、コンポーザブルの状態を使うカウンターと親の状態を使うカウンターは、値が共有されます。
すべての状態において、変更した瞬間に関係するすべてのHTMLエレメントがリアクティブに再描画されることが確認できます。
nuxt2 から nuxt3 への変更点は非常に多く、全く別のフレームワークといえます。どちらかというと、nuxt2 より Svelte に近いものとなっています。
中でも、自動インポートの取り組みは素晴らしく、今回のコードではサブディレクトリの中にコンポーネントを作っていますし、グローバルな状態管理も行っていますが、import 文を一切書くことなく使用できています。
さらに、グローバルな状態管理も、TypeScript も、ライブラリの追加無く記述できます。


