-
Notifications
You must be signed in to change notification settings - Fork 0
User Guide
This script was made with the intention of helping those who wish to separate sound effects audio sent by Streamlabs output to a different channel inside OBS Studio.
It's well known that Streamlabs Chatbot allows streamers to enable song requests as well as play sound effects using commands on stream. Both audio outputs, though, are sent to the same channel, which can cause one of the possible "complications"
- Audio overlap between the song request and the sound effects
- No audio effects being played if the streamer opt-in for not saving a specific track on their VODs to prevent clips and other features from Twitch to be played with Copyrighted songs
With this in mind, this script was created per request for the streamer Gwennsday, so they could still have their sound effects played on clips and VODs while keeping them clear of Copyrighted songs.
- Simulate a faux-audio channel to be added to your track list on OBS to separate sound effects added to it from all other audio sent on stream by Streamlabs Chatbot
- Send any sound effect added to it's database, when trigger by a command, to an invisible overlay, which functions as the faux-audio channel
- Prevent the overlapping audio mentioned
- Bot commands to manage script and database of audio files
- Better user interface (GUI) made with Python Tkinter to allow easy configuration of the script
- Auto creation of sound effects commands with just a few clicks
- Customization of individual sound effects
- Connection to custom commands created inside the Commands tab of Streamlabs Chatbot
This script was written with a set of commands that allow easy control of some features of it. The commands are inside the script folder in the file [SLCB] SendSounds_commands.abcomg, which is the file that needs to be imported to the Commands tab inside Streamlabs Chabot.
The commands can be easily imported using the import function in the tabs command. You can either follow the Streamlabs Chabot documentation to learn how to import commands or you can following the steps below.
- Open the Streamlabs Chatbot Commands tab

- Click on the button
Import

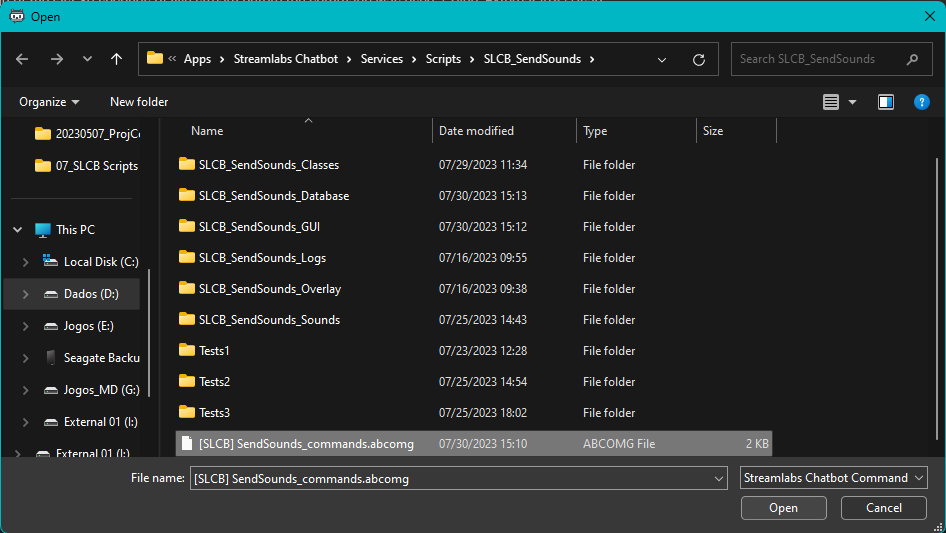
- Search for the file
[SLCB] SendSounds_commands.abcomginside the script folder, selecting it then clicking on the buttonOpen

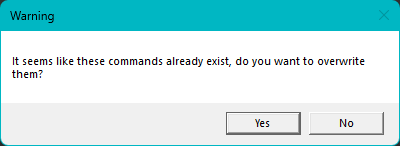
- If a pop-up window similar to the one below is shown up, just click on
Yes

- Test the commands and script by typing
!soundsdbon the bot console. IF everything is working as intended, the script dashboard will open.
The commands are listed in alphabetic order:
-
!soundsdb
Syntax: !soundsdb
Function: Opens the dashboard to control the base script settings and sounds database
Usage: Caster
Cooldown: None
User colldown: None
-
!soundslist
Syntax: !soundslist
Function: Lists the last saved sounds from inside the sound database
Usage: Caster
Cooldown: 1 minute
User colldown: 5 minutes
-
!soundsrld
Syntax: !soundsrld
Function: Reloads the script and refresh the database with the last saved information provaded in the dashboard for both base script settings and sounds settings
Usage: Caster
Cooldown: None
User colldown: None
-
!soundstest
Syntax: !soundstest $trigger
where $trigger should be replaced by the sound trigger set on the Dashboard.
Function: Allows testing a specific sound with the new settings after a sound is updated in the dashboard and the script is reloaded
Usage: Caster
Cooldown: None
User colldown: None
The main script interface (accesssible by clicking on the Scripts tab of Streamlabs Chatobt) is formed only by buttons, each one with a specific function:

1. README
Opens the README file (on Github) with some script general information
2. OPEN USER GUIDE
Opens this documentation
3. OPEN DASHABOARD
Opens the script dashboard
4. ONLINE SUPPORT
Opens a link with a Discord Server invitation to my personal server where I can provide a better support for you
5. CHECK FOR UPDATES
Opens a link with the script releases and updates.
6. VON SCHAPPLER'S SITE
Opens my personal website
7. VON SCHAPPLER'S TWITCH
Opens my Twitch page
8. DONATE THIS PROJECT
Opens my PayPal page for donations if you feel inclined to support my work in creating this
9. Save settings
This button has no function in this script
This dashboard was created to make the script management easier for the user, instead of the old and "not so friendly" script GUI from Streamlabs Chatbot
The dashboard can be opened in two different ways:
Using command lines
To open the dashboard using Windows Powershell type the code below when it opens, if you have just one version of Python (Python 2.7.13) installed on your machine:
cd <slcb_install>/Services/Scripts/SLCB_SendSounds/SendSounds-GUI; python SendSounds_App.pyor the command below if you have two or more Python versions installed:
cd <slcb_install>/Services/Scripts/SLCB_SendSounds/SendSounds-GUI; py -2 SendSounds_App.pyNOTES:
-
Remember to replace
<slcb_install>by the folder path where your Streamlabs Chatbot is installed before running any of those commands. -
If you prever using the normal Command Prompt, the commands above need to be used in sightly different way (each command on its line, instead of linked with a ';'):
cd <slcb_install>/Services/Scripts/SLCB_SendSounds/SendSounds-GUI
python SendSounds_App.py
or
cd <slcb_install>/Services/Scripts/SLCB_SendSounds/SendSounds-GUI
py -2 SendSounds_App.py- Tip: In order to make this folder typing on the Command Prompt / Windows PowerShell, make use of the tab key to auto-complete folder names
- Remember to ALWAYS open either Windows PowerShell or the normal Command Prompt as administrator in order to use the dashboard as an stand-alone application
Using Streamlabs Chatbot:
Opening the dashboard using Streamlabs Chatbot is a lot eaiser than using the command lines. But there is a catch to it, this will "lock" the bot execution for as long as the dashboard is opened.
To open the dashboard using Streamlabs Chatbot, you can either:
-
Click on the button
Open Dashboardin the Script GUI inside theScriptstab of the chatbot; or -
IF you have already imported and enabled the commands provided with the script to your
Commandstab, just type the command!soundsdbon the bot's console tab.
This step is totally optional, but if you'd like to make use of all the features provided with the dashboard, follow the steps listed below:
-
Start Windows PowerShell or the Command Prompt as administrator
-
Type one of the commands below:
- If you just have one version of Python installed on your computer:
pip install pygame
- If you have more than one version of Python installed on your computer:
pip2 install pygame
-
Certify that pygame was installed correctly:
- If you just have one version of Python installed on your computer:
pip show pygame
- If you have more than one version of Python installed on your computer:
pip2 show pygame
If pygame is successfily installed, the text below should appear on Windows PowerShell or in the Command Prompt:
Name: pygame
Version: 2.0.3
Summary: Python Game Development
Home-page: https://www.pygame.org
Author: A community project.
Author-email: pygame@pygame.org
License: LGPL
Location: <python_install>\lib\site-packages
Requires:
Required-by:
Whenever the dashboard is opened, no matter the way you chose to do so, a black window with some log actions will be displayed on screen. By any means close that window or the dasbhboard will be closed with it.
When you open the dashboard for the first time, some default/basic settings are created for use with the script.
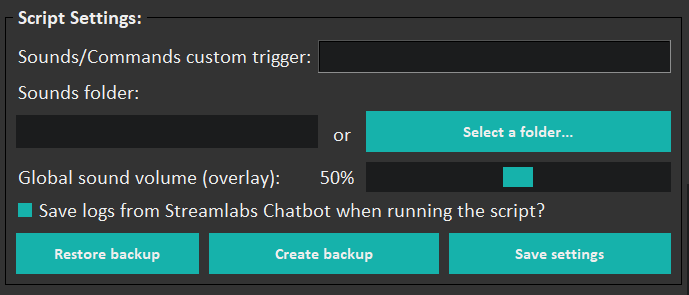
The dashboard is formed by sections, as described below:
This tab is used to control general aspects of the script.

-
Sounds/Commands custom trigger
Use this to define which trigger viewers will use to play any sound effect. Anything typed inside this box will be used.
Tip: Avoid using the default command triggers (usually
!- for the bot - or/- for Twitch) in this field, to prevent the script from being overloaded by commands possible triggers what would conflict with the sounds -
Sounds folder
Use this to enter the folder path where your sounds are stored. The folder can also be selected by clickin on the button
Select a folder...It's important to notice that it's possible to make use of the default folder,
<chatbot_scripts_folder>\SendSounds-Sounds, by copying your sounds to this folder. -
Global sound volume (overlay)
Use this to set the global sound volume which can be used as a master volume to all sounds to be played.
-
Save logs from Streamlabs Chatbot when running the script?
Use this option to select if you wish to save Streamlabs Chatbot script logs.
-
Restore backup
Use this button to revert any changes made to the settings added. This button will work ONLY if a backup of a saved script settings is found inside the script folder structure.
-
Create backup
Use this button to create a backup of the last saved script settings. This button will work ONLY if a saved script settings is found inside the script folder structure.
-
Save settings
Use this button to save any changes made to the fields above. By clicking on this button, the script will:
- Create the a database with a default trigger based on the name of the audio files added in the sounds folder
- Check for possible database issues which could affect the script functionalities
- In case you change the sounds folder after the datatase was created, disable the previous sounds to prevent the script from taking too long to load.1

-
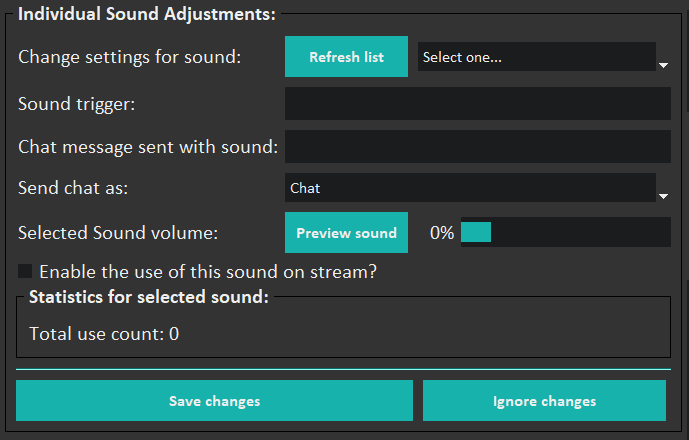
Change settings for sound:
- Use this option to select one of the sounds added to the sounds database and enable the customization of the sound.
- If a specific sound is not displayed on the list, clicking on the button
Refresh listwill force an updated of the listed sounds - IF this still do not work, close both the dashboard and Streamlabs Chatbot and restar both applications and the list should be updated.
-
Sound trigger
- Use this option to customize a trigger for the selected sound in case you want to change default trigger created when saving the settings
-
Chat message sent with sound
- Use this option to if you want to add an message to be sent with the sound effect when it's played2
-
Send chat as
- Use this option to define how the chat message set on the option
Chat message sent with soundwill be sent on chat- Chat: this will send the message as a normal chat
- Announcement (/announce): this will send the message as an announcement, making it more visible in chat
- Action (/me): this will send the message as an action
- Announcement+Action (/announce /me): this will send the message as an announcement while also displaying it as an action
- Use this option to define how the chat message set on the option
-
Select Sound volume
- Use this option to adjust an individual sound effect volume if the default volume level is not audible
- It's possible to preview sounds if you want to preview the sound level selected. This will only be enabled IF the optional dependency pygame 2.0.3 is installed
-
Enable the use of this sound on stream?
- Use this option to enable or disable the use of the selected sound on the script
-
Statistics for selected sound
- This is a simple display of how many times a specific sound was used since it's addition to dashboard
-
Save changes
- Use this button to save all the changes made on the fields above
-
Ignore changes
- Use this button to revert all the changes made on the fields above
- This button will not revert changes if changes are already saved by clicking on
Save changes
- This button will not revert changes if changes are already saved by clicking on
- Use this button to revert all the changes made on the fields above

-
Disable entries / triggers
- Use this option to disable sounds which files are not located inside the selected Sounds folder from being triggered
-
Delete entries / triggers
- Use this option to delete sounds which files are not located inside the selected Sounds folder. This action is irreversible!
-
Enable disabled sound triggers
- Use this button to re-enable previously disabled sounds by clicking the button Disable entries / triggers
-
Delete disabled sounds triggers
- Use this option to delete database entries where their trigerring were disabled. This action is irreversible!
NOTE: The database manager should be used with extreme care. Changes made in this section are non-reversible!

-
Open Dashboard Logs Folder
- Use this button to open the dashboard logs. A new log is created automatically whenever the dashboard is opened.
-
Delete Dashboard Logs
- Use this button to delete all logs created by the dashboard execution
-
Open Dashboard Logs Folder
- Use this button to open the script logs. A new log is created automatically whenever the Streamlabs Chatbot is opened, if the option
Save logs from Streamlabs Chatbot when running the script?is enabled.
- Use this button to open the script logs. A new log is created automatically whenever the Streamlabs Chatbot is opened, if the option
-
Delete Dashboard Logs
- Use this button to delete all logs created by the Streamlabs Chatbot execution
-
Delete All log files
- Use this button to delete all logs created by the both dashboard and script execution
NOTE: Remember that logs are important for the developer to track down any issues in case you need support. Deleting them may optmise disk space, but also make tracking issues hard.
This tab is used to display some basic and aditional information about the script.
This set of instruction is going to help you on adding and setting OBS to use the script.
Adding the overlay to use with this script works as adding any overlay on it. But in order to provide a better set of instructions to maximize the compatiblity between the script and OBS.
NOTE: Remember that the order how the applications Streamlabs Chatbot and OBS are opened may affect in the final result. ALWAYS open the chatbot before opening OBS!
- Right-click on the script name
[SLCB] SendSoundson the Scripts tab on Streamlabs Chatbot and select the optionInsert Api Key - Select the scene where you want to add the overlay
- Add a new Browser Source on OBS on the selected scene with the name you want

- On the source properties, make sure that:
-
The option
Local fileis unchecked -
The option URL has a value that matches the format:
file:///<script_folder>/SLCB_SendSounds/SendSounds-Overlay/sendsounds.htmlreplacing
<script_folder>by the directory where your script is installed -
Both
WidthandHeightare set to1 -
The option
Control audio via OBSis chekced -
The option
Refresh browser scene when scene becomes activeis checked -
Everything else is set as default
-

- Set the volume level of the source created to the maximum value (0db)

- Adjust the tracks settings in a way it would play on both stream and VODs inside OBS, making sure to organize your audio tracks on the settings. An example of those settings is displayed below.


To use the script after everything is customized as you want, all that needs to be done is to make use of the trigger to play an added sound in the dashboard.
As an example, if your command trigger was set to # and you have an sound effect with the trigger my-sound, the sound commands are triggered by any viewer using #my-sound.
The way this script was written, makes it possible for you to create custom scripts possible of doing anything allowed by Streamlabs Chatbot.
To create a custom command compatible with the script, follow the steps below:
- Open the Streamlabs Chatbot Commands tab

- Click on the button
Add

- Add the command as any other, but remember that inside the field
Command(displayed in the image below), the value entered MUST begin with the selected trigger defined onSounds/Commands custom triggerand then the name of the trigger saved on the database
a. Blank command

b. Filled info assuming the selected triger is # and the sound trigger is my-sound

- Proceed with the command creation following the Streamlabs Chatbot documentation for creating commands
This is a quick information on how to trobleshoot some of the issues found during the execution of the script. If your issue is not listed here or the solution provided does not work for you, contact the developer so we can try to find a solution for your specific case.
The most common cause for the integrated dashboard not to open is mainly because there is more then a single Python install on the user machine or Python 2.7.13 did not created the necessary enviromental variables in order to work properly.
If you think that's the case, be sure to adjust the user and system variables as displayed below, by placing the correct instalation path as displayed on the images (the images assume that Python 2.7.13 is installed on the root directory of D:\ drive and that the aditional version of Python in the current machine is Python 3.12).
- User Environment Variables Settings:

- System Environment Variables Settings :

- If you use a different operational system other than Windows, you may need to check the documentation of your operational system in order to set the environmental variables as displayed above.
- If you use Windows, have followed the ins