-
Notifications
You must be signed in to change notification settings - Fork 7
BOINC Setup on Windows
Note: There are several ways how BOINC client can be run on Windows computer. This section describes how to install and configure BOINC to run as a service, because connecting to computer via AndroBOINC assumes the computer is running unattended. Installation of BOINC as a service ensures that BOINC is always running, even in case nobody is logged on. Unfortunately, BOINC is not installed as a service by default. In such case the BOINC must be uninstalled first and installed again, there is no easier way to switch BOINC to service. The workunits in progress should be preserved during uninstallation and new installation of BOINC, nevertheless the backups are always recommended practice.
(If the BOINC is already installed as a service, this section can be skipped.)
When running BOINC installer, one step is important for installation as a service:

The installation as a service is hidden behind option "Protected application execution" which is disabled in default and also grayed out. The button "Advanced" must be selected to be able to change this option.

Note: The "Data directory" option will be used in later steps, so it is good idea to remember the directory. By default it should be C:\Documents and Settings\All Users\Application Data\BOINC on Windows XP and C:\ProgramData\BOINC on Windows 7.
After installation it asks for restart of computer. But it should NOT be restarted yet, because several other modifications are needed (they will require restart anyway).
The password is in file gui_rpc_auth.cfg located in the BOINC "Data directory" (the one mentioned in installation section, by default C:\Documents and Settings\All Users\Application Data\BOINC on Windows XP and C:\ProgramData\BOINC on Windows 7, but it is modifiable by user. On Windows this file already contains automatically generated password, quite long string difficult to remember by average person. Of course, this generated password can be used, but it can be replaced by other string chosen by user (e.g. something more easy to remember).
Note: It is important to use some password! Without password the BOINC client would be accessible from the network by anybody
This is the most tricky part. By default the BOINC client can be accessed only by certain hosts. But since AndroBOINC on the phone most likely uses different IP-address every time the data connection is established, the BOINC client must allow connections from any host (this is another reason why password is important).
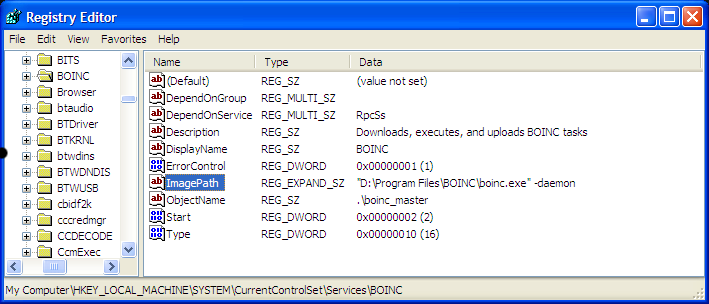
Start the Registry editor (e.g. pressing Win+R and typing regedit.exe into dialog).
In Registry editor navigate to the key:
HKEY_LOCAL_MACHINE\SYSTEM\CurrentControlSet\Services\BOINC

If this key does not exist, then BOINC is not installed as a service. Try to reboot the computer and if it does not help, you must unistall BOINC and install it as a service (see installation part above).
There is a value "ImagePath" which should on Windows XP contain (by default, if not modified during installation phase):
"C:\Program Files\BOINC\boinc.exe" -daemon
This should be modified by appending -allow_remote_gui_rpc, so finally the value "ImagePath" should be:
"C:\Program Files\BOINC\boinc.exe" -daemon -allow_remote_gui_rpc

Note: Do not try to change existing string, just add the new parameter after it. The path to program must remain same, otherwise BOINC client will not be able to start as a service.
Now the computer should be restarted, so all settings above will apply and BOINC client should start as a service, with password set and connections allowed from any hosts.
Optional: Local verification of the password can be done following way:
- Start the BOINC Manager
- In Advanced menu choose "Select Computer"
- Put 127.0.0.1 into Host name field and the chosen password into Password field
- If manager connects to client successfully, then the password is working correctly
The firewall must allow connection to TCP port used by BOINC client from everywhere. By default the port is 31416. As there are many various firewalls existing, this document cannot cover them. Most important is to allow incoming access to TCP port 31416 or possibly to program boinc.exe.