-
Notifications
You must be signed in to change notification settings - Fork 56
Eclipse Setup
IMPORTANT: Zanata's wiki has moved to https://github.com/zanata/zanata-platform/wiki
New link: https://github.com/zanata/zanata-platform/wiki/Eclipse-Setup
The recommended distribution of Eclipse for Zanata development is the Eclipse IDE for Java EE Developers (Helios/3.6).
To install Eclipse, download the distribution and unzip it to a location such as $HOME/apps/eclipse-jee
- Google Eclipse Plugin (3.7 update site)
- Google Plugin for Eclipse
- Google Web Toolkit SDK 2.5.0
- Git plugin (update site)
- TestNG plugin (update site)
-
Project Lombok (click Download, then run
java -jar lombok.jarto modify youreclipse.ini) - Maven Integration for Eclipse, available in the default update site for your version of eclipse (e.g. http://download.eclipse.org/releases/indigo) (Note: you may need to install Eclipse GEF first)
- JBoss Tools (zip-archived update site is usually faster) - don't install everything: maybe start with Drools and Hibernate Tools, plus maybe Maven Support (need Maven Integration for Eclipse), !RichFaces and Seam Tool.
-
To import Zanata project into eclipse via maven, run the following in root directory mvn -Peclipse eclipse:eclipse This will generate .project file for eclipse
-
Alternately, you can import GIT project from eclipse.
- Code formatting profile for Zanata is available in the source repository under
server/zanata-war/eclipse - You can import this file using the Import button in Window/Preferences:

- Make sure the "Seam" profile is selected.
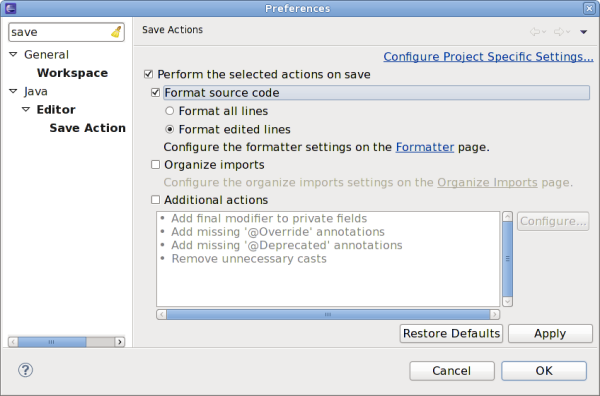
- This shows how to activate automatic code formatting in Preferences:

- The classpath variable
M2_REPOshould be set up to point to your local maven repository (typically$HOME/.m2/repository). This is done through Window > Preferences > Classpath variables - Look at the information in Working With Maven for how to generate an eclipse configuration for Zanata. Then, in Eclipse, select
File -> Import -> Existing Projectsand select the Zanata checkout directory.
You will need to create some variables in Window/Preferences/Run/Debug/String Substitution:
| **Variable name** | **Description** | **Value** |
| `deploy.zanata` | Full path to exploded zanata.war (NB: should be a subdirectory of `as.deploy` property in `~/.m2/settings.xml`. See [JBossSetup].) | *eg /home/username/apps/jboss-ewp-5.0/jboss-as-web/server/default/deploy/zanata.war* |
| `mvn` | Name of Maven executable on system path (*or full path to mvn if you prefer*) | `mvn` (*Linux*) or `mvn.bat` (*Windows*) |
By default, Eclipse uses quite large fonts on Fedora. To override this and let Eclipse use a neater GTK theme, create a file $HOME/.eclipse.gtkrc with the following contents
style "eclin" {
GtkButton::default_border={1,1,1,1}
GtkButton::default_outside_border={1,1,1,1}
GtkButtonBox::child_min_width=0
GtkButtonBox::child_min_heigth=0
GtkButtonBox::child_internal_pad_x=0
GtkButtonBox::child_internal_pad_y=0
GtkMenu::vertical-padding=1
GtkMenuBar::internal_padding=1
GtkMenuItem::horizontal_padding=4
GtkToolbar::internal-padding=1
GtkToolbar::space-size=1
GtkOptionMenu::indicator_size=0
GtkOptionMenu::indicator_spacing=0
GtkPaned::handle_size=4
GtkRange::trough_border=0
GtkRange::stepper_spacing=0
GtkScale::value_spacing=0
GtkScrolledWindow::scrollbar_spacing=0
GtkExpander::expander_size=10
GtkExpander::expander_spacing=0
GtkTreeView::vertical-separator=0
GtkTreeView::horizontal-separator=0
GtkTreeView::expander-size=12
GtkTreeView::fixed-height-mode=TRUE
GtkWidget::focus_padding=0
font_name="Sans Serif 8.5"
}
class "GtkWidget" style "eclin"

style "eclin2" {
xthickness=1
ythickness=1
}

class "GtkButton" style "eclin2"
class "GtkToolbar" style "eclin2"
class "GtkPaned" style "eclin2"
You can then run Eclipse through GTK2_RC_FILES=$HOME/.eclipse.gtkrc:$GTK2_RC_FILES $HOME/apps/eclipse-jee/eclipse
You can create a launcher for Eclipse by creating a shell scripts such as $HOME/bin/eclipse-jee.sh with the contents:
#!/bin/sh
GTK2_RC_FILES=$HOME/.eclipse.gtkrc:$GTK2_RC_FILES $HOME/apps/eclipse-jee/eclipse
Make this file executable by executing chmod +x $HOME/bin/eclipse-jee.sh
You might want to add $HOME/bin to your PATH variable. To do this, you can as the root user create a file such as /etc/profile.d/home.sh with the contents:
export PATH=$PATH:$HOME/bin
To activate the new profile settings you will have to restart your console session.
Create a file eclipse-jee.desktop in /usr/local/share/applications/ with the following contents:
[Desktop Entry]
Encoding=UTF-8
Name=Eclipse (JEE Helios)
GenericName=Eclipse IDE for Java EE Development
Comment=Develop Java EE Applications with Eclipse Helios
Exec=/home/username/bin/eclipse-jee.sh
Icon=/home/username/apps/eclipse-jee/icon.xpm
Terminal=false
Type=Application
Categories=Development;
StartupNotify=true
You should then have an Eclipse launcher under Applications -> Programming.