-
Notifications
You must be signed in to change notification settings - Fork 0
Create a simple tile for set top box
WhatsOn consist of Views menu an its tile submenus. Views are a collection of widget tiles. The views are configured in the ITV administration console and all configuration options will be provided by the widget tile itself. The widget tile is defined by a widget uploaded to our widget store. Tile is basically an item with content. One widget can contain multiple tiles.
This tutorial will guide you through the steps that are necessary to create your own tile for set-top boxes.
- Clone your widgets-customer repository. You can find more information on how to get started in the README file of the repository.
- A widget in which we will create the tile. You can read a tutorial on how to create a new widget (we chose revo for this tutorial) here and here on how to deploy one.
- WhatsOn widget needs to be deployed in order to be able to initiate tiles
- One or more template images for the tile, basically an image for the tile's layout
- Mootools framework is used in some parts of the tutorial. A brief explanation will be given. Here you can read the full documentation.
- 1. File Structure
- 2. Descriptor.xml
- 3. Main JavaScript File
- 4. Tile's JavaScript File
- 5. How to create a tile that shows an image and some text
- 6. Add configuration
The structure of the newly created DemoTile widget looks as follows.
DemoTileWidget/
  DemoTileWidget.js
  descriptor.xml
  resources/
    DemoTileWidget.html
    language.json
  skins/
    revo2/
      720p/
        DemoTileWidget.css
In order to setup an ES6 environment what we need to change in the file structure can be seen below. What was added is a new folder named src which contains a main javascript file for the widget called DemoTileWidget_main.js and DemoTile.js file which is the javascript file for the demo tile.
DemoTileWidget/
  DemoTileWidget.js
  descriptor.xml
  resources/
    DemoTileWidget.html
    language.json
  skins/
    revo2/
      720p/
        DemoTileWidget.css
  src/
     DemoTile.js
     DemoTileWidget_main.js
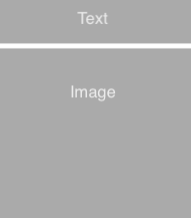
Inside the resources folder we need to add a new folder which we will name tile-templates and it will contain all the template images that are used from the tiles in our widget. A template image is just an image that shows the layout of the tile. In our case where we only have one tile and one template we will add to the folder the DemoTileTemplate.png image which looks like it shown below.
This template image will be shown in the ITV administration console once the tile is created.

Finally, another file needs to be added. The file should be called options.json and need to be placed inside the 720p folder. The file should contain an empty object to start with.
To sum up the final structure of our folder is the following.
DemoTileWidget/
  DemoTileWidget.js
  descriptor.xml
  resources/
    DemoTileWidget.html
    tile-templates/
        DemoTileTemplate.png
    language.json
  skins/
    revo2/
      720p/
        DemoTileWidget.css
        options.json
  src/
     DemoTile.js
     DemoTileWidget_main.js
The first file we are going to change is the Descriptor.xml file. The file as created from the widget creator script looks like below.
#!xml

<?xml version="1.0" encoding="UTF-8"?>
<tns:widgetDescriptor css_class="DemoTileWidget" id="DemoTileWidget"
                      version="@REVISION@" xmlns:tns="http://www.nordija.com/itv/widget_descriptor"
                      xmlns:xsi="http://www.w3.org/2001/XMLSchema-instance"
                      xsi:schemaLocation="http://www.nordija.com/itv/widget_descriptor http://www.nordija.com/itv/widget_descriptor">
    <package>demo-widgets</package>
    <name>DemoTileWidget</name>
    <description>widget to demo tile</description>
    <widgetDeployType>NORMAL</widgetDeployType>

    <languages defaultLang="@DEFAULT_LANGUAGE@">
        @LANGUAGES@
    </languages>
    <aspects defaultAspect="16x9">
        <aspect>16x9</aspect>
        <aspect>4x3</aspect>
    </aspects>

    <buildInfo>
        <coreVersion>@CORE_VERSION@</coreVersion>
        <revision>@REVISION@</revision>
        <date>@DATE@</date>
    </buildInfo>

</tns:widgetDescriptor>
In this file we will add the code bellow in order to insert a tile into our widget. Copy and paste it bellow the </buildInfo> tag.
#!xml
   <tiles>
        <tile id="DemoTile" name="Demo Tile">
            <description>Show a text and an image.</description>
            <templates>
                <template>
                    <id>DemoTileTemplate</id>
                    <url>resources/tile-templates/DemoTileTemplate.png</url>
                </template>
            </templates>
            <navigationType>REMOTE</navigationType>
        </tile>
    </tiles>
A descriptor file of a widget can contain only one <tiles> tag but it can contain multiple <tile> tags to define the tiles of a widget which can be as many as we need.
The <tile> tag must or may contain:
-
one id attribute
-
one name attribute, this name will appear in ITV administration console and, if not changed, in the widget
-
a non mandatory
<description>tag, in which can be inserted a description for the tile -
one
<templates>tag which can contain multiple<template>tags for the different templates used in the tile. A tile can have multiple templates which are useful to keep the same logic and items but choose between different layouts. -
one optional
<configurations>tag. Here, we are choosing to add no configuration because we will talk later about how to add configuration and we will provide an explanation about the different parameters. -
one
<navigationType>tag which can take two options, REMOTE for set-top boxes and TOUCH for multiscreen. We are choosing REMOTE as we will cover multiscreen in a different tutorial.
Every time that a change in Descriptor.xml is made ie. adding configuration or a new tile, the widget need to be rebuild. Next you need to delete it and re-deployed in the ITV administration console. When this is done you should be able to add your new tile in a WhatsOn view under the tab STB. If a tile was already in a view then a change was made and the widget was rebuilt, in order to see that change you need to remove it from the view and add it again.
The main Javascript file in our widget is the DemoTileWidget_main.js we created in a previous step and it is empty. Copy and paste to DemoTileWidget_main.js the code that was generated from widget creator script in the DemoTileWidget.js file. The code can be also seen below.
#!javascript
fokusEnv.define('DemoTileWidget', [ 'FokusOn', 'REVO' ], function (FokusOn, REVO) {
  return REVO.Widget.extend({
    initialize: function (initParams) {
      this.parent(initParams);
      this.loadCSS('DemoTileWidget.css');
    },
    render: function () {
      // This will load HTML from skinPath and if its not there
      // it will load the one from resources
      var elem = $(this.initParams.id);
      if (!$defined(elem)) {
        // loading the html template see ButtonRevoDemoWidget.html
        this.loadSkinnableWidgetHTML({
          'onComplete': function (elem) {
            this.setupElems(elem);
          }.bind(this)
        });
      } else {

      }
    },
    setupElems: function (elem) {


    }
  });
});
Next we need to add the following line to import the function DemoTile from DemoTile.js which is located in the src folder as well and by this step is empty. Copy the next line to the top of the file.
#!javascript
import demoTile from './DemoTile.js'
In this file also we need to define the new tile we are about to create. This is done by adding the code below inside the initialize function in the DemoTileWidget_main.js file. Initialize function is called the moment that the widget is created and the new tile is defined at the same time.
#!javascript
fokusEnv.define("DemoTile", ["FokusOn", "REVO"], function (FokusOn, REVO) {
        return demoTile(FokusOn, REVO, this)
    }.bind(this))
These are the only changes we need to make in the main JavaScript file. All the tile's logic will be written in its own JavaScript file and will be described in the following section.
We named the tile's JavaScript DemoTile.js and by this time is completely empty. The first code we will add to this file will be the following line which will export the DemoTile function we will create and that we imported to the main JavaScript file in the previous step.
Copy to the file next line. This line will be the last line of this file. Everything else will be added on top of it.
#!javascript
module.exports = DemoTile;
Next, we need to define the function that actually creates the tile and gives it all the logic. This can be done by adding the following code to the file.
#!javascript
function DemoTile(FokusOn, REVO , widget){
    return FokusOn.WidgetTile.extend({

       // Here we will add the main 4 functions and everything else that is needed, separated by comma.

    })
}
Next, we will add the following four functions that are necessary to exist in all tiles.
1.renderTemplate: In this function we are rendering the template which was specified in the descriptor.xml file and we are setting up a container for templates which is called templatePanel. Also, we are checking whether the templatePanel is created and if it is, then we handle the updates.
This function exist in every widget and it's called for every widget separately after function render in WhatsOn widget is called.
The code we will add as a base in this function is the following.
#!javascript

renderTemplate: function (template,callback) {
            if(this.templatePanel) {
                // call setupText function in later step (configuration)

                callback(this.templatePanel);
            } else {

                this.setupTemplate(template);
                callback(this.templatePanel);

                // call setupText function in later step (configuration)
            }
        },
2.setupTemplate: Inside this function we are setting up our template and here we will draw the structure of the tile and we will add all the necessary html.
So far it should look like it follows.
#!javascript
setupTemplate: function setupTemplate(template){
            this.templatePanel = new FokusOn.Panel({
                "elementClass": template
            });

},
3.isTemplateValid: This function can be used to check whether a template is valid or not. For now it's just returns always true however it must exists in our code.
#!javascript
isTemplateValid: function (templateId, callback){
            callback(true);
},
4.isConfigurationValid: This function can be used to check if we have set valid configuration for the tile. For now it's just returns always true however it must exists in our code.
#!javascript
isConfigurationValid: function (configuration, callback){
            callback(true);
},
To begin with our tile we will use the code we have already written in the previous steps.
The first step is to define the structure of our tile. This is done by adding html in the tile. As mentioned before, the function where this is done is the setupTemplate function.
#!javascript
this.textDiv = new Element('div',{'class':'demoText'});
this.imgDiv = new Element('div',{'class':'demoImg'});
this.textDiv.injectInside(this.templatePanel.element);
this.imgDiv.injectInside(this.templatePanel.element);
By adding these lines in our setupTemplate function we are creating two new DOM elements using the Mootools' element constructor, one div for placing the text and one for the image.
Next, we are injecting these two elements to the templatePanel element using the injectInside method from Mootools which inserts the element at a particular place relative to the Element's children.
In order to add text in our div we just need to add the following line into our function.
#!javascript
this.textDiv.setText('This a Demo Text for our Demo Tile in our Demo widget. And Hello World!')
Finally, we need to add the image to our tile. This can be done very easily by adding an images folder inside the 720p folder. Inside this folder we will add the images that are used from the tile.
To display the picture in our tile we need to to add the following code to the DemoTileWidget.css file. Moreover we are adding some styling in the text of the tile.
#!css
.DemoTileTemplate {
    width :340px;
}
.DemoTileTemplate .demoImg {
 background-image: url('./images/puppy1.jpeg');
 height : 509px;
}

.demoText{
    color: #61737d;
    font-size: 18px;
    padding-left: 5px;
    padding-right: 5px;
    padding-bottom: 14px;
}
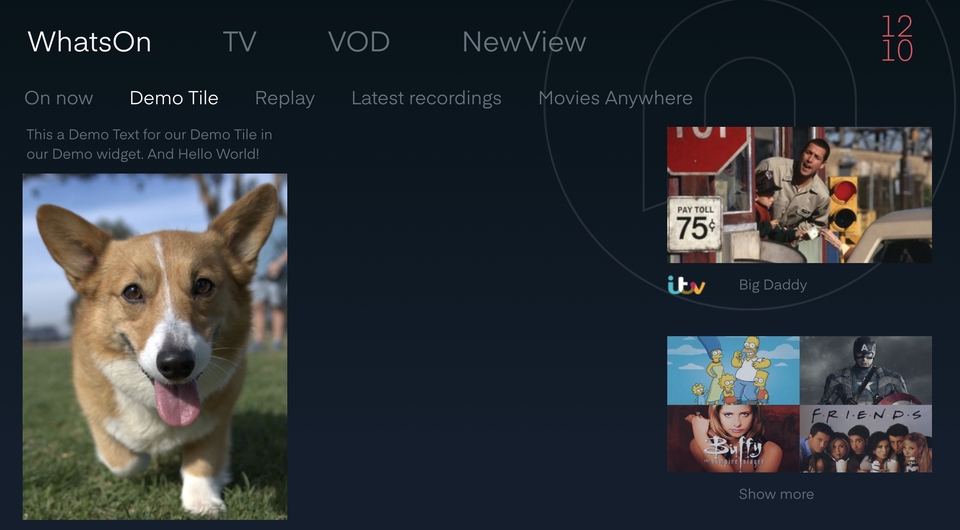
The tile we created is shown in the picture below.

In this section we will present a small demo on how to add configuration in the tile.
If you are adding a new configuration or an option in an existing tile then you need to build it and deploy it again.
First of all we need to add the configuration in the descriptor.xml file. To do that we are adding a <configurations> tag.
The <configurations> tag can contain many <configuration> tags The <configuration> must or may contain
- one
<param> tagin which we are defining the name of our configuration. If there are many configurations keep in mind that they need to have different names because using this name we will be able to fetch data from the configuration in our code. - one
<optional>tag in which we are defining whether is mandatory to fill the configuration. It set to be false when the configuration is mandatory and true when it's not. - one
<optionsUrl>or one<options>list (optional) the options can contain anything we want to add in the configuration. We can add all the options we want inside thedescriptor.xmlfile or we can add them into a separate file which we can link using the<optionsUrl>. The external file should be a file in json format that contains an array of objects where each object needs to contain a "name" and an "id" attribute.
The first configuration we will add is a configuration about the text that appears in the tile. We will add two options for this text. The first option will be a default text which is written in the tile's code while the second is a custom text that can be decided and changed in the ITV administration console.
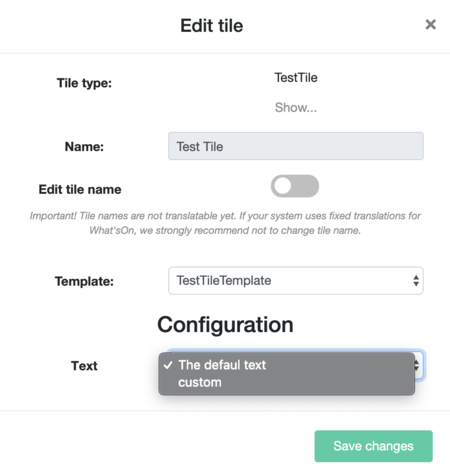
In the picture below we can see how configurations look like in the ITV administration console. The user as can be seen can choose from a dropdown the desired text to be added.

First we need to add the following code to the descriptor.xml file below the closing of the <templates> tag in order to define our configurations. Inside the <option> tag we see that there are two tags, the <text> tag that contains the text that will appear in the dropdown the ITV administration console whereas the <value> tag contains the actual text that will be shown in the tile.
#!xml
<configurations>
   <configuration>
      <valueType>STRING</valueType>
      <param>text</param>
      <optional>false</optional>
      <option>
         <value>This a Demo Text for our Demo Tile in our Demo widget. And Hello World!</value>
         <text>The defaul text</text>
      </option>
      <option>
         <value>custom</value>
         <text>custom</text>
      </option>
   </configuration>
</configurations>
Next, we need to specify in the tile's Javascript tile that the text of the tile should be taken from the configurations.
To do so, we are create the following function which checks if the div that contains the text is created and then whether there is custom text or not. Finally, it sets the text of tile to the one chosen from the configurations (custom or default).
#!javascript

setupText: function(){
    if (this.textDiv){
        let  textFromConfiguration = this.selectedConfigurations.text;
        let textToshow = textFromConfiguration.custom ? textFromConfiguration.custom : textFromConfiguration;
        this.textDiv.setText(textToshow);
    }
}
This function needs to be called inside renderTemplate function two times - one for the template creation and one for the template update - You can see the comments in this function in section 4.
Another, configuration that can be added in our tile is one about letting the user to choose the image for display from a selection of some images. Here we will allow the user to choose from three images of puppies. Remember that the widget needs to be redeployed if you are making changes to the configurations.
We are starting as we did before by adding the configuration in the descriptor.xml file. We will add the following code. By doing this we are adding our second configuration which has as image <param>.
#!xml
<configuration>
    <valueType>STRING</valueType>
    <param>image</param>
    <optional>false</optional>
    <option>
        <value>images/puppy1.jpeg</value>
        <text>Puppy #1</text>
    </option>
    <option>
        <value>images/puppy2.jpeg</value>
        <text>Puppy #2</text>
    </option>
    <option>
        <value>images/puppy3.jpeg</value>
        <text>Puppy #3</text>
    </option>
</configuration>
Next, we can remove from our css file the lines that add the image to the tile.
#!css
.DemoTileTemplate .demoImg {
 background-image: url('./images/puppy1.jpeg');
 height : 509px;
}
Finally we need to add our JavaScript code in the DemoTile.js file. We will add a function in the same way we did before for the setupText function and we will call it two times in the renderTemplate function exactly as previously.
The function we will add is the following.
#!javascript
setupImage:  function(){
    let imagePath = widget.getSkinPath() +this.selectedConfigurations.image;
    if (this.imgDiv){
        this.imgDiv.setStyle("background-image", "url('" + imagePath + "')");
        this.imgDiv.setStyle("width", 340 + "px");
        this.imgDiv.setStyle("height", 509 + "px");
     }
}
In this function we are using a widget's function called getSkinPath() which retrieves the path for the widgets skin. In this path we are adding the path of the image as it's set in the configuration.
Next, we add the image to the tile and we set its dimensions.
The configurations is a very useful tool for reusing a tile and we can add as a configuration anything we want to either for content or for styling.
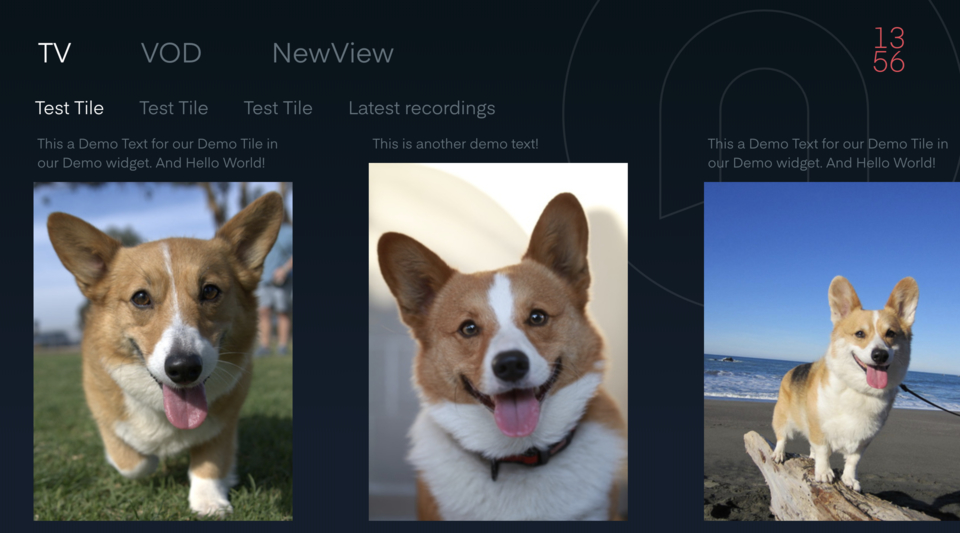
In the picture below we can see the same tile used with different configurations three times in a view.

The widget with a tile that we created can be found in the widget creator script. The type you need to choose is Tile. Then of course it needs to be deployed. This code can be used as a template that you can use to build your own widget with tile.