-
Notifications
You must be signed in to change notification settings - Fork 0
Revo 2.5 Theming
Theming was introduced with the Revo 2.5 skin. And the main idea is to add structured customization to the widgets that are using the Revo 2.5.
This means that the uses of NDP have the opportunity to create sub skins of the Revo 2.5 without copying or altering the Revo 2.5 skin. The different elements of the skin that can be charged by the Theme are controlled by the Widget/skin create. The change that can be customized in the Revo 2.5 skin can be found in the section called "What's is part of the Theming"
Theming aims to provide enough customization to make a clear branding difference between two Themes of the Revo 2.5 skin. There are, of cause some tradeoffs with theming, but if the Revo 2.5 skin fits most of the design needs that you have. Then Theming is probably something for you.
Pros
- It easier to create a new Theme than it is to create a new skin.
- The Revo 2.5 skin plus Theming is used by multiple customers, and the bug fixes and improvement will benefit all.
- New features will work with the Theme you have created.
Corns
- You can't change anything you want in the skin Revo 2.5 Skin. Like you can if it is your own skin.
The core of the Theming are colors, logo, backgrounds, and fonts, but other statice resources can be changed by the Theme.
The parts controlled by the Theme can be found under "Revo 2.5 Theming for STB" and "Revo 2.5 Theming for Multi-screen".
And there is also described how to change them and what statice resources is needed.
- Bacis Theming
- Changing the logo
- Changing the background
- Changing the widget options
- Theme changes for the VodWidget
The core Theme styling is found in the _CommonRevoWidget-theme.scss/_CommonRevoWidget-theme.scss
An example of the _CommonRevoWidget-theme.scss can be found in the widgets repository under themes/nordija-revo2_5/theme-widget-sass/_CommonRevoWidget-theme.scss
/theme-folder/
├── theme-widget-sass/
│            └── _CommonRevoWidget-theme.scss
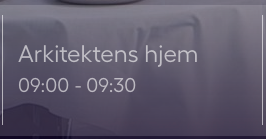
Here are examples of what changes to the _CommonRevoWidget-theme.scss dose to the UI
| _CommonRevoWidget-theme.scss | Example1 | Example2 |
|---|---|---|
| colors.primary-color1 |  |
 |
| background.solid.color | 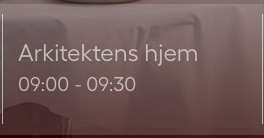 |
 |
| rounding.element-corner-radius |  |
 |
| logos.small.top/left/width/height |  |
 |
| content-highlight.border-width/border-color |  |
 |
The easiest way is to add a new logo.png file to the Theme folder.
For example, the Nordija Demo Theme has a logo.png locate here themes/nordija-revo2_5/theme-widget-resources/CommonRevoWidget/720p/images/logo.png
If this png is replaced with another logo png file, then the logo will change in the UI.
You may have to adjust the size and position of the new logo to make sure that it looks good.
You can adjust size and position in the _CommonRevoWidget-theme.scss file.
We recommend that the small logo is not larger than 150x150px.
This can be done server-side by adding image scaling parameters to the image URL.
To scale the image to 150x150px you need to add "_i150x150" right before the ".png". Like this: "./theme-resources/images/logo_i150x150.png"
Look for
'logos' : (
        'small' : (
            'top': 634px,
            'left': 1120px,
            'width': 130px,
            'height': 110px,
            'url': url("./theme-resources/images/logo_i130x110.png")
        )
    )
We have three options for the background.
- Image
- Solid color
- LinearGradient
To use a solid color as the background.
The easiest way to change the background is to "replace" the image used as default in the Revo 2.5 skin.
This is done by adding an image called tv-app-main-bg.png to the Theme folder.
The image needs to be added to the theme-widget-resources -> CommonRevoWidget -> 720p -> images folder. You can see an example of this in the Nordija Demo Theme in the widget repo under. themes/nordija-revo2_5/theme-widget-resources/CommonRevoWidget/720p/images/tv-app-main-bg.png
/theme-folder/
├── theme-widget-resources/
│   ├── CommonRevoWidget/
│   │   ├── 720p/
             └── images/
                 └── tv-app-main-bg.png
The size of the background image is 1280x720 px.
To use a solid color as the background.
You need to add an option.json file to your theme if it doesn't exist. The option.json needs to be here. themes/your-theme/theme-widget-options/CommonRevoWidget/options.json
And need to container this JSON.
"canvasImgUrl": "",
    "canvas": {
    "width":1280,
    "height": 720,
    "strategy": "color",
    "color": "rgba(255, 0, 0, 0.50)"}
Of course, you can change the "color" to something else.
To use a LinearGradient as the background.
You need to add an option.json file to your theme if it doesn't exist. The option.json needs to be here. themes/your-theme/theme-widget-options/CommonRevoWidget/options.json
And need to container this JSON.
"canvasImgUrl": "",
    "canvas": {
    "width":1280,
    "height": 720,
    "strategy": "linearGradient",
    "linearGradient": {
        "x0": 640,
        "y0": 0,
        "x1": 640,
        "y1": 720,
        "colorStops": [
            {"offset": 0, "color": "rgba(255, 20, 33, 0.20)"},
            {"offset": 0.5, "color": "rgba(255, 20, 26, 0.55)"},
            {"offset": 1, "color": "rgba(255, 20, 33, 0.90)"}
        ]
    }
}
It is possible to change the widget skin options when using Theming.
If you want to change one or more of the widget skin options for a Theme you have to add an options.json file to the theme folder. The file needs to be located like this.
/theme-folder/theme-widget-options/[WidgetName]/options.json
Here is an example of how to change the amount of time that the media player skips forward and backward.
When the user press the remotes skip forward and backward buttons.
How the options.json needs to be placed in the Theme folder.
/theme-folder/
├── theme-widget-options/
│   ├── MediaInfoWidget/
│   │   └── options.json
│   │
And here is the content of the options.json file. /theme-folder/theme-widget-options/MediaInfoWidget/options.json
{
    "skipLeftJumpInMs": 10000,
    "skipRightJumpInMs": 30000
}
The JSON in the options.json file is merged with the JSON that is in the options.json located in the targeted widget. For this example, the JSON is merged with the content of this option.json file.
fokuson4/MediaInfoWidget/skins/revo2_5/720p/options.json
To change the fonts, you need to add the _CommonRevoWidget-fonts.scss and the fonts file to the Theme folder.
When changing the fonts, be aware that you may need to adjust the size of the text. This is done in the _CommonRevoWidget-theme.scss file. The properties to look for is under "font"
An example of where the fonts and Sass files are located in the Theme folder
/theme-folder/
├── theme-widget-resources/
│   ├── CommonRevoWidget/
│   │   ├── 720p/
│            └── fonts/
│                ├── dobra-book-webfont.eot
│                ├── dobra-book-webfont.woff
│                ├── dobra-book-webfont.ttf
│                ├── Oswald-Bold.eot
│                ├── Oswald-Bold.woff
│                ├── Oswald-Bold.ttf
│                ├── dobra-medium-webfont.eot
│                ├── dobra-medium-webfont.woff
│                └── dobra-medium-webfont.ttf
│
├── theme-widget-sass/
│            └── _CommonRevoWidget-fonts.scss
An example of the content of the _CommonRevoWidget-fonts.scss Sass file.
The font-family names are important. The names need to be 'Light Base Font', 'Regular Base Font', and 'Bold Base Font'
@font-face {
    font-family: 'Light Base Font';
    src: url('./theme-resources/fonts/dobra-book-webfont.eot');
    src: url('./theme-resources/fonts/dobra-book-webfont.eot?#iefix') format('embedded-opentype'),
         url('./theme-resources/fonts/dobra-book-webfont.woff') format('woff'),
         url('./theme-resources/fonts/dobra-book-webfont.ttf') format('truetype');
    font-weight: normal;
    font-style: normal;
}

@font-face {
    font-family: 'Regular Base Font';
    src: url('./theme-resources/fonts/dobra-medium-webfont.eot');
    src: url('./theme-resources/fonts/dobra-medium-webfont.eot?#iefix') format('embedded-opentype'),
         url('./theme-resources/fonts/dobra-medium-webfont.woff') format('woff'),
         url('./theme-resources/fonts/dobra-medium-webfont.ttf') format('truetype');
    font-weight: normal;
    font-style: normal;
}

@font-face {
    font-family: 'Bold Base Font';
    src: url('./theme-resources/fonts/Oswald-Bold.eot');
    src: url('./theme-resources/fonts/Oswald-Bold.eot?#iefix') format('embedded-opentype'),
         url('./theme-resources/fonts/Oswald-Bold.woff') format('woff'),
         url('./theme-resources/fonts/Oswald-Bold.ttf') format('truetype');
    font-weight: normal;
    font-style: normal;
}Changing the VOD age-rating
The age-rating images in the VodWidget can be changed via the Theme.
To change the age-rating images, you need to add a Sass file called _VodWidget-age-rating.scss and the images using in the Sass file.
The age-rating number used for the CSS classes "age-rating-3" is "age-rating-" plus the age rating set on a movie in itvAdmin. itvAdmin->On-Demand Service->Movies->(selected movie)->Agerating
Here is an example of what changes on the VodWidget asset page


And here is the image used to make the change

Example of the Theme folder structure.
/theme-folder/
├── theme-widget-resources/
│   ├── VodWidget/
│   │   ├── 720p/
│            └── images/
│                ├── age_3.png
│                ├── age_7.png
│                ├── age_12.png
│                ├── age_14.png
│                ├── age_16.png
│                └── age_18.png
│
├── theme-widget-sass/
│            └── _VodWidget-age-rating.scss
An example of the _VodWidget-age-rating.scss Sass file
// Everything in this file can be overwritten if a _VodWidget-age-rating.scss is added to the Theme

// Age-rating start
.VodWidget .moviepage .middle-container .extended-movie-info .age-rating.age-rating-3 {
    background-image: url("theme-resources/images/age_3.png");
}

.VodWidget .moviepage .middle-container .extended-movie-info .age-rating.age-rating-7 {
    background-image: url("theme-resources/images/age_7.png");
}

.VodWidget .moviepage .middle-container .extended-movie-info .age-rating.age-rating-12 {
    background-image: url("theme-resources/images/age_12.png");
}

.VodWidget .moviepage .middle-container .extended-movie-info .age-rating.age-rating-14 {
    background-image: url("theme-resources/images/age_14.png");
}

.VodWidget .moviepage .middle-container .extended-movie-info .age-rating.age-rating-16 {
    background-image: url("theme-resources/images/age_16.png");
}

.VodWidget .moviepage .middle-container .extended-movie-info .age-rating.age-rating-18 {
    background-image: url("theme-resources/images/age_18.png");
}
// Age-rating end
Changing the VOD operator/content-provider branding
To change the content-provider branding of the covers in the VOD Widget. First, you need to add a Sass file called _VodWidget-operator-branding.scss and any images referenced in the Sass file to the Theme folder.
One thing to note is that the branding class used (in the example below, it is SF_ANYTIME) is set in itvAdmin. You can find this page in itvAdmin itvAdmin->On-Demand Service->Setup->Content Owner and set a "Branding CSS class" that then can be used to add the branding.
The branding is applied to the movie covers like this.
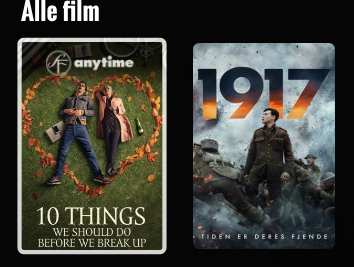
And the branding images (selector-SF_ANYTIME.png) used looks like this.

And on the Movie info page, the branding looks like this.

And the branding images (vendor_SF_logo.png) used looks like this.

The reserved area for this logo is 100x100px
Here is an example of how the files need to be positioned in the Theme folder.
/theme-folder/
├── theme-widget-resources/
│   ├── VodWidget/
│   │   ├── 720p/
│            └── images/
│                ├── vendor_SF_logo.png
│                └── selector-SF_ANYTIME.png
│
├── theme-widget-sass/
│            └── _VodWidget-operator-branding.scss
An example of the _VodWidget-operator-branding.scss Sass file
// operator branding of the movie covers example
// The "SF_ANYTIME" in the selector selected.branding-SF_ANYTIME need to macth the "Branding CSS class" that is set in the itvAdmin->On-Demand Service->Setup->Content Owner
#VodWidget .vod-related-movies .selected.branding-SF_ANYTIME .cover::after,
#VodWidget .vod.selected.branding-SF_ANYTIME .cover::after {
    background-image: url("theme-resources/images/selector-SF_ANYTIME.png");
}

#VodWidget .moviepage.branding-SF_ANYTIME > .branding {
    background-image: url("theme-resources/images/vendor_SF_logo.png");
}
The core/default theme styling is found in the ReactComponentsWidget/skins/revo_2_5/theme-resources/_ReactComponentsWidget-theme.scss
When creating a new theme, all we have to do is create a new theme folder - in which we will create a new theme file (for multiscreen this file is called _ReactComponentsWidget-theme.scss).
Besides this theme file, we can also include & use static resources like images and fonts in our theme.
The easiest way to get started, is to look at one of the example themes in the /themes/ folder.
It is important to decide if the new theme will be for a specific customer only, or a generic theme that can be shared with all customers.
If the theme is for a specific customer, it should be placed under /themes-customer/ - otherwise, it should be placed under the /themes/ folder.
The reason: any theme inside the general /themes/ folder will be shared with all customers under the NDP agreement.
You can find an example of a multiscreen theme inside the widgets repository under themes/revo2_5-demo/theme-widget-sass/_ReactComponentsWidget-theme.scss
/theme-folder/
├── theme-widget-sass/
│            └── _ReactComponentsWidget-theme.scss
Here are examples of what changes to the _ReactComponentsWidget-theme.scss dose to the UI
| _ReactComponentsWidget-theme.scss | Example1 | Example2 |
|---|---|---|
| colors.primary-color1 |  |
 |
| background.solid.color |  |
 |
| rounding.element-corner-radius |  |
 |
| logos.small.top/left/width/height |  |
 |
| content-highlight.border-width/border-color |  |
 |
The easiest way is to add a new logo.png file to the Theme folder.
For example, the revo2_5-demo Theme has a logo.png locate here themes/revo2_5-demo/theme-widget-resources/ReactComponentsWidget/responsive/images/logo.png
If this png is replaced with another logo png file, then the logo will change in the UI.
You may have to adjust the size and position of the new logo to make sure that it looks good.
You can adjust size and position in the _ReactComponentsWidget-theme.scss file.
This can be done server-side by adding image scaling parameters to the image URL.
To scale the image to for example 150x150px you need to add "_i150x150" right before the ".png". Like this: "./theme-resources/images/logo_i150x150.png"
Look for
'logos' : (
        'small' : (
            'top': 634px,
            'left': 1120px,
            'width': 130px,
            'height': 110px,
            'url': url("./theme-resources/images/logo_i130x110.png")
        )
    )
We have two options for the background.
- Image
- Solid color
To use an image as the background.
This is done by adding an image called tv-app-main-bg.png to your theme folder.
The image needs to be added to the theme-widget-resources -> ReactComponentsWidget -> responsive -> images folder.
You can see an example of this in the Revo2_5 Demo theme in the widget repo under.
themes/revo2_5-demo/theme-widget-resources/ReactComponentsWidget/responsive/images/tv-app-main-bg.png
/theme-folder/
├── theme-widget-resources/
│   ├── ReactComponentsWidget/
│   │   ├── responsive/
             └── images/
                 └── tv-app-main-bg.png
The size of the background image is 1280x720 px.
To use a solid color as the background.
You can choose to use a solid background-color instead of a background image inside the _ReactComponentsWidget-theme.scss file of your theme.
This is done by removing the image property from your theme-config, and only using the solid background property.
See an example of what this would look like inside the _ReactComponentsWidget-theme.scss file below:
 'background': (
        'solid': (
            'color': #0e0101,
        ),
        'opaque': (
            'opacity': 0.9
        ),
    ),
Of course, you can change the "color" to something else.
It is possible to change the skin options of individual widgets when using Theming.
If you want to change one or more of the widget skin options for a Theme you have to add an options.json file to the theme folder. The file needs to be located like this.
/theme-folder/theme-widget-options/[WidgetName]/options.json
Here is an example of how to change the amount of time that the media player skips forward and backward.
When the user press the remotes skip forward and backward buttons.
How the options.json needs to be placed in the Theme folder.
/theme-folder/
├── theme-widget-options/
│   ├── MediaInfoWidget/
│   │   └── options.json
│   │
And here is the content of the options.json file. /theme-folder/theme-widget-options/MediaInfoWidget/options.json
{
    "skipLeftJumpInMs": 10000,
    "skipRightJumpInMs": 30000
}
The JSON in the options.json file is merged with the JSON that is in the options.json located in the targeted widget. For this example, the JSON is merged with the content of this option.json file.
fokuson4/MediaInfoWidget/skins/revo2_5/720p/options.json
Of coarse, the example above is for an STB widget - but it works the exact same way for multi-screen widgets.
To change the fonts, you need to add the _ReactComponentsWidget-fonts.scss and the fonts file to the Theme folder.
An example of where the fonts and Sass files are located in the Theme folder
/theme-folder/
├── theme-widget-resources/
│   ├── ReactComponentsWidget/
│   │   ├── responsive/
│            └── fonts/
│                ├── Nunito-Light.ttf
│                ├── Nunito-Regular.ttf
│                ├── Nunito-Bold.ttf
│                ├── Georama-SemiBold.ttf
│                ├── ...
│                ├── ...
│
├── theme-widget-sass/
│            └── _ReactComponentsWidget-fonts.scss
An example of the content of the _ReactComponentsWidget-fonts.scss Sass file.
The font-family names are important. The names need to be Light Base Font, Regular Base Font, Bold Base Font, Heavy Base Font, Secondary Regular Base Font and Secondary Bold Base Font
@font-face {
  font-family: 'Light Base Font';
  src: url('./theme-resources/fonts/Nunito-Light.eot');
  src: url('./theme-resources/fonts/Nunito-Light.eot?#iefix') format('embedded-opentype'),
  url('./theme-resources/fonts/Nunito-Light.woff') format('woff'),
  url('./theme-resources/fonts/Nunito-Light.ttf') format('truetype');
  font-weight: normal;
  font-style: normal;
}

@font-face {
  font-family: 'Regular Base Font';
  src: url('./theme-resources/fonts/Nunito-Regular.eot');
  src: url('./theme-resources/fonts/Nunito-Regular.eot?#iefix') format('embedded-opentype'),
  url('./theme-resources/fonts/Nunito-Regular.woff') format('woff'),
  url('./theme-resources/fonts/Nunito-Regular.ttf') format('truetype');
  font-weight: normal;
  font-style: normal;
}

@font-face {
  font-family: 'Bold Base Font';
  src: url('./theme-resources/fonts/Nunito-Bold.eot');
  src: url('./theme-resources/fonts/Nunito-Bold.eot?#iefix') format('embedded-opentype'),
  url('./theme-resources/fonts/Nunito-Bold.woff') format('woff'),
  url('./theme-resources/fonts/Nunito-Bold.ttf') format('truetype');
  font-weight: normal;
  font-style: normal;
}

@font-face {
  font-family: 'Heavy Base Font';
  src: url('./theme-resources/fonts/Georama-SemiBold.eot');
  src: url('./theme-resources/fonts/Georama-SemiBold.eot?#iefix') format('embedded-opentype'),
  url('./theme-resources/fonts/Georama-SemiBold.woff') format('woff'),
  url('./theme-resources/fonts/Georama-SemiBold.ttf') format('truetype');
  font-weight: normal;
  font-style: normal;
}

@font-face {
  font-family: 'Secondary Regular Base Font';
  src: url('./theme-resources/fonts/Poppins-Regular.eot');
  src: url('./theme-resources/fonts/Poppins-Regular.eot?#iefix') format('embedded-opentype'),
  url('./theme-resources/fonts/Poppins-Regular.woff') format('woff'),
  url('./theme-resources/fonts/Poppins-Regular.ttf') format('truetype');
  font-weight: normal;
  font-style: normal;
}

@font-face {
  font-family: 'Secondary Bold Base Font';
  src: url('./theme-resources/fonts/Poppins-SemiBold.eot');
  src: url('./theme-resources/fonts/Poppins-SemiBold.eot?#iefix') format('embedded-opentype'),
  url('./theme-resources/fonts/Poppins-SemiBold.woff') format('woff'),
  url('./theme-resources/fonts/Poppins-SemiBold.ttf') format('truetype');
  font-weight: normal;
  font-style: normal;
}