-
Notifications
You must be signed in to change notification settings - Fork 0
Widgets Basics
The frontend of fokusOn is dynamic and changes from operator to operator and can be also different across different devices. This is achieved because it consists of widgets.
A widget is a small independent component which in concert with others make up the frontend application. For example we can see in the picture below that this specific UI is composed of four widgets which provide access to menus, live tv etc.
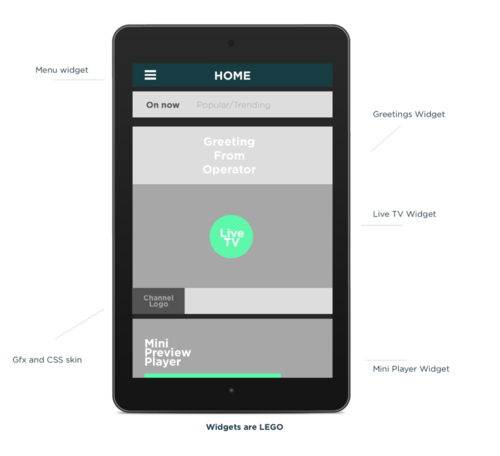
Every user interface component across all devices can be managed and users can receive differentiated user interfaces based on configuration on the backend. Skinning of UI and using responsive design of the HTML5 and CSS stylesheets helps achieve the same look and feel across different devices.
Widgets are using standard HTML, CSS and JavaScript. Any web developer would be able to, with minimal training, develop new elements for the frontend. In fact, developers use a standard PC/Mac web browser to debug and test their widgets.
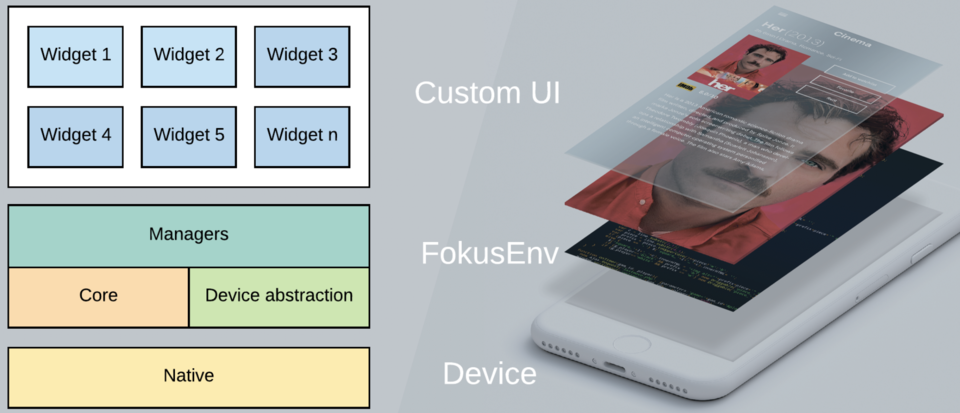
The fokusOn Widget Engine is an operating system for components running on top of or in concert with video. The engines purpose is to bring up the device to a level where it can serve the user interface and playback the video streams.
The engine consists of a core part which offers low level operating system features, and then it loads an environment which contains the drivers needed to operate the device. The last step is loading the widget components that has been configured for this customer and device. A representation of the widget engine can be seen in the picture below.
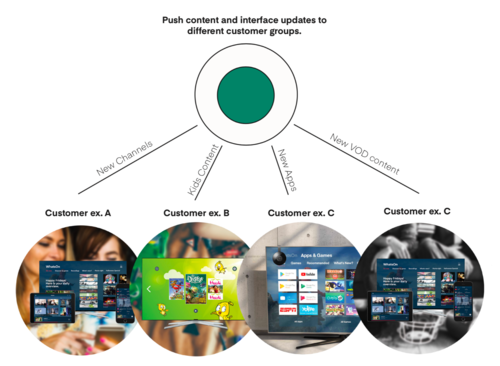
The widget components are “deployed” to groups of customers and the combination of components will create their user interface. The concept of differentiated user interfaces is widely used in the following ways.
- To provide access regional free to air channels no needing subscription.
- To provide regional widgets linking to local sports, news sites etc
- Allow sub brands to address a specific audience with own look and feel.
- Offer B2B services to compounds, companies and specific verticals like hotels etc
In the picture below you can see an example of different user interfaces in different customer groups.
DemoWidget/
  DemoWidget.js
  descriptor.xml
  resources/
    DemoWidget.html
    language.json
  skins/
    fokuson/
      720p/
        DemoWidget.css
In the highlighted area above we can see the file structure of a non-responsive widget. All widgets contain a descriptor.xml file which contains all the widget's necessary metadata for its deployment. If you create a widget using the widget creator script, this file - and all the other files - are automatically created and you probably won't need to change it. It is important to mention that the name in the descriptor must match the name of the main .js file.
<name>TestWidget</name> ==> TestWidget.js
An example of a descriptor.xml file can be see below. As you can see here is defined the css class of the widget among other things.
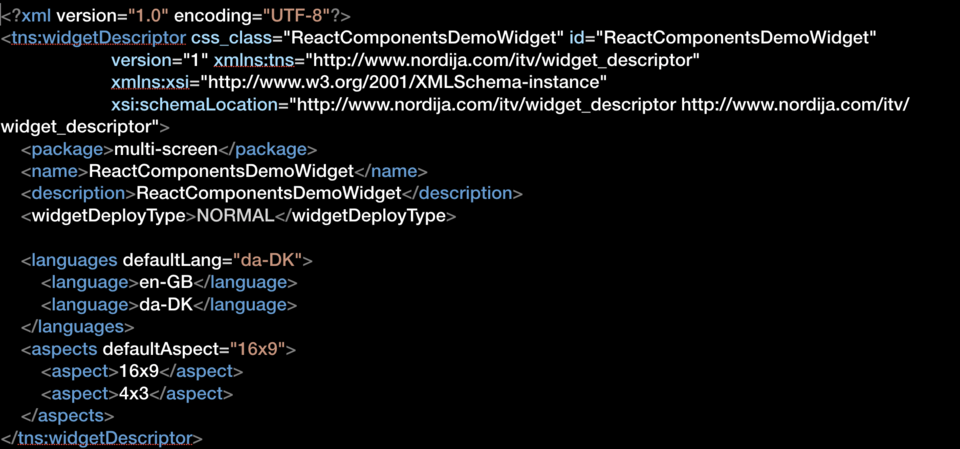
A widget will contain a skins folder since a widget can contain more than one skin. A skin is like a theme, it retains exactly the same functionality but the styling differs. Each skin folder contains all the files necessary for the skin such as css, images, fonts and an options.json file, which can contain any different options you need to specify for the skin such as a background colour, the number of the rows in a table, the order of some button etc.
In order to avoid css rules to affect other widgets due the by default global nature of css, it is important to scope them by using before every rule the class of the widget which is defined in the descriptor.xml file, as seen in the example below.
#!css
.NameOfWidgetClass .div{
    background-color: #111111;
}
In addition, each skin will contain different resolutions folders in which we are defining how a widget should look in different resolutions. A widget can have multiple resolutions while each of them targets a screen size - today though is more a set of devices. The resolutions normally used are "720p" for set-top boxes and "responsive" for phones, tablets and web.
Moreover, a widget contains a resources folder that contains a JSON file which defines translations for the widget's translatable strings.
Finally, as mentioned before it contains at least one JavaScript file which must be named as the widget.
Below we can see the file structure of a multiscreen widget which has the same basic structure with the only difference that contains an scr folder. In the src folder there are two folders, components which contains all the different .jsx files for the different components and controllers which contain JavaScript files containing functions that control the functionality of the widget and not what appears in the screen. Another difference is that it contains a NameOfTheWidget_main.js file which is the one that contains al of our code and it transforms to NameOfTheWidget.js during the built.
#!javascript
ResponsiveDemoWidget/
  ResponsiveDemoWidget.js
  descriptor.xml
  resources/
    language.json
  skins/
    fokuson/
      responsive/
        ResponsiveDemoWidget.css
  src/
    components/
       ResponsiveDemoWidgetRoot.jsx
    controllers/
       ResponsiveDemoWidgetController.js
  ResponsiveDemoWidget_main.js
** fokusOn JavaScript **
The JavaScript of fokusOn consist of the following.
- Mootools 1.11
- Event based api
- GLOBAL - fokusEnv http://hudson.nordija.com/client-doc/widget-api/fokusEnv.html
- Device http://hudson.nordija.com/client-doc/widget-api/FokusOn.Device.Device.html
- Media player http://hudson.nordija.com/client-doc/widget-api/FokusOn.Device.MediaPlayer.html
- Managers http://hudson.nordija.com/client-doc/widget-api/FokusOn.Managers.html
Also, there are UI components such as button, lints, navigation panels etc created to be used for set top boxes (http://hudson.nordija.com/client-doc/widget-api/REVO.html) and for multiscreen which are not yet documented.
Below we can see an example of a UI component for STB which provides navigation of its subpanels in the layout and direction specified. The layout property specifies how the panel should consider its sub panels being laid out. A REVO.LayoutPanel provides navigation of its subpanels in the layout and direction specified.
#!javascript

var panelMainEl = elem.getElement(".nav-container-main");

var panelMain = new REVO.LayoutPanel({
   element: panelMainEl,
   layout: REVO.Layout.LinearVertical,
   active: true
});

this.addSubPanel(panelMain);
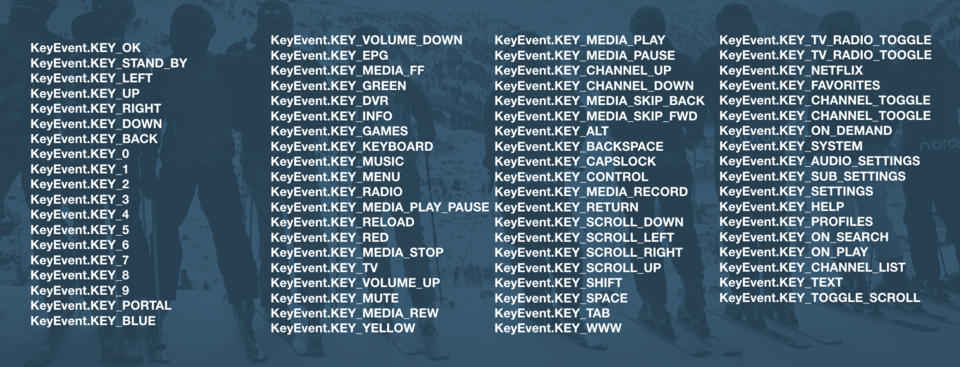
Widgets and components can also receive key events as seen in the example code.
#!javascript

// add a key event handler
this.registerKeyEventHandler(KeyEvent.KEY_MEDIA_PLAY_PAUSE,
this.handelKeyPlayPause.bind(this))


// remove a key event handler
this.unregisterKeyEventHandler(KeyEvent.KEY_MEDIA_PLAY_PAUSE);
All the fokusOn key events can be found on KeyEvent enum. You can see them in the picture below.
A widget development kit -WDK- allows the developers to build their own widgets or to skin existing ones. Widgets can be developed on PC and Macs using standard web development tools since they are based on HTML, JavaScript, graphics and Cascading Stylesheets. WDK is basically a proxy that enables loading the widgets from an external server instead of the backend. The WDK uses straight standardised JavaScript, this means client side rendering inside the browser. The development cycle is through WDK automated to offer save-reload-debug on standard browser and save-reload on device. The calls to the server side are asynchronous and developers can use their ideal JS framework. The updates to the widgets are handled through a heartbeat where the clients often "check-in".
How to set up WDK
-
The developer needs a itv-admin user with the role of widget-designer.
-
A test customer group and test customer should be created.
-
The environment is loaded.
-
Widget descriptors is loaded.
-
Each widget script is loaded.
-
Each widgets css and options are loaded.
-
On widget show some widgets load a html template.
-
The widget is shown on the screen
-
The device receives a heartbeat of type “onWidgetDeploymentChanged”
-
The descriptor for the widget is loaded.
-
The widget script is loaded.
-
If a widget with the same id exists it will be destroyed.
- If the widget is currently being shown. The widget updating process is paused until the widget is hidden.
-
The widget css and options is loaded.
-
The launcher menu is updated.
-
The new widget can new be shown.
- DOM Manipulations are slow. This means: Update as few element as possible.
- A complex DOM is slow. Use as few elements as possible.
- Use absolute positions in CSS. This is known to improve performance on opera (STB).
- Image resize on the STB is slow and resource intensive. Serve the images in the right size.
The launcher menu can be configured in itvAdmin.
Menu items syntax
#!xml


<menuItem wtype="WIDGET" widgetId=“ButtonRevoDemoWidget”/>
Submenu items syntax
#!xml


<menuItem wtype="GROUP" id="Demo" text="Demo" cssclass=“LAUNCHER_GROUP_Demo”>

    <subMenuItems>menuItem wtype="WIDGET" widgetId=“ButtonRevoDemoWidget”/>

    </subMenuItems>

</menuItem>
Menu structure can be obtained from the fokusEnv.widgetManager
this.observe(fokusEnv.widgetManager, 'onLauncherMenuChanged', callback); function.
The callback is passing an array with a structure that matches the xml from itvadmin that configures the menus.
-
Changing Log level to debug - Logger.setLogLevel(LogLevel.DEBUG)
-
If the widget is not loaded:
1. Check the customer widget deployment list in itvAdmin. 2. Check the console log for “# widget SomeWidget Loaded” 3. Check network tab to see if the widget script fails. 4. Check for script errors in the console log. -
If the widget is not loaded from the WDK:
  1. Check the widget script url. Look for “/P/“ and not for "/L/".
  2. Check web server or widget dev server.