-
Notifications
You must be signed in to change notification settings - Fork 3
Scanning for malware
###Overview
In this tutorial, we'll run the Microsoft Malicious Software removal tool to verify that the user's computer isn't infected by malicious software. There are a lot of moving parts here, as we'll have to download the malicious software removal tool from our server before we can run it.
Setup
This tutorial assumes that you have completed the tutorial, Verifying the user's local credentials, and have a version of the engine that will start and attempt to contact your web-server.
A note on examples
Our xml files are starting to get too long to include their full text inline in these tutorials. When you see this symbol  in the text, you can click on it to view the xml in question.
Downloading support files for use by the engine
There are many cases when you need to run third-party programs to configure users' computers. Programs that don't change frequently can be packaged into setup.cab for later use, but this can prove unwieldy for programs that need to be updated frequently -- anti-virus definition files, windows updates, etc. It's much better to download these sorts of programs as needed. The engine has provisions for downloading and caching binary files. We will explore this functionality in this section.
Downloading a binary file for use by the engine involves the following steps:
- retrieve a
FileInfoWrapperxml file that includes the size and sha1 hash of the target file. Here is theFileInfoWrapperfor the 64-bit version of the Malicious Software Removal tool:
```xml
<InCommonProvision version="1.0">
  <FileInfoWrapper>
    <FileUrl>msscanner64.exe</FileUrl>
    <FileName>msscanner64.exe</FileName>
    <FileSha1>IGIiTSrL7LpgJLtRMDY8ofE5DYI=</FileSha1>
    <FileSize>24859352</FileSize>
    <Version>5.8.9803.0</Version>
    <Vital>true</Vital>
    <MsiProductCode/>
    <MsiUpgradeCode/>
  </FileInfoWrapper>
</InCommonProvision>
```
-
Look for an existing version of the file in the engine's download directory. If the file is found, use the hash and size values to evaluate whether we need to download the file again. Here, if the engine determines that the size and hash values of the target file are the same as the local version of the file, it will not download the file again.
-
If necessary, download the file.
If all of this sounds complicated, don't worry! The engine comes with a embedded task branch that will handle all of the above.
Configuring the engine to download files
Before we can begin downloading files, we need to provision a location for our various FileInfoWrappers. We've already done this in our first tutorial, but let's revisit the process briefly.
If you look in the init.xml file we created in our first tutorial, you'll find the following xml block:
<WebServices.SetEndpointUrlForFunction>
  <Properties>
    <Function>GetFileInfo</Function>
    <Url>https://certdev0.incommontest.org/incommon/windows/downloads/</Url>
  </Properties>
</WebServices.SetEndpointUrlForFunction>
This block tells the engine where to look for its FileInfoWrappers. If you need to update this location, follow the steps in the first tutorial before continuing.
Downloading the Malicious Software Removal Tool and Running the Scan
- Download and copy the following four files to the download directory that you've provisioned on your server:
msscanner32.exe
msscanner32.exe.info.xml
msscanner64.exe
msscanner64.exe.info.xml
These are the 32- and 64-bit versions of the Malicious Software Removal Tool and their corresponding FileInfoWrapper files. (These are not the latest versions of the tool, but they'll do for the purposes of this tutorial).
- Create a new xml file called
antimalware.xmland add the following to it:
<Content xmlns:xsi="http://www.w3.org/2001/XMLSchema-instance" xsi:schemaLocation="http://incert.incommon.org/schemas ../Schemas/tasklist.xsd">
  <TaskBranch name="antimalware.download malicious software removal tool">
    <Settings.SetSettingText>
      <Conditions.Any>
        <SystemInfo.Is64Bit/>
      </Conditions.Any>
      <Properties>
        <Setter key="show generic download banner">false</Setter>
        <Setter key="generic download branch info key">msscanner64.info.xml</Setter>
        <Setter key="generic download branch target url">msscanner64.info.xml</Setter>
        <Setter key="generic download branch display name">Malicious Software Removal Tool</Setter>
        <Setter key="msscanner target">MSScanner64.exe</Setter>
      </Properties>
    </Settings.SetSettingText>
    <Settings.SetSettingText>
      <Conditions.Any>
        <SystemInfo.IsNot64Bit/>
      </Conditions.Any>
      <Properties>
        <Setter key="show generic download banner">false</Setter>
        <Setter key="generic download branch info key">msscanner32.info.xml</Setter>
        <Setter key="generic download branch target url">msscanner32.info.xml</Setter>
        <Setter key="generic download branch display name">Malicious Software Removal Tool</Setter>
        <Setter key="msscanner target">MSScanner32.exe</Setter>
      </Properties>
    </Settings.SetSettingText>
    <Control.ReturnBranchResult>
      <Properties>
        <Branch>generic download branch</Branch>
      </Properties>
    </Control.ReturnBranchResult>
  </TaskBranch>
</Content>
This branch configures the generic download branch and then executes it. Note that there are 32- and 64-bit configuration blocks controlled by SystemInfo.Is64Bit and SystemInfo.IsNot64Bit conditions.
The configuration blocks specify the url of the FileInfoWrapper and a temporary settings key that will hold the contents of the retrieved FileInfoWrapper. The FileInfoWrapper url is relative to the GetFileInfo base url specified in the WebServices.SetEndpointUrlForFunction in your info.xml file. These configuration blocks also disable the embedded download dialog and set a display name.
Additionally, each configuration block specifies a msscanner target setting. We will use this setting to determine the name of the executable to run. Note that each msscanner target setting matches the FileName element of the corresponding FileInfoWrapper. Here's the 64-bit wrapper again:
<InCommonProvision version="1.0">
  <FileInfoWrapper>
    <FileUrl>msscanner64.exe</FileUrl>
    <FileName>msscanner64.exe</FileName>
    <FileSha1>IGIiTSrL7LpgJLtRMDY8ofE5DYI=</FileSha1>
    <FileSize>24859352</FileSize>
    <Version>5.8.9803.0</Version>
    <Vital>true</Vital>
    <MsiProductCode/>
    <MsiUpgradeCode/>
  </FileInfoWrapper>
</InCommonProvision>
When the engine downloads content from the url specified by the FileUrl element, it will save the content to its download directory using the name specified in the FileName element. Here, our FileUrl is a relative url -- but we could just as easily provide an absolute url.
The branch's final Control.ReturnBranchResult block executes the generic download branch, which handles verifying and downloading the file. Again, all you need to do is specify the settings that drive the generic download branch.
- Add this task branch to
antimalware.xml:
<TaskBranch name="antimalware.scan">
  <Control.ReturnBranchResult errorBranch="generic download error branch">
    <Properties>
      <Branch>antimalware.download malicious software removal tool</Branch>
    </Properties>
  </Control.ReturnBranchResult>
  <UserInterface.DisableCloseButton>
    <Properties>
      <Dialog>Main dialog</Dialog>
    </Properties>
  </UserInterface.DisableCloseButton>
  <AntiMalware.ScanComputerForMalware>
    <Properties>
      <ScannerPath>[msscanner target]</ScannerPath>
      <Interactive>false</Interactive>
    </Properties>
  </AntiMalware.ScanComputerForMalware>
  <UserInterface.EnableCloseButton>
    <Properties>
      <Dialog>Main dialog</Dialog>
    </Properties>
  </UserInterface.EnableCloseButton>
</TaskBranch>
This branch executes the download branch that we created in step 2, disables the Main Dialog's close button and then uses the executable with the name that is saved to the msscanner target temporary setting. When the scan has completed, the branch then re-enables the Main Dialog's close button.
The AntiMalware.ScanComputerForMalware task handles running the Malicious Software Removal tool and interpreting its results. The source for the task class is here, if you're interested in what exactly it does. Essentially, though, it throws an MalwareDetected error result if the scanner's return code indicates that it found something, a IssueScanningForMalware error result if the scanner's return code indicates that something went wrong, or a NextResult if the scan completes without issue.
Note that we're assigning an error branch (generic download error branch) to the Control.ReturnBranchResult task that will run our download branch. generic download error branch is an embedded branch that will prompt users to retry a download if something goes wrong.
This is, basically, the download and execute pattern. There are a lot of moving parts, but much of the complexity is handled by the embedded download branches.
Entertaining users while the scan is running
The Malicious Software Removal Tool can take a few minutes to complete, so we need to inform users that the scan is on-going, etc. "Entertain" is probably too ambitious a goal, but let's wire in some user-interface elements that to let the user know that the engine is waiting for the scan to complete.
- In
antimalware.xmlreplace yourantimalware.scantaskbranch xml with the following:
<TaskBranch name="antimalware.scan">
  <UserInterface.ActivateCheckedParagraph minimumTaskTime="1">
    <Properties>
      <Dialog>Main dialog</Dialog>
      <ControlKey>Scanning computer for malware</ControlKey>
    </Properties>
  </UserInterface.ActivateCheckedParagraph>
  <UserInterface.SetCheckedParagraphSubtitle>
    <Properties>
      <Dialog>Main dialog</Dialog>
      <ControlKey>Scanning computer for malware</ControlKey>
    </Properties>
    <Content>
      <ProgressParagraph settingKey="Scanning computer for malware subtitle" margin="0,0,0,0" padding="0,0,0,0" style="InsetText">
        <Content>
          <DirectTextContent>Downloading Microsoft Malicious Software Removal Tool</DirectTextContent>
        </Content>
      </ProgressParagraph>
    </Content>
  </UserInterface.SetCheckedParagraphSubtitle>
  <UserInterface.StartMessageTimer forwardOnly="true">
    <Properties>
      <SettingKey>Scanning computer for malware subtitle</SettingKey>
    </Properties>
  </UserInterface.StartMessageTimer>
  <Control.ReturnBranchResult errorBranch="generic download error branch" minimumTaskTime="3">
    <Properties>
      <Branch>antimalware.download malicious software removal tool</Branch>
    </Properties>
  </Control.ReturnBranchResult>
  <UserInterface.StopMessageTimer>
    <Properties>
      <SettingKey>Scanning computer for malware subtitle</SettingKey>
    </Properties>
  </UserInterface.StopMessageTimer>
  <UserInterface.SetCheckedParagraphSubtitle>
    <Properties>
      <Dialog>Main dialog</Dialog>
      <ControlKey>Scanning computer for malware</ControlKey>
    </Properties>
    <Content>
      <ProgressParagraph settingKey="Scanning computer for malware subtitle" margin="0,0,0,0" padding="0,0,0,0" style="InsetText">
        <Content>
          <DirectTextContent>Please wait while !ApplicationTitle! scans your computer for viruses, trojans, or other types of malicious software</DirectTextContent>
        </Content>
      </ProgressParagraph>
    </Content>
  </UserInterface.SetCheckedParagraphSubtitle>
  <UserInterface.StartMessageTimer>
    <Properties>
      <SettingKey>Scanning computer for malware subtitle</SettingKey>
    </Properties>
  </UserInterface.StartMessageTimer>
  <UserInterface.DisableCloseButton>
    <Properties>
      <Dialog>Main dialog</Dialog>
    </Properties>
  </UserInterface.DisableCloseButton>
  <AntiMalware.ScanComputerForMalware>
    <Properties>
      <ScannerPath>[msscanner target]</ScannerPath>
      <Interactive>false</Interactive>
    </Properties>
  </AntiMalware.ScanComputerForMalware>
  <UserInterface.EnableCloseButton>
    <Properties>
      <Dialog>Main dialog</Dialog>
    </Properties>
  </UserInterface.EnableCloseButton>
  <UserInterface.StopMessageTimer>
    <Properties>
      <SettingKey>Scanning computer for malware subtitle</SettingKey>
    </Properties>
  </UserInterface.StopMessageTimer>
  <UserInterface.RemoveCheckedParagraphSubtitle>
    <Properties>
      <Dialog>Main dialog</Dialog>
      <ControlKey>Scanning computer for malware</ControlKey>
    </Properties>
  </UserInterface.RemoveCheckedParagraphSubtitle>
  <UserInterface.CompleteCheckedParagraph minimumTaskTime="1">
    <Properties>
      <Dialog>Main dialog</Dialog>
      <ControlKey>Scanning computer for malware</ControlKey>
    </Properties>
  </UserInterface.CompleteCheckedParagraph>
</TaskBranch>
We've added a lot to the branch, but it is all user-interface code. First, we activate the Scanning computer for malware checked paragraph using an UserInterface.ActivateCheckedParagraph task.
The one thing of interest here is the UserInterface.SetCheckedParagraphSubtitle task. This content element of this task's xml block expects a formatted banner paragraph. For example:
<UserInterface.SetCheckedParagraphSubtitle>
  <Properties>
    <Dialog>Main dialog</Dialog>
    <ControlKey>Scanning computer for malware</ControlKey>
  </Properties>
  <Content>
    <ProgressParagraph settingKey="Scanning computer for malware subtitle" margin="0,0,0,0" padding="0,0,0,0" style="InsetText">
      <Content>
        <DirectTextContent>Please wait while !ApplicationTitle! scans your computer for viruses, trojans, or other types of malicious software</DirectTextContent>
      </Content>
    </ProgressParagraph>
  </Content>
</UserInterface.SetCheckedParagraphSubtitle>
When executed, the task inserts this content into the banner under the CheckedParagraph in question. This is a quick and dirty way of adding more descriptive messages to your checked paragraphs. User UserInterface.RemoveCheckedParagraphSubtitle to remove your subtitles as appropriate.
Adding the Task Branch and Testing Things Out
- Modify the
Control.GetContentFromEndpointtask block of yourtasklist.xmlfile as follows:
<Control.GetContentFromEndpoint>
  <Properties>
    <ContentName>banners.xml</ContentName>
    <ContentName>restorepoint.xml</ContentName>
    <ContentName>credentials.xml</ContentName>
    <ContentName>antimalware.xml</ContentName>
  </Properties>
</Control.GetContentFromEndpoint>
This tells the engine to load our new anti-malware content.
-
Add the following to
tasklist.xmlimmediately after theControl.ReturnBranchResulttask that runs the "credentials.verify admin account credentials" task branch that we implemented in the last tutorial:<Control.ReturnBranchResult> <Properties> <Branch>antimalware.scan</Branch> </Properties> </Control.ReturnBranchResult>
-
Upload tasklist.xml
 and antimalware.xml
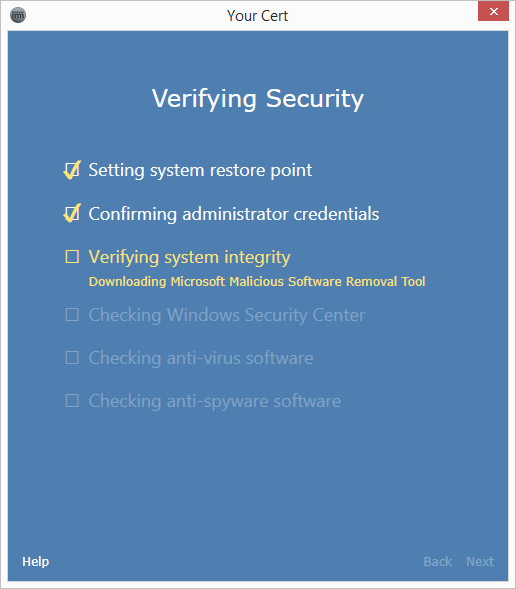
  to your server and run the engine. You should see the engine download the Malicious Software Removal tool:

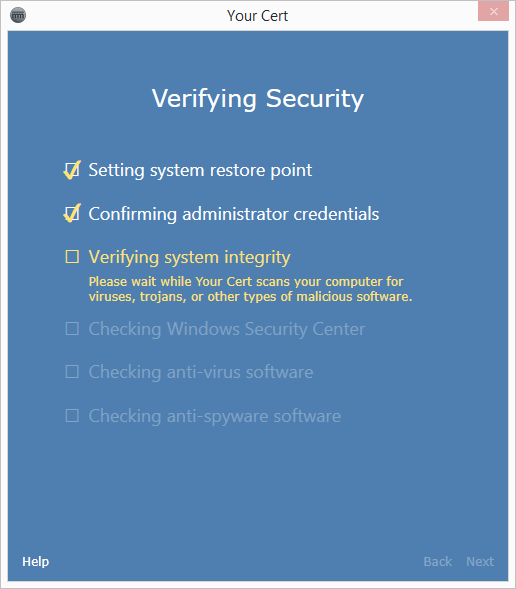
The engine will then run the tool:

Hopefully, it doesn't find anything!
Conclusion
In this tutorial, we used InCert's embedded download task branches to download the Microsoft Malicious Software Removal tool on demand. We then configured the engine to run the Malicious Software Removal tool to scan users' computers for known malware.
The next tutorial will revisit this topic again. The malware scan takes a few minutes to complete, so we'll add code that will skip the scan if it's recently been completed successfully.