-
Notifications
You must be signed in to change notification settings - Fork 0
Paletta Hand
Download the Arduino IDE 1.6.12
- Unzip/Install the Arduino IDE on your computer
- Run the Arduino IDE to create the Arduino folders
- Close the Arduino IDE to get ready for the Tools and Library installation
In most versions of Linux, you can just plug your board in via USB and everything will work, but it is very quiet about it, not giving you any notification that the device is ready. There are many ways to check this, the easiest being to open the Arduino IDE and check under Serial Port for ttyUSB0, but we'd like to show you an easy and definitive way you can check in a terminal.
- Open up a terminal window and type:
ls /dev | grep ttyU
This will list the contents of the /dev directory that start with 'ttyU'. Once you hit enter, this command should return:
ttyUSB0
First download the Tools and Libraries ZIP file. In this .zip file, there will be two folders:
- libraries -> this folder contains libraries that will add functionality to your Arduino.
- hardware -> this folder contains the hardware definitions that the Arduino IDE needs to communicate with the ArbotiX-M
To install these files you will move these 2 folders into your 'Arduino' user folder. This is NOT the folder where the Arduino IDE itself is located. This is the path to your 'Arduino' folder.
~/Arduino/
By default, access to the serial and USB ports in Linux is restricted to root and dialout group users. To access your XBee devices and use XCTU to communicate with them, your Linux user must belong to this group. To add your Linux user to the dialout group:
- Open a terminal console and execute this command:
sudo usermod -a -G dialout <user>
where <user> is the user you want to add to the dialout group.
-
Log out and log in again with your user in the system.
-
Download and install XCTU for Linux X64.
- Remove the XBee module from the ArbotiX-M board
The XBee and the FTDI port share a hardware serial port. This means that you can only have one of these devices connected at a time.
- Plug the FTDI-USB cable as shown in the figure
- Check that the power jumper is in this configuration
This allows you to power the ArbotiX-M from the external power supply
-
Plug the external battery to the board and turn the switch on
-
Run Arduino. We need to pick the ArbotiX board from the boards menu. Select the proper board:
Tools->Board ->ArbotiX Std
Now pick the serial port. Go to
Tools ->Serial Port
and pick the serial port for the FTDI device. Once you have set the board and serial port, go to
Tools ->Serial Monitor
-
Now you are ready to command the gripper:
- Sending a serial command of "C or c" will close the gripper
- The gripper stops at the contact (predefined threshold)
- Again sending a burst of "C or c" will increase the torque and will actuate the Paletta Hand.
- Sending a serial command of "O or o" opens the gripper
-
Connect the XBee #2 module
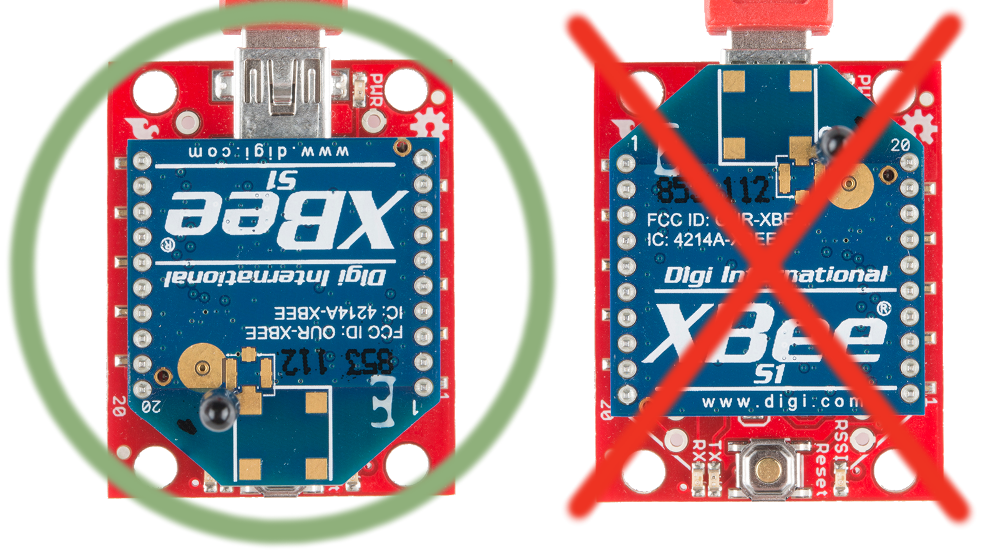
X_PCto the Xbee USB adapter as shown in the following figure and plug it to the PC. -
Run XCTU. Open a terminal and type
cd /opt/Digi/XCTU-NG

sudo ./XCTU.desktop
- Press the button
Discover radio modules connectedand select the appropriate communication port.
The application will start to look for different devices connected. Once it will find the XBee module named X_PC, click on Add selected device.
-
Ensure that the XBee #1 module
X_GRIPPERis connected to the Arbotix-M board. Hence, plug the external battery to the board and turn the switch on. -
Search the XBee #1 module
X_GRIPPERby clicking onDiscover radio nodes in the same network. Once you find click onAdd selected device. -
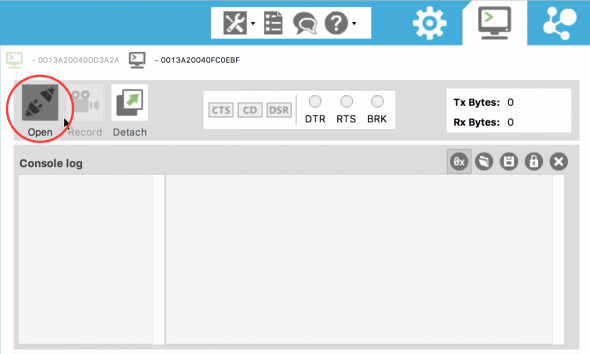
Select the Console icon to view the console. Click
Open. -
Now you are ready to command the gripper:
- Sending a serial command of "C or c" will close the gripper
- The gripper stops at the contact (predefined threshold)
- Again sending a burst of "C or c" will increase the torque and will actuate the Paletta Hand.
- Sending a serial command of "O or o" opens the gripper
Return to Home


