-
Notifications
You must be signed in to change notification settings - Fork 5
Installation
The installation instructions are probably incomplete, but should give a rough idea of the steps involved. Comments and improvements are welcome!
To use the ovbox hardware or the ov-client desktop application after successful installation (e.g. to connect to other users), you need an account on the configuration frontend https://box.orlandoviols.com/. We recommend that you create an account before installing the device.
Installation available on: Raspberry Pi / Linux Desktop / MacOS / Windows
This is the easiest way to install an ovbox. You will need a computer (whether Windows PC, Apple or Linux computer), an SD card reader and an ovbox (i.e. a Raspberry Pi with USB sound card). On the computer, you need to install the Raspberry Pi imager (https://www.raspberrypi.org/downloads/) or another programme for writing to the SD card.
Load the ovbox system onto the computer: 2021-05-07-raspios-buster-armhf-lite-ovbox0.29.14.xz (886 MB)
If you want to make sure that the download worked correctly, you can check the integrity of the file. To do this, you need to calculate the md5sum - open the command line and enter md5sum <file> on Linux or MacOS, or CertUtil -hashfile <file> MD5 on Windows. <file> is the full path to the downloaded file. The md5 sum should be this:
eeaff271b45c8e7bba048dac619db3fa 2021-05-07-raspios-buster-armhf-lite-ovbox0.29.14.xz
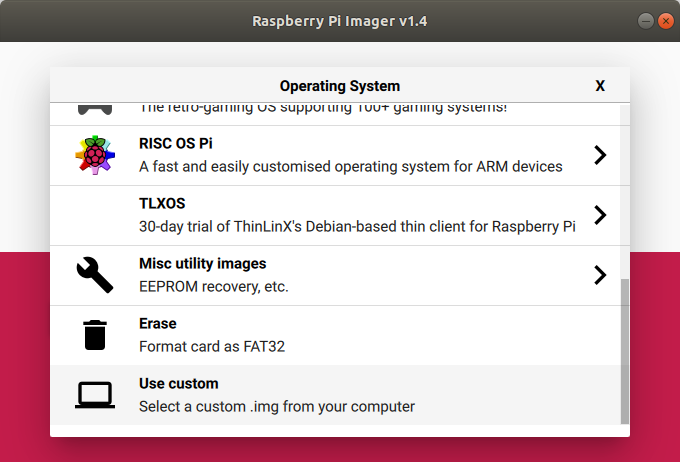
Now open the Raspberry Pi imager, select the system by clicking on ‘Operating System’ and then ‘Use custom’ (at the bottom of the list). Select the previously downloaded image file. The SD card must then be selected. Press ‘write’ to write the system to the SD card. Please wait until the write process and the check have been completed.

Now remove the SD card from the card reader and insert it into the Raspberry Pi.
Before switching on the Raspberry Pi, please make sure that
- it is connected to the internet via a network cable;
- a ‘class compliant’ USB sound card is connected (class compliant devices can be operated with the standard driver for USB sound cards and do not require any special drivers);
- headphones are connected to the phones output of the sound card;
- the new SD card is inserted correctly.
The Raspberry Pi can now be switched on. After about a minute, you should hear an announcement over the headphones and a new device should be displayed on the box.orlandoviols.com website. Now you can connect the device to your account: wiki.
Connect your device to your account as soon as possible so that it is not accidentally claimed by others. The connection to the account is only necessary after the first installation.
Unfortunately this method is currently not available due to a server problem.
The ovbox is available for Ubuntu LTS and for other Debian-based systems, e.g. RaspiOS, as a binary package. This can be installed via the package manager of the operating system:
In Ubuntu 22.04 (jammy jellyfish, also Debian 12 bookworm), x86_64:
sudo apt install software-properties-common
wget -qO- http://apt.hoertech.de/openmha-packaging.pub | sudo tee /etc/apt/trusted.gpg.d/openmha-packaging.asc
sudo apt-add-repository 'deb [arch=amd64] http://apt.hoertech.de jammy universe'
In Ubuntu 20.04 (focal, also Debian 11 bullseye), x86_64:
wget -qO- http://apt.hoertech.de/openmha-packaging.pub | sudo apt-key add -
sudo apt-add-repository 'deb [arch=amd64] http://apt.hoertech.de focal universe'
In Ubuntu 18.04 (bionic, also Debian 10 buster), x86_64:
wget -qO- http://apt.hoertech.de/openmha-packaging.pub | sudo apt-key add -
sudo apt-add-repository 'deb [arch=amd64] http://apt.hoertech.de bionic universe'
In Debian Buster on ARM (Raspberry Pi), 32-Bit arm:
wget -qO- http://apt.hoertech.de/openmha-packaging.pub | sudo apt-key add -
(echo "";echo "deb [arch=armhf] http://apt.hoertech.de bionic universe")|sudo tee -a /etc/apt/sources.list
Then install the ov-client and all dependendies with
sudo apt update
sudo apt install --assume-yes ov-client-gui
To obtain the shortest possible latencies and a stable connection, the audio system should be optimized. The steps required for this are described here.
You will find the ovbox application in the "Sound & Video" application menu. To start the ovbox manually, open a terminal and type:
ovbox
You may now use the jack ports with your preferred audio software. Please note that ports may disappear and re-appear after remote configuration of your system or any of your peers. To ensure persistent port connections you may use the 'extra ports' field in the 'expert settings' of the 'device settings' dialog.
ov-client is available through the arch user repository.
It can be installed using an AUR helper such as yay or paru as follows:
yay ov-client or paru ov-client
after installation, you will need to enable realtime privileges:
sudo usermod -a -G realtime $USER
Now after logging out and in again, you may start the ov-client
by typing ov-client in a terminal.
for a minimal GUI, type ovbox instead.
Finally, proceed with claiming your device in the web frontend.
For the display of the web mixer, the package node-js is required.
The ovbox was tested under MacOS 12 (monterey), MacOS 13 (ventura), MacOS 14 (Sonoma) and MacOS 15 (Sequoia). Earlier versions of macOS will probably not work.
To run the ovbox under macOS, some additional tools are needed. The most important one is the audio backend jack audio connection kit. This can be installed from jackaudio.org. Navigate to the downloads section and install the latest universal installer. The other dependency is node-js, required for the local web mixer. This can be installed from nodejs.org. To install node-js, download the macOS installer and execute it.
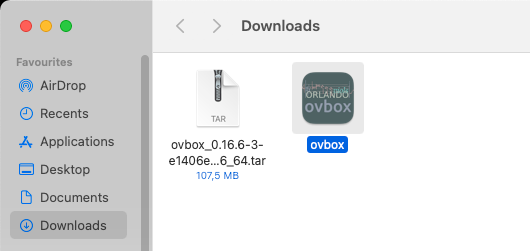
Once you have installed the dependencies, please download ovbox_0.24.2-1-24012f2_macOS-12.7.5_x86_64.tgz. Once downloaded, doubleclick to unpack.

You can start ovbox by clicking on the ovbox icon. Depending on your security settings you might need to press the command key when starting it for the first time, or allow launching in the system settings.

The ovbox can be installed via brew as a homebrew tap:
brew install gisogrimm/tab/ovbox
This will install all dependencies automatically.
A preliminary version for Windows can be found here: ov-client-0.27.1-206532d-windows.zip
Download and unzip the zip file and double click the file ovbox.bat.
Please note that you may need to increase the jitter buffer length to
work on Windows. The latency is likely to be much higher than using a
Raspberry Pi. A simple test showed the best delay performance using
the Windows WDM-KS audio API.
Documentation and images CC BY-SA 4.0.
Documentation and images CC BY-SA 4.0.